INSTALLATION INSTRUCTIONS GUIDE D’INSTALLATION GUÍA DE INSTALACIÓN FOR RIGHT AND LEFT SIDE DOOR INSTALLATION (RIGHT SIDE SHOWN) POUR INSTALLATION DE PORTE CÔTÉ DROIT ET GAUCHE (CÔTÉ DROIT ILLUSTRÉ) PARA LA INSTALACIÓN DE LA PUERTA DEL LADO DERECHO E IZQUIERDO (SE MUESTRA INSTALACIÓN AL LADO DERECHO) MODEL • MODÈLE • MODELO ALPINE DOORS A two person installation is recommended. Une installation par deux personnes est recommandé. Se recomienda realizar la instalación entre dos personas.
PARTS PIÈCES PIEZAS AND COMPONENTS ET COMPOSANTES Y COMPONENTES 17 16 1 15 11 10 1 14 12 13 7 6 2 9 8 18 28 4 3 29 2 5
PARTS PIÈCES PIEZAS AND COMPONENTS ET COMPOSANTES Y COMPONENTES 7 1 3 5 6 11 12 4 8 9 10 13 14 15 16 17 21 22 26 27 20a 18 19 23 24 28 29 20b 25 3
PARTS PIÈCES PIEZAS AND COMPONENTS ET COMPOSANTES Y COMPONENTES XXX 084=Chrome, Cromo 305=Brushed nickel, Nickel brossé, Níquel cepillado 173=Dark bronze, Bronze foncé, Bronce oscuro DOOR | PORTE | PUERTA # Part Nom de la pièce Pieza Qt Cant.
TOOLS OUTILS HERRAMIENTAS REQUIRED REQUIS NECESARIAS Electric drill Perceuse électrique Taladro eléctrico Level Niveau Nivel Pencil Crayon Lápiz Clear silicone sealant Silicone claire Sellador de silicona transparente Masking tape Ruban adhésif Cinta de emmascarar Measuring tape Ruban à mesurer Cinta métrica Hacksaw Scie à métaux Sierra para metal Phillips screwdriver Tournevis étoile Destornillador estrella Square Équerre Escuadra Utility knife Couteau à lame rétractable Cuchillo multiuso Sec
1 Images are based on a right side door installation. Ces images sont basées sur une installation de porte à droite. STEP ÉTAPE ETAPA Estas imágenes se basan en la instalación de la puerta al lado derecho. A. Position and level the wall jamb (7) [fixed panel side] as close from the exterior edge of the threshold as possible. B. Mark the fastening holes. C. Drill the wall covering. D. File the corner of the wall jamb (7) if needed. E. Fill the holes with a generous amount of silicone.
2 STEP ÉTAPE ETAPA A A. Slide out the cover from the wall fastener. From inside the shower, place the wall fastener against the wall jamb aligned with the top as shown and mark the holes to be drilled. B. Drill the wall covering. C. Fill the holes with a generous amount of silicone. D. Install a wall fastener (9) with the provided flat head screws (19). INSIDE INTÉRIEUR INTERIOR A. Rétirer le couvercle de la fixation murale.
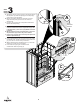
STEP ÉTAPE ETAPA 3 A. Temporarily place the U-channel (29) on the threshold against the wall jamb. Dry fit the fixed panel (2) in the wall jamb (7) and U-channel. Level and square. B. Measure the distance between the wall jamb (7) and the edge of the fixed panel (2) and remove 3/4'' from that measurement. C. Cut the U-channel (29) to the recently taken measurement. Remove the fixed panel (2). 7 A 7 29 INSIDE INTÉRIEUR INTERIOR A.
STEP ÉTAPE ETAPA 4 A. Install the rollers (13) on the door (1) in the top holes as shown. [Do not over tighten the rollers] B. Insert the bottom sealing gasket (28) on the bottom of the door (1). C. Place the door (1) temporarily and safely inside the shower over cardboard. D. Remove tape film under the U-channel (29) and put it on the bathtub or base deck against the wall jamb parallel to the outside edge. E. Apply silicone inside the wall jamb at the bottom. A A.
STEP ÉTAPE ETAPA 5 A. Insert the fixed panel (2) in the wall jamb (7) and U-channel (29). B. Level and square the fixed panel (2). [For leveling, use wedge spacers (26) as needed inside the U-channel] C. From the outside of the shower, insert the sealing gasket (8) between the fixed panel (2) and the wall jamb (7). D. Use the insertion tool (24) to completely insert the gasket (8). A 7 INSIDE INTÉRIEUR INTERIOR A. Insérer le panneau fixe (2) dans le montant mural (7) et le rail en U (29). B.
STEP ÉTAPE ETAPA 6 A. Measure the distance wall-to-wall at the top of the alcove and subtract 5/8". Cut the support bar (10), based on this measure. [Opposite the holes for fixed panel assembly] B. Insert the door bumper (11) on the support bar (10). Cut opposite the holes for panel assembly. Couper du côté opposé aux trous de fixation. Corte del lado opuesto a los agujeros de montaje. A. Prendre la mesure d’un mur à l’autre en haut de l’alcôve et soustraire 5/8 po.
STEP ÉTAPE ETAPA 7 A B A. Insert the support bar (10) on the installed wall fastener (9). Ensure support bar is level. B. Attach support bar (10) to fixed panel using the panel fastener (12) on the hole in the middle. Do not overtighten. C. Insert the wall fastener on the opposite side of the support bar. Mark the position of the wall fastener. Remove the support bar. D. Place the wall fastener on the previously mark position. Mark the holes to be drilled. Drill the holes and fill them with silicone.
STEP ÉTAPE ETAPA 8 A. Gently slide the covers of the wall fastener in place. B. Tighten set screws to hold in place. Verify support bar is level and square. A. Glisser doucement les couvercles des fixations muraux en place. B. Serrer les vis pour fixer en place. Vérifier que la barre de soutien est à niveau et à l'équerre. A INSIDE INTÉRIEUR INTERIOR A. Deslizar suavemente las cubiertas de los sujetadores murales en posición. B. Apretar los tornillos de ajuste para mantener en posición.
STEP ÉTAPE ETAPA 9 A. Apply silicone sealant under the door guide (4). B. Place the door guide (4) at the base of the fixed panel (2) and tape the door guide in place until 24 hours after the installation is completed. A A. Appliquer du silicone sous le guide de porte (4). B. Placer le guide de porte (4) à la base du panneau fixe (2) et le tenir en place avec du ruban jusqu’à 24 heures après la fin de l’installation. A. Aplicar sellador de silicona debajo de la guía de la puerta (4). B.
STEP ÉTAPE ETAPA 10 A. Install the door (1) on the support bar (10). [Make sure the rollers (13) are well seated on the bar] B. Insert the bottom of the door (1) in the door guide (4). [Make sure the door remains as deeply as possible in the guide without touching the bottom when adjusting the rollers during the next step] A A. Installer la porte (1) sur la barre de soutien (10). [S'assurer que les roulettes (13) s'insèrent bien sur la barre de soutien] B.
STEP ÉTAPE ETAPA 11 A. From inside the shower, close the door (1) against the wall. Adjust the excentric part of the roller assemblies (13) so the door magnet (1) sits flat against the wall. B. Fasten both rollers (13) in position using the assembly wrenches (23) on the excentric parts to maintain the adjustment and on the nuts to tighten as much as possible. A 1/4" adjustment is possible. C. Install the anti-jump stopper (14) as shown and the finishing caps on the rollers (13). D.
STEP ÉTAPE ETAPA 12 A. Install the side sealing gasket (6b) on the edge of the door (1) and the sealing gasket (6) on the fixed panel (2) as shown and cut under the support bar (10). A. Installer le joint d'étanchéité de côté (6b) sur le rebord de la porte (1) et le joint d'étanchéité (6) sur le rebord du panneau fixe (2) tel que démontré et couper sous la barre de soutien (10). A.
STEP ÉTAPE ETAPA 13 A. Install the handle (18) on the door (1) as shown. A. Installer la poignée (18) sur la porte (1) tel que démontré. A. Instalar la manija (18) en la puerta (1) como se muestra en la ilustración.
STEP ÉTAPE ETAPA 14 A A. Measure the distance between the wall and the door guide (4) at the base of the alcove and add 7/8''. Cut the threshold (3) based on this measure. B. If the corner between the base and the wall is rounded, file the threshold lower corners. C. Apply silicone sealant under the door threshold (3). D. Insert the threshold (3) in the door guide (4) and install the threshold parallel to the door. E.
STEP ÉTAPE ETAPA 15 A. Place the jig (25) flat on the top of the header with the end against the wall bracket. B. Push the door bumper (11) against the jig notch detail as shown C. Fasten the bottom set-screw to lock the bumper position D. Fully open the door to validate that the glass panel is not in contact with the wall. Manually adjust the bumper position if more clearance is needed E. Use a power tool to fix the bumper assembly with the self drilling screw provided with the bumper. E A.
STEP ÉTAPE ETAPA 16 A A. Close the door (1) against the shower wall. Mark the position of the door on the wall. Open the door. B. Place the wall channel (17) on the previosly marked position on the wall. Drill the holes and fasten with the provided screws. C. Insert the magnetic jamb (16) on the wall channel (17). B A. Fermer la porte (1) contre le mur de douche. Marquer la position de la porte sur le mur. Ouvrir la porte. B. Mettre le profilé mural (17) sur la marque fait précédément sur le mur.
STEP ÉTAPE ETAPA 17 A. From outside the shower, apply silicone sealant between the wall jamb (7) .[fixed panel side] and the wall, between the fixed panel (2) and the base, and on the door guide (4). Apply also between the wall channel (17) and the shower wall. A. De l'extérieur de la douche, appliquer du silicone entre le montant mural (7).[côté panneau fixe] et le mur, entre le panneau fixe (2) et la base, et sur le guide de porte (4). Appliquer aussi entre le profilé mural (17) et le mur de douche.
LIMITED WARRANTY GARANTIE LIMITÉE GARANTÍA LIMITADA Aquatic offers an express limited warranty on each of its products. This warranty extends only to the original owner/end-user for personal household use. For commercial uses, additional limitations apply. Aquatic offre une garantie limitée expresse sur chacun de ses produits. Cette garantie s’adresse uniquement au propriétaire/ utilisateur original pour un usage personnel domestique.
Technical Services / Service technique / Servicio técnico T.