Installation Data 4-Piece Low-Threshold Showers Read and follow all instructions prior to installing your Aquatic fixture. Save these instructions for future reference. Failure to comply with these instructions may invalidate your warranty. For questions concerning installation and maintenance of your Aquatic shower or tub/shower, contact Technical Services at 800-945-2726.
Installation Data 4-Piece Low-Threshold Showers NOTICE: Please inspect the unit thoroughly before installation to make sure it has not been damaged during transportation. Under no circumstances should a damaged unit be installed. Neither Aquatic nor the distributor will be responsible for removal or reinstallation costs should a replacement be necessary due to installation of a damaged unit. PRE-INSTALLATION PLANNING 1.
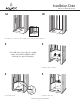
Installation Data 4-Piece Low-Threshold Showers 1A 1B 2 D B D C 6“Dia. C A A B 6“x12” A 6“Dia. Check dimensions. For showers, refer to Diagram 1A; for tub-showers, refer to Diagram 1B. 2 3 Pre-install unit to ensure alcove is plumb, square and a level installation can be achieved (see steps 3 through 6). Lift and place base into framing. 4 5 Level and mark all sides. Lift and place back wall.
Installation Data 4-Piece Low-Threshold Showers 6 7 Level back wall vertically & horizontally. Shim if necessary. Remove back wall and base. 8 9 Install drain assembly per manufacturer’s instructions. Place base into framing pocket. Tap down until level. Level lengthwise and widthwise using 3 ft. (915mm) level by shimming, if necessary. The unit should be set level. 10 11 Pre-drill horizontal nailing flanges along top of base section and fasten into each corresponding stud.
Installation Data 4-Piece Low-Threshold Showers 12 13 Level back wall vertically & horizontally. Shim if necessary. Pre-drill and fasten back wall. Pre-drill horizontal nailing flanges along top of back wall and fasten into each corresponding stud. Pre-drill both (vertical) side nailing flanges and fasten to side studs 8” (200mm) on center. 14 15 Silicone front edge, approximately 4” (100mm) from the front of the unit. Slide left side wall into position. Check for level.
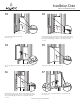
Installation Data 4-Piece Low-Threshold Showers 18 19 Pre-drill and fasten right wall. Pre-drill horizontal nailing flanges along top of right side wall and fasten into each corresponding stud. Pre-drill side (vertical) nailing flange and fasten to side studs 8” (200mm) on center. Refer to “Tub and Shower Mounted Fitting” for measurements. Using a hole saw (fine tooth or abrasive grit cutting edge), make necessary openings for filler and valves, drilling from inside (smooth side) out. 20 Clean unit.
Installation Data 4-Piece Low-Threshold Showers CLEAN-UP CAUTION: DO NOT USE heat or solvent based cleaning fluids. NOTE: Do not remove warranty/maintenance adhered label. Warranty/User maintenance label must be left for occupant (Required by ANSIZ124). 1. Prevent staining. Remove all debris before plumbing leak test. Drain and wipe clean immediately after the inspection process. Use sponge with warm water and liquid detergent. Rinse, drain and wipe clean.
Customer Service | Technical Services | Warranty Services 1521 No. Cooper, Ste. 500 Arlington, TX 76011 PH: 800-945-2726, 817-801-8300 FAX: 866-544-5353 LITID1177 Rev 06.15.