
Installation Guide


6 Aquatic
Builders' Choice Owner's Manual & Installation Guide
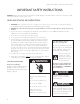
INSPECTION BEFORE INSTALLATION
1. Inspect the Aquatic jetted bath to ensure it is the correct model number, size, color, and has all features, options and
accessories originally ordered.
2. If damage or shortage has occurred, notify your distributor, freight carrier, or Aquatic Customer Service Center at
(800) 945-2726.
NOTICE: Under no circumstances should a damaged or defective bath be installed without prior factory approval.
Neither Aquatic nor the distributor will be responsible for removal or reinstallation costs should replacement of the bath
be necessary.
3. Whirlpool is factory-assembled, complete with motor, pump, controls and plumbing. DO NOT lift or support unit
using plumbing lines or any part of circulation system. DO NOT relocate or otherwise modify any part of the
factory-installed circulation system, as this may affect the performance or safe operation of the whirlpool and will
VOID ALL WARRANTIES.
4. For an Aquatic jetted tub supplied with a motor that has an integral pneumatic on/off switch - Make certain the
air tube that is connected to the motor is also connected to the on/off button nipple under the deck in order for the
system to function.
5. Inspect whirlpool unit and circulation system carefully before installing. WATER TEST the unit before installation. If any
damages or defects are observed, DO NOT INSTALL. Repack unit and notify distributor immediately.
WATER TEST: PLACE THE TUB IN AN AREA WHERE IT MAY BE DRAINED AFTER TESTING.
1. Fill the tub with water to the overflow and allow to stand for a few minutes.
2. Run whirlpool for 10 minutes.
3. Inspect the tub completely. Any defect must be reported to Aquatic prior to installation in order to have it covered
by warranty.
4. Check to ensure that your installation will conform to all applicable codes and secure necessary permits. All electrical
and plumbing connections should be made by qualified electricians and plumbers.
5. This unit has been factory-tested prior to shipment for leakage and proper operation of the system. However, in transit
and handling, the unions at both ends of the pump may become loose. Make sure they are hand-tight.
Aquatic will not be liable for any defects or damages, including incidental or consequential damages that could have
been discovered or prevented by following these procedures for storage, handling and inspection.
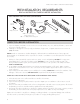
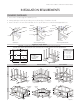
PRE-INSTALLATION REQUIREMENTS
READ ALL INSTRUCTIONS CAREFULLY BEFORE INSTALLATION
TOOLS REQUIRED FOR INSTALLATION: (NOT INCLUDED)
3/16"
Drill Bit
Phillips Screw Bit
Tape Measure
Safety Glasses Hammer Level
#10 x 1 ½" self –tapping
washer head screw
OR 1 ½" Galvanized roofing nail
Pencil
Drill