
Installation Guide


8 Aquatic
Builders' Choice Owner's Manual & Installation Guide
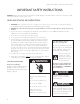
ELECTRICAL INSTALLATION:
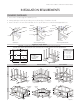
INSTALLATION REQUIREMENTS
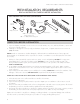
FRAMING DIAGRAMS
1. Protect interior of tub throughout installation process.
2. Framing and supports will vary according to the model and type of installation selected.
3. Please refer back to the unit's Technical Data sheet for specific dimensions located at www.aquaticbath.com.
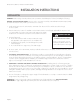
Island Drop-In Alcove-Integral Tiling Flange
Tile Bed
Wood Shim
Wall Stud
Tile
Tub
Tile
100% Silicone
Sealant
1" x 3" Ledger
Tile Bed
Wood Shim
Wall Stud
Tub
Tile bed
100% Silicone
Sealant
Tile
Tub
Alcove-Integral Skirted Models
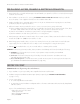
ISLANDS
ALCOVES
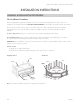
OVAL MODELS
DECK CUTOUT - A paper template will be enclosed with all oval models. For the deck cutout, scribe on the deck two center lines (a major and minor axis).
Next, match the center lines and trace the ellipse. Repeat this step three more times. Once the tracing is complete, cut out the ellipse. The dimensions should be exactly 2" (50) smaller than the unit.
A- 6" x 12" (150 x 305) Box-outs
B - Leveled Supports
1" x 3" (25 x 75) Ledgers
C - 12" x 18" (305 x 460)
minimum access
CORNER MODELS
A
C
B
LH
AW
1
DH
A
2
A
1
LH
B
LD
AW
Note: For Skirt Installation
disregard front framing
INTEGRALLY SKIRTED MODELS
RECTANGULAR MODELS
A
ACCESS PANELON
PUMP END
C
ID
As Desired
As Desired
DH
IW
B
A
AW
LH
LD
ACCESS PANELON
PUMP END
C
ACCESS PANELON
PUMP END
C
A
DH
As Desired
As
Desired
1
A
2
ACCESS PANELON
PUMP END
C
A
2
A
1
Control Panel
Notch
IW
DH
ID
ACCESS PANELON
PUMP END
C
A
DH
A
2
1
ACCESS PANELON
PUMP END
C
As
Desired
As
Desired
MINOR
AXIS
TEMPLATE
CUTOUT
MAJOR
AXIS
IW
ID
As
Desired
As
Desired
A
1
= Delphinius & Morandi
A
2
= Cavalcade
A
1
=
Ariel I, Ariel II, Ariel III,
Belmont I & Belmont II,
Starla
A
2
= Velencia 1.5 & Velencia II
LEGEND
AW Overall Width
DH Deck Height
ID Inner Depth
IW Inner Width
LH Ledger Height
LD Ledger Depth