
Installation Guide


Aquatic 9
Builders' Choice Owner's Manual & Installation Guide
INSTALLATION
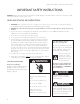
WARNING - When using electrical products, basic precautions should always be followed, including the following:
DANGER - RISK OF ELECTRIC SHOCK. Connect only to a circuit protected by a Ground-Fault Circuit-Interrupter (GFCI).
(For built-in and custom units.) Install to permit access for servicing.
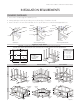
1. Install outlet(s) as shown. The outlet must be a minimum of 6" above the floor and be accessible through
the access panel.
2. Place the bath in the location for installation. Check that the bath is leveled (length and width). A carpenter’s level
is recommended. If necessary, place shims under support legs. Make
measurements for framework construction. Remove bath from location.
3. Construct framework.
• Ensure that construction and construction materials comply
with applicable code requirements for the installation site.
• All framing must be square, level and designed to provide
structural support.
• Do not allow tub rim to support any of the bath weight.
4. An access panel, 14" x 18" minimum, must be provided to allow access to the pump, electrical connections, and
other accessories.
5. ALL MODELS WITH LEVELING FEET - The following procedure is recommended for pre-leveled bottoms. Lift unit by
the rim and place in alcove or framework. If necessary, shim feet until unit just rests on leveled ledges or framework.
Secure the unit by fastening the bottom feet to the subfloor with any construction adhesive. The use of casting plaster
or plaster of paris is suggested but not mandatory as a foundation support between floor and bottom of unit to
suppress noise and give a solid and stable feel for the user.
6. WHIRLPOOL & SOAKING TUB MODELS WITHOUT LEVELING FEET - (Including island or self rimming units) Just
before placing unit in alcove or framework, spread a bed of casting plaster or plaster of paris on the floor or subfloor.
Limit the size of bed to dimensions of bottom. Lift unit by the rim and place in alcove or framework. Press down until
the tub perimeter rim just rests securely on top of the ledge or framework on all sides. This step is mandatory to prevent
shifting after installation and for proper operation, drainage and weight distribution. Use a carpenter’s level to check
that the unit is leveled.
7. The rim of the bath is not designed to support weight. If finished material is to overlap or contact the bath, the added
weight must be fully self-supporting.
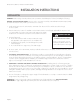
IMPORTANT: If a skirt is to be used, it must be installed at the time of tub installation. [See SKIRT INSTALLATION
PROCEDURES on page 10.] Install optional trim parts when all installation has been completed.
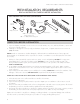
WARNING
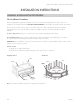
Installation Recommendation
Use two or more people to move
and install jetted bath. Failure to do
so can result in back or other injury.
INSTALLATION INSTRUCTIONS