
Installation Guide

Customer Service: 800.945.2726 • aquaticbath.com
— 3 —
Installation Instructions
Shower Stalls/Tub-Showers
Aquatic products may be specified as Lasco Bathware.
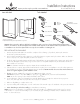
2
4 5
7
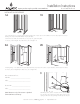
Check for level.
INSTALLATION PROCEDURE, CONT.
2
Place the unit into framing with drain fitting over and onto waste
pipe with skirt firmly on the floor.
6
Assure waste pipe protrudes well into drain fitting.
Maintain proper floor slope towards drain.
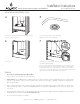
Pre-drill pilot holes. Fasten panel to framing at every stud and eight inches
vertically through nailing flange.
When other than cementitious backer board plaster is to be used, furring strips
as thick as nailing flanges are recommended for installation on studs above the
installed Aquatic unit to assure walls will be flush. 100% silicone with mildew
resistant properties should be applied between the backer board and horizontal
surface of unit. Then finished wall materials can be applied.
CLEAN-UP
1. Do not remove warranty/maintenance adhered label.
Leave on unit for owner/occupant per code requirement.
2. Prevent staining. Remove all debris before plumbing leak test. Use sponge with warm water and liquid detergent. Rinse, drain and wipe
clean. Do not use abrasive cleansers such as scouring powders, steel wool, metal scrapers, sand paper or anything else that might mar,
dull or scratch the finish.
3. Plaster and latex paint may be removed with warm water, liquid detergent and brittle brush or plastic scraper. Glues, tars and enamels
may be removed with acetone or paint thinner. Do not use turpentine or laquer thinner. Do not use excessive heat or any caustic solvents
or chemicals.
4. Dull areas and light scratches may be removed by buffing with a light colored automotive rubbing compound and buffing pad. Entire unit can be
waxed with light colored automotive wax. Do not wax bottom of unit.
5. See user maintenance label for more details.