
Instructions / Assembly
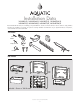

Shower Mounted Fittings:
If mounting fittings on tub or shower, from stable reference points (back wall studs, floor), measure the locations of shower
arm and valves. Note measurements:
Shower Arm: ___________________________________ Valve: ____________________________________
(Mark dimensions only if shower arm is plumbed within bath fixture wall area.)
Tub Filler: _____________________________________
(If applicable.)
— 2 —
Customer Service: 800-945-2726
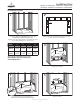
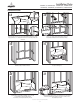
1. Review job print and Aquatic rough-in dimensions; verify all key
dimensions against actual job conditions.
2. In remodeling, if necessary, add studs at each end to provide a
vertical nailing surface for the side nailing flanges of bath fixture
product.
3. Make sure framed-in framing pocket is of proper size, square and
plumb; check floor for level. Some shimming between the stud
frame and fixture may be required.
4. If fire-rated framing pocket is required, approved finish material
must be in place prior to unit installation to meet fire safety
requirements of local building code and/or FHA/HUD Minimum
Property Standards.
NOTE: Finished framing pocket must have interior dimensions
shown on rough-in diagram to permit installation of unit.
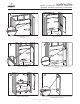
5. No foundation materials are required on Aquatic shower and
tub/shower units.
6. DO NOT install the product over open floor joist. Shimming and/
or foundation material may be required for additional support, if
subfloor is uneven.
7. Provide 6” (150mm) diameter floor opening for 2” (50mm) IPS
and drain connection for shower, or a 6” x 12” floor opening
for tub.
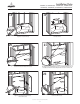
8. Make sure all plumbing is complete and to code.
9. To avoid obstruction, make sure that supply lines and valve
plumbing do not project into framing pocket during the installation
process.
10. On inside of plumbing wet wall of unit, note location of supply
elbow and mixer valve. (See “Shower Mounted Fittings” below.)
11. To prevent scuffing while installing unit, cover the floor of the unit
with a piece of cardboard or other protective material.
12. Fasteners for:
Wood framing – 1 1/2” galvanized roofing nails or #10 x 1
1/2” self-tapping washer head screws.
Concrete or block walls – 1” concrete nails and nailing tool.
Steel studs (18 ga.) – drill flanges and studs with 5/32”
carbide bit and use #12 x 1” sheet metal screws.
NOTE: Always pre-drill no matter what fastener is
to be used.
13. If installing shower door refer to the shower door manufacturers
installation instructions for any special considerations.
14. NOTE: Where local codes specify minimum door openings,
shower stalls may require swing (not sliding) doors.
NOTICE: Please inspect the unit thoroughly before installation to make sure it has not been damaged during transportation. Under
no circumstances should a damaged unit be installed. Neither Aquatic Bath nor the distributor will be responsible for removal or
reinstallation costs should a replacement be necessary due to installation of a damaged unit.
Pre-Installation Planning
*Please read ALL installation instructions completely before beginning.
Installation Data
160304PSL/R, 160304PSML/R, 160304PSTL/R, 160304PSTML/R,
260304PSL/R, 260304PSML/R, 260304PSTL/R, 260304PSTML/R