
Installation Guide

INSTALLATION PROCEDURE
Before you start:
• Ensure that the floor is even.
• The wate-overflow fitting is supplied with the product, however other accessories like the slip joint and
adaptors are not included and must be purchased seaparately.
• Because of the technical features of the product, it should be used only with the supplied waste-overflow
or specific 3rd party models that have been tested and approved by us.
• Place the bathtub by raising it up 4” with 4x4 pieces of lumber so you can
have access from the bottom of the bathtub.
• The bath must rest on its feet, not the monobloc sides. The feet must be
adjusted to compensate for any floor imperfections and leave minimal
gap w. floor.
• IMPORTANT! If present with the bathtub, the European p-trap must
be removed by untightening the marked collar. (fig.A)
INSTALLATION SEQUENCE
• Aquatica
®
bathtubs are equipped with factory pre-installed overflow system .
• The waste pipe/p-trap connection must be made directly to the waste/drain outlet located at the bottom of the tub.
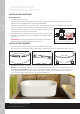
• Picture 1-2: the bathtub is leveled via a water level at the intended local installation area.
• Picture 3: place the bathtub by raising it up 4” with 4x4 peices of lumber so you can have access from the bottom of
the bathtub. Important note: during the installation, the bathtub should not be turned on its side to prevent its weight
from deflecting its monobloc sides. This is why it is important to use supports to raise the bathtub above the floor.
This will also provide you with easy access to the internal plumbing parts.
Untighten this collar and
remove this part. It is not required in the USA.
INSTALLATION SEQUENCE continued
• Picture 4: the water outlet pipe should be connected.
• Picture 5: foot leveling lock nuts are adjusted.
• Picture 6: silicone is applied to the feet of the bathtub that stands on the floor.
• Picture 7: when the installation is completed, the bathtub is taken down from
the supports ( ie 2 x 4x4's).
If necessary, installation is completd by applying silicone at several points
between the bottom panel and floor
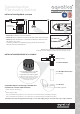
3” ABS DWV Hub
x FIPT Female Adapter*
4 5 6
7
The ABS female adapter features a hub x female NPT thread connection
and provides a means for adapting a solvent weld connection to a threaded connection
INSTALLATION PROCEDURE AT A GLANCE
• Drain (provided)
• 1½” Female Adapter*
• 1½" ABS ABS Extension Pipe*
(cut to length)
• 1½" ABS Trap*
* Provided by plumber
Use Home Depot PART “1 1/2” ABS
Female Adapter Hub x FIPT
or equivalent from another supplier
The ABS female adapter features a hub x female
NPT thread connection and provides a means
for adapting a solvent weld connection
to a threaded connection
Compatible adaptors for adapting a threaded male
connection to a solvent weld connection
:
• Mueller Industries: Part # 05913
Or
• Nibco: C5803 or c4803
http://t.homedepot.com/p/NIBCO-3-in-PVC-DWV-Hub-x-FIPT-Female-Adapter-C4803HD3/100345631/
http://t.homedepot.com/p/NIBCO-4-in-PVC-DWV-Hub-x-FIPT-Female-Adapter-C4803HD4/100677997/
The adaptor must have the appropriate thread type or it will keep slipping and you will not be able to get a tight connection!
TypicalAquatica
®
Freestanding Bathtub