2050 PSI Electric Pressure Washer ASSEMBLY, CARE AND USE INSTRUCTIONS Model AR 2N1-QVC READ CAREFULLY IMPORTANT: RETAIN THESE INSTRUCTIONS AND ATTACH RECEIPT TO MANUAL FOR FUTURE REFERENCE Questions, problems, missing parts? 93982-MP 93982_MP_AR 2IN1.indd 1 Before returning to your retailer, call our customer service department at 1-866-235-5112, 8 a.m. - 5:00 p.m., CST, Monday - Friday. www.arblueclean.
TABLE OF CONTENTS Product Specifications....................................................................................................... 2 Package Contents.............................................................................................................. 3 Hardware Contents............................................................................................................ 3 Safety Information...........................................................................................
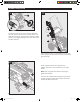
PACKAGE CONTENTS AA A BB B CC DD O N 4M 1.
SAFETY INFORMATION Please read and understand this entire manual before attempting to assemble, operate, or install the product. This manual contains information that relates to PROTECTING PERSONAL SAFETY and PREVENTING EQUIPMENT PROBLEMS. It is very important to read this manual carefully and understand it thoroughly before using the product. The symbols listed below are used to indicate this information. DANGER Potential hazard that will result in serious injury or loss of life.
SAFETY INFORMATION 25. Protect eyes, lungs, and skin from exposure to detergent. Dish or laundry soap is too thick and will clog the nozzle of your detergent bottle. IMPORTANT: Store the power washer indoors to prevent the water in the unit from expanding under freezing conditions. When the water freezes and expands, your power washer will be damaged and become inoperable. Or, if storing outdoors, it is recommended you use pump saver (not included) to protect pumps. 26.
PREPARATION Before beginning assembly of product, make sure all parts are present. Compare parts with package contents list and hardware contents list. If any part is missing or damaged, DO NOT attempt to assemble the product. Tools Required for Assembly (not included): Phillips screwdriver Estimated Assembly Time: 5 minutes ASSEMBLY INSTRUCTIONS 1 2 2 F G 1 1 1 G J 2 AA lace a foot on the pad at the front of the lower P frame (G) and then lift the power washer unit (F) off the frame.
ASSEMBLY INSTRUCTIONS 3 4 B BB H 2 1 G G 2 2 Install nozzle holder (H) to lower frame (G). Secure with two screws (BB). Hardware Used: 3 BB Screw AA Axle Pin Qty. 2 1 x2 BB Screw Qty. 2 CC Screw Qty. 2 DD Cotter Pin Qty. 2 Press buttons on lower frame (G) extensions and install handle (B). Lower frame extensions will click when handle is in proper position. 5 Install hose holder (A) onto back side of upper handle (B). Secure with two screws (CC).
PREPARATION ASSEMBLY INSTRUCTIONS 7 6 M B F G lide spray gun holster (M) into place on the S upper handle (B). 8 Place power washer unit (F) into position on the lower frame (G). 9 G K 2 N F 3 1 N 1 2 Pull back on collar at one end of soft PVC hose (N).Push firmly to connect hose to spray gun (K). Twist collar to secure. Confirm hose is locked into spray gun by slightly pulling on them. The hose is now securely attached to spray gun.
ASSEMBLY INSTRUCTIONS 10 11 K *I 1 K 2 1 Locked Unlocked Locking Spray Gun (before Lance installation) To lock trigger of spray gun (K), point gun away from you and turn dial to lock (“3” and “9” position). Squeeze or pull trigger to make sure it is locked. Always leave in locked position when not in use. This ensures the gun is in “safe” mode until it is ready for use. Turn dial to unlock (“12” and “6” position) to release spray gun trigger.
ASSEMBLY INSTRUCTIONS 14 15 F 2 3 1 N N M F 2 ull back on collar at the other end of soft PVC hose P (N). Push firmly to connect hose to power washer unit. Twist collar to secure. Confirm hose is locked into power washer unit by slightly pulling on hose. The hose is now securely attached. K *I 1 Insert extension lance (*I) into nozzle holder (H), and press spray gun (K) with extension lance (*I) into spray gun holster (M). 16 Attach a garden hose to built in garden hose adapter.
OPERATING INSTRUCTIONS •P ush the power button to turn the unit on (green power light will turn on). The unit will turn on for 1 - 2 seconds and shut off. This is a normal function of the auto start feature. •S queeze the spray gun trigger to begin pressure washing. •B egin power washing by squeezing the trigger on the spray gun all the way into the handle. •R elease the spray gun trigger to stop the power washer. •A llow the motor to come to a complete stop before squeezing the trigger again.
OPERATING INSTRUCTIONS • Always test a small area to avoid chance of damaging the surface. •W hen removing the detergent tank, squeeze the clamp and remove the small hose from detergent tank. Pull the detergent tank straight out. To replace tank, push straight in and then reattach hose with clamp. • T he power washer will pull a ratio of water to detergent of 10:1 or 10 parts water to 1 part detergent. The detergent concentration can be adjusted by turning the detergent knob on the top of the machine.
OPERATING INSTRUCTIONS 1 3 How to Avoid Damaging Surfaces •D amage to surfaces being cleaned occurs because the impact force of the water pressure exceeds the durability of the surface. Bare wood can be penetrated, paint can be peeled off, etc. You can vary the force of your power washer by controlling: 1. The angle of the surface being cleaned 2. The distance of the nozzle from the surface being cleaned •N ever use a narrow high pressure stream of water on soft surfaces susceptible to damage.
CARE AND MAINTENANCE Detergents •U se detergents designed for power washers. Hardware stores or home centers also have power washer detergents for different cleaning projects. The cleaning solution should be the consistency of water in order to prevent clogging your detergent bottle and nozzle. • T his system applies detergent under low pressure. The cleaning power of the detergents is enhanced when applied with low pressure and enough time is given to break down dirt and grime.
OPERATING INSTRUCTIONS CARE AND MAINTENANCE Storage •W hen your pressure washing session has been completed, turn off the power switch. Unplug the power cord from the outlet. Turn off the water supply. Pull the trigger on the spray gun 2 - 3 times to drain out the excess water and to release any remaining water pressure. Do not allow the power washer to run with no water flowing through it. •R emove detergent tank and clean completely.
TROUBLESHOOTING If you have any questions regarding the product, please call customer service at 1-866-235-5112 PROBLEM Unit will not turn on. The high pressure (HP) hose will not connect/stay connected to the spray gun. Is this a spray gun problem? The unit is running but there is no water flow. Why is water leaking where the high TROUBLESHOOTING pressure hose connects to the spray gun? I can’t remove the lance from the spray gun.
LIMITED WARRANTY TROUBLESHOOTING This product has a 2 (two) year warranty. Please read the following carefully to understand what each warranty entails: This product is under warranty to the original retail consumer against defects in material and workmanship for a period 1(one) year and is a complete “bumper to bumper” warranty including the spray gun,the high pressure hose and all accessories from the date of purchase. The warranty is not transferable or assignable. This warranty covers replacement parts.
REPLACEMENT PARTS LIST For replacement parts, call our customer service department at 1-866-235-5112, 8 a.m. - 5:00 p.m., CST, Monday - Friday or order online at www.arblueclean.
93982_MP_AR 2IN1.
93982_MP_AR 2IN1.