
User's Manual

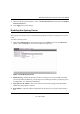
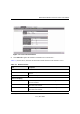
Table Of Contents
- Contents
- About This Manual
- Chapter 1 Introduction
- Chapter 2 Basic Installation and Configuration
- Wireless Equipment Placement and Range Guidelines
- Understanding MaxR-3210 Wireless Security Options
- Installing the MaxR-3210 Wireless Access Point
- Logging In Using the Default IP Address
- Setting Basic IP Options
- Wireless Settings
- Setting Up and Testing Basic Wireless Connectivity
- Understanding Security Profiles
- SSID and WEP/WPA Settings Setup Form
- Configuring the RADIUS Server Settings
- Setting up a Security Profile
- Configuring WEP
- Configuring WPA with RADIUS
- Configuring WPA2 with RADIUS
- Configuring WPA and WPA2 with RADIUS
- Configuring WPA-PSK
- Configuring WPA2-PSK
- Configuring WPA-PSK and WPA2-PSK
- Restricting Wireless Access by MAC Address
- Chapter 3 Management
- Remote Management
- Remote Console
- Upgrading the Wireless Access Point Software
- Configuration File Management
- Changing the Administrator Password
- Enabling the SysLog Server
- Using Activity Log Information
- Viewing General Summary Information
- Viewing Network Traffic Statistics
- Viewing Available Wireless Station Statistics
- Enabling Rogue AP Detection
- Viewing Rogue AP Statistics
- Packet Capture
- Chapter 4 Advanced Configuration
- Chapter 5 Troubleshooting and Debugging
- No lights are lit on the Access Point.
- The Wireless LAN activity light does not light up.
- The LAN light is not lit.
- I cannot access the Internet or the LAN with a wireless capable computer.
- I cannot connect to the MaxR-3210 to configure it.
- When I enter a URL or IP address I get a timeout error.
- Using the Reset Button to Restore Factory Default Settings
- Appendix A Default Settings and Technical Specifications
- Appendix B Command Line Reference
- Index
MaxR-3210 Wireless-N Access Point User Manual
Arada Systems Confidential 11
v1.1, Dec 2009
3. Then enter the new password twice—once in the New Password field and again in the Repeat
New Password field.
4. Click Apply to save your change.
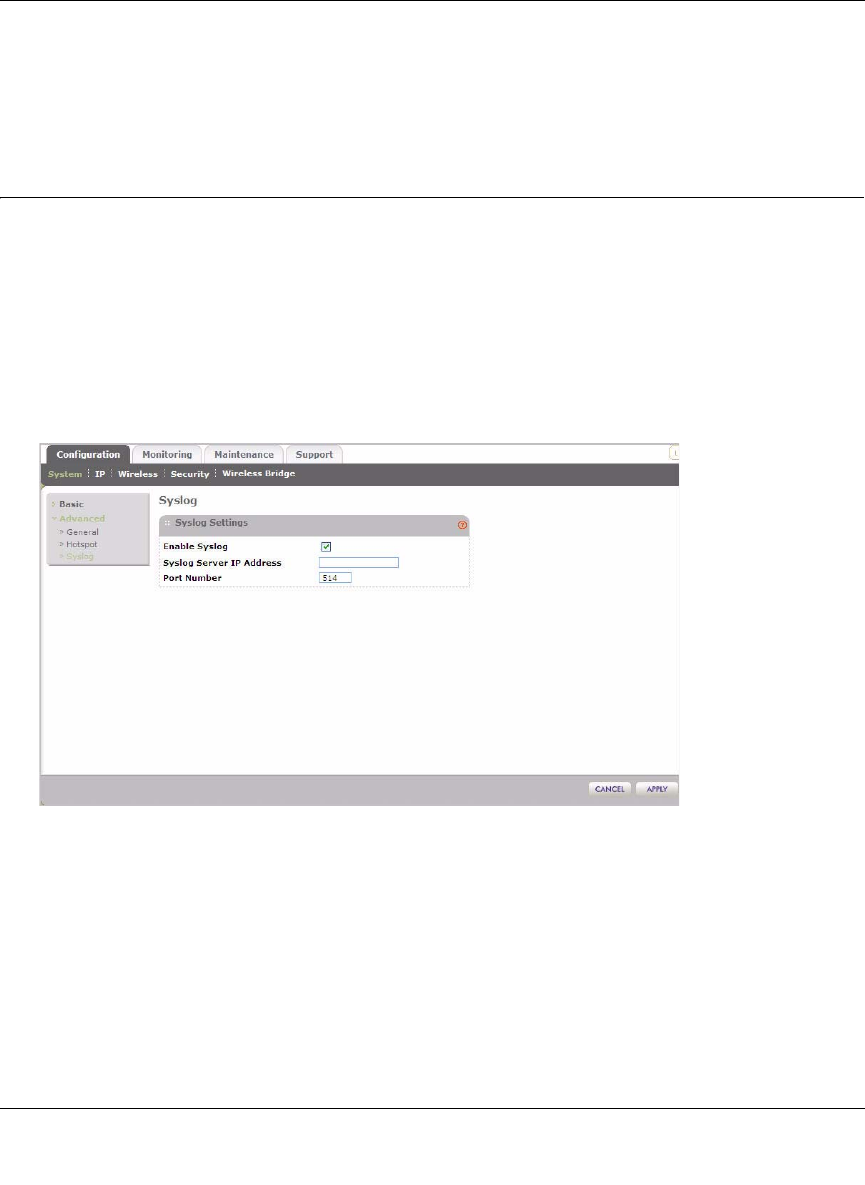
Enabling the SysLog Server
The SysLog screen allows you to enable the SysLog option if you have a SysLog server on your
LAN.
To enable a SysLog server:
1. Under the Configuration tab on the main menu, select System, then select the Advanced
option, and select SysLog to view the screen shown in Figure 3-9.
2. Enable SysLog – Enable this option if you have a SysLog server on your LAN. If enabled,
you must enter the IP address of your SysLog server and the port number your SysLog server
is configured to use. The default is Disabled.
3. SysLog Server IP Address –The access point will send all the SysLog to the specified IP
address if SysLog option is enabled.
4. Port Number – The port number configured in the SysLog server on your LAN. Default is
514.
Figure 3-9 Enable Syslog server