AOF6SE1
We recommend that you read the instructions in this owner’s manual carefully before use for the best performance and to extend the life of your appliance, as it will provide you with all the instructions you require to ensure its safe installation, use and maintenance. Always keep this owner’s manual close to hand since you may need to refer to it in the future. Thank you.
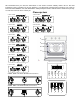
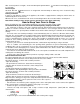
A. Control Panel B. Cooking mode selection knob C. Cooking temperature selection knob D. Electronic programmer-Allows you to programme the desired cooking by selecting the cooking time and the end cooking time. It can also be used as a timer (only available on certain models) E. Oven indication light (only available on certain models) -When lit, it indicates the ovens is heating up to the temperature set F. Dripping Pan or Baking Sheet G. Oven Rack 4. Manual operation setting H.
Multi-Cooking Mode 2924W Position of thermostat knob “C”:Between 60℃and Max.The top 、circle and bottom heating elements, as well as the fan ,will come on alternately .Since the heat remains constant and uniform throughout the oven ,the air cooks and browns food uniformly over its entire surface. With this mode ,you can also cook various dishes at the same time ,as long as their respective cooking temperatures are the same .
Position of thermostat knob“C”:Between 60℃and 250℃.The rears heating element and the fan come on, guaranteeing delicate heat distributed uniformly throughout the oven. This mode is ideal for baking and cooking delicate foods-especially cakes that need to rise,and for the preparation of certain tartlets on 3 shelves at the same time. Here are a few examples: cream puffs, sweet and savory biscuits, savoury puffs, Swiss rolls and small portions of vegetables au gratin, etc. ….
When the related button is pressed, the set roast process will be displayed. Whenever the button is pressed, and set backward the time to “0”,the set roast process will be cancelled. When button is pressed again, the oven will revert to the manual operation process. Timer 23 hours 59 minutes can be set as maximum. To set the time, press the button, and then + or - button, until the required time is shown on the screen.
After electrical power is on again, “12:00” and the square symbol above “ ” will show on the display, you need to set it again . The oven light Set knob “B”to the symbol to turn it on .It lights the oven and stays on when any of the electrical heating elements in the oven come on. Cooling ventilation In order to cool down the exterior of the appliance, this model is equipped with a cooling fan, which comes on automatically when the oven is hot.
Practical Cooking Advice The oven offers a wide range of alternatives which allow you to cook any type of food in the best possible way. With time you will learn to make the best use of this versatile cooking appliance and the following directions are only a guideline which may be varied according to your own personal experience.
Pastry dropped Use less liquid or lower the temperature by 10℃. Pastry is too dark on top Place it on a lower rack, lower the temperature, and increase the cooking time. Cooked well on the inside but sticky on the outside Use less liquid, lower the temperature, and increase the cooking time. The Pastry sticks to the pan Grease the pan well and sprinkle it with a dusting of flour or use greaseproof paper.
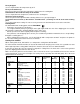
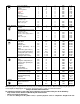
5 Grill Soles and cuttlefish Squid and prawn kebabs Cod filet Grilled vegetables Veal steak Cutlets Hamburgers Mackerels Toasted sandwiches With rotisserie (where prevent) Veal on the spit Chicken on the spit Lamb on the spit 6 Fan Assisted Grill Grilled chicken Cuttlefish With rotisserie (where prevent) Veal on the spit Chicken on the spit Chicken (on the spit)+potatoes (roasted) Lamb on the spit 7 Baking 8 Fast cooking 9 Pizza Tarts Fruit cakes Fruitcake Sponge cake Stuffed pancakes) on 2 racks) Sm
manufacturer or maintenance department shall be used for replacement When handling the appliance, we recommend you always use the purpose provided handles recessed into the sides of the oven to prevent harming people or damaging the appliance itself. · This appliance is designed for non-professional ,house-hold use and its functions must not be changed .
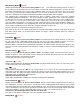
in 45 mi n 45m 565 22 in 200m 564.5 594 564.
Connecting the supply cable to the mains Install a standardized plug corresponding to the load indicated on the data plate. When connecting the cable directly to the mains, install an omni polar circuit breaker with a minimum contact opening of 3 mm between the appliance and the mains .The omni polar circuit breaker should be sized according to the load and should comply with current regulations (the earth wire should not be interrupted by the circuit breaker).
PRODUCT SERVICE NUMBER I 800 805 300