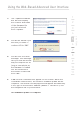
Using the Web-Based Advanced User Interface 3. 1 The “Update Firmware” box will now display the location and name of the firmware file you just selected. Click “Update”. 2 3 4 5 You will be asked if you are sure you want to continue. Click “OK”. 6 7 5. 6. 8 You will see one more message. This message tells you that the Router may not respond for as long as one minute as the firmware is loaded into the Router and the Router is rebooted. Click “OK”.
Manually Configuring Network Settings In order for your computer to properly communicate with your Router, you will need to change your PC’s TCP/IP settings to DHCP. Manually Configuring Network Adapters in Windows 2000, NT, or XP 1. Click “Start”, “Settings”, then “Control Panel”. 2. Double-click on the “Network and dial-up connections” icon (Windows 2000) or the “Network” icon (Windows XP). 3.
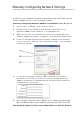
Manually Configuring Network Settings Manually Configuring Network Adapters in Windows 98SE or Me 1 1. Right-click on “My Network Neighborhood” and select “Properties” from the drop-down menu. 2 2. Select “TCP/IP -> settings” for your installed network adapter. You will see the following window. 3 (1) 4 (3) 6 7 8 3. If “Specify an IP address” is selected, your Router will need to be set up for a static IP connection type. Write the address information in the table below.
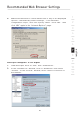
Recommended Web Browser Settings In most cases, you will not need to make any changes to your web browser’s settings. If you are having trouble accessing the Internet or the Web-Based Advanced User Interface, then change your browser’s settings to the recommended settings in this section. Internet Explorer 4.0 or Higher 1. Start your web browser. Select “Tools” then “Internet Options”. 2.
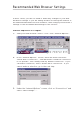
Recommended Web Browser Settings 4. Make sure there are no check marks next to any of the displayed options: “Automatically detect settings”, “Use automatic configuration script”, and “Use a proxy server”. Click “OK”. Then click “OK” again in the “Internet Options” page. 1 2 3 4 5 6 8 Netscape® Navigator® 4.0 or Higher 1. Start Netscape. Click on “Edit” then “Preferences”. 2. In the “Preferences” window, click on “Advanced” then select “Proxies”.
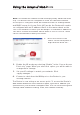
Using the Adapter Access Point ModeMode Note: This advanced feature should be employed by advanced users only. The Router can be configured to work as a wireless-network access point. Using this mode will defeat the NAT IP sharing feature and DHCP server. In Access Point (AP) mode, the Router will need to be configured with an IP address that is in the same subnet as the rest of the network to which you will bridge. The default IP address is 192.168.2.254 and the default subnet mask is 255.255.255.0.
Using the Adapter Mode Setting Up your Computer to Use the Web-Based Advanced User Interface The default IP address of the Router (while functioning in Adapter Mode) is 192.168.2.225. You will need to set your computer’s IP address to the same subnet (e.g., 192.168.2.224) before you can access the Web-Based Advanced User Interface. Perform the following steps from Windows 98SE, Me, 2000, or XP: 1. Move the center of the switch on the back panel to align with the word “Adapter”. 2.
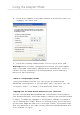
Using the Adapter Mode 6. Enter an IP address in the same subnet as the access point (for example, 192.168.2.224). 7. Enter the following subnet mask: 255.255.255.0. Click “OK”. Warning: Once you have configured your Router, you must repeat steps 1 through 3 and select “Obtain an IP automatically” or set a valid IP for your computer on the same subnet as the network to which you are connecting.
Using the Adapter Mode 1 2 3 4 5 6 7 One computer at a time can log into the Router to make changes to the Router’s settings. Once a user has logged in to make changes, there are two ways that the computer can be logged out. The first is to click the “Logout” button. The second method is automatic. The login will time out after a specified period of time. The default login time-out is 10 minutes. This can be changed to any period of time from 1 to 99 minutes.
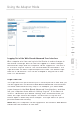
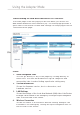
Using the Adapter Mode Understanding the Web-Based Advanced User Interface The home page is the first page you will see when you access the Web-Based Advanced User Interface (UI). The home page provides a quick view of the Router’s status and settings. All setup pages can be reached from this page. (4) (1) (3) (2) Status 1. Quick-Navigation Links You can go directly to any of the pages by clicking directly on these links.