AV9 Pre-amp.
Safety guidelines CAUTION ATTENTION RISK OF ELECTRIC SHOCK DO NOT OPEN RISQUE DE CHOC ELECTRIQUE NE PAS OUVRIR CAUTION: To reduce the risk of electric shock, do not remove cover (or back). No user serviceable parts inside. Refer servicing to qualified service personnel. WARNING: To reduce the risk of fire or electric shock, do not expose this apparatus to rain or moisture.
English Contents Safety guidelines ........................................ E-2 Important safety instructions ......................E-2 Safety compliance .....................................E-2 Before you start! ......................................... E-4 Introduction..............................................E-4 Using this handbook ..................................E-4 What’s in the box? .....................................E-4 Before making connections .........................
Before you start! Introduction Thank you for purchasing the Arcam AV9 Preamp processor. The AV9 is a high-quality and high-performance home-cinema processor and audio pre-amplifier built to Arcam’s quality design and manufacturing standards. It combines digital processing with high performance audio and video components to bring you an unrivalled home-entertainment centre.
English Before making connections Before connecting your equipment it is important to think about the following points, as these will affect your choice of connections and subsequent use of the system. Audio Wherever possible, connect both analogue and digital outputs of digital sources. This enables use of a digital input for the main zone with the corresponding analogue input used for recording onto an analogue tape deck or VCR, or for the Zone 2 output.
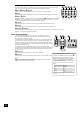
Installation Serial Control control connections Digital audio inputs Component video connections Composite & S-video connections Digital output DIGITAL INPUTS REMOTE OUT IN LOCAL DVD AV 1 Y/G TAPE HIGH QUALITY VIDEO 2 U/B V/R Y/G U/B VIDEO V/R ZONE 2 RS232 CONTROL 2 1 MONITOR OUT TAPE VIDEO TRIGGERS VCR OUT VCR IN AV SAT DVD GND MM 50/60Hz 100–240VAC~ MAX 40VA 12V IN TRIGGER ZONE 2 OUT LEFT TUNER CENTRE CD VCR SUB 2 L SURR SAT Y/G U/B LS BACK LEFT CENTRE OUT V/R
< Wherever possible, connect both the analogue and digital outputs of digital sources. This enables use of a digital input for the main zone and the corresponding analogue input for recording onto an analogue tape deck or VCR, and for the Zone 2 output if used. < Take care to place the audio cables as far from any power supply cabling as is practically possible to reduce hum and other noise problems. English Audio connections Analogue audio inputs SAT bl DVD.
Analogue pre-amplifier outputs dl dn dp dr dt All these analogue outputs are buffered, have a low output impedance and are at line level. They are able to drive long cables or several inputs in parallel if required. dl LEFT, dm RIGHT, dn CENTRE. LEFT CENTRE RIGHT SUB/1 SUB/2 L/SURR LS/BACK SUB/3 R/SURR RS/BACK Connect these to the equivalent front channel inputs of your power amplifier. do SUB 1. Main subwoofer output. Connect this to the input of your active subwoofer, if you have one.
English Video connections Important notes As described on page 5, the AV9 performs no video format conversion between component, RGB, S-video or composite. Therefore, wherever possible, connect multiple video outputs from your video sources. This enables use of the higher quality video connection for the main system and the corresponding S-video or composite connection for the record and Zone 2 outputs.
HDMI An HDMI connection between a source and your display device offers (in most cases) the best possible picture quality. This connection type is, however, the most limiting in terms of routing and conversion. HDMI IN DVD OUT SAT The AV9 provides five HDMI inputs, labelled to match the other digital inputs. Each input may be used for any HDMI source.
English Configuring the AV9 The AV9 ‘Setup Menu’ has six ‘Basic’ and six ‘Advanced’ menu screens which take you through the configuration process. The ‘Basic’ menus enable you to match your AV9 to your speakers. The ‘Advanced’ menus allow you to optimise the operation of your system. Screen shots of these menus are shown in shaded boxes on the following pages. The best way to set the AV9 up is using the on-screen display (OSD).
Basic Setup 1 – General Settings: 1 - General Settings Volume display: Allows you to select how volume is displayed. Choose from Normal 0–82 (in 1dB steps), THX Ref –63dB to +19dB, and Fine 0–82 (in 0.5dB steps). We recommend setting this to THX Ref as this represents a volume control around 0dB (the reference level) which is the same loudness level of a movie in a movie theatre (once you have calibrated your system correctly).
English HQ Video: Allows selection of the high quality video output to match your display device. Choose between RGB or Component. This setting has no effect on the HDMI output. The AV9 allows progressive scan and high definition TV (HDTV) signals to be passed through the high quality component inputs to the high quality output. Note, however, that the OSD cannot overlay text at any rate other than standard NTSC or PAL. Sync On Green: This applies only if RGB video is used.
3 – Speaker delay settings Note: Only enter these delay settings once you have specified what delay units (i.e., Time, Imperial or Metric) you will be using, or the information will be lost when changing units. The measurement units can be specified on page 1 of this menu (described on page 12). The speaker distance control automatically sets the appropriate time delays required for all the speakers in your system.
5 – Subwoofer Settings Crossover Frequency: This setting defines the frequency at which bass redirection begins. Frequencies below this level are redirected from ‘small’ speakers to the Fronts or to the subwoofer; frequencies above this level are not redirected. The value for this setting depends on your speakers, environment and taste, and is best determined by experimentation. The adjustment can be made in increments of 5Hz between 40Hz and 150Hz. If THX or THX Surr.
6 – THX Settings THX Surr. EX: This can either be set to Auto or Manual and is only applicable when playing either THX ‘Surround EX’-encoded material. < Auto The AV9 switches THX to THX Surr. EX when suitably encoded material is detected (this can be temporarily overridden by pressing the THX button on the AV9). < Manual The AV9 will not select THX Surr. EX automatically. It can however be selected manually by pressing the THX button. Dolby Digital Surround EX processing.
< If set to Separate, then audio and video signals for video sources can be separately assigned (e.g., DVD sound with video from a satellite receiver). Once assigned to be separate, audio and video remain separate. < If set to Tracked, audio and video signals are linked together (e.g., DVD audio and video). This setting is recommended for simplicity. In this mode, audio and video sources can still be separated temporarily via ‘Main Menu Screen 1’.
ADV 5 – Input trims Input trims: Allows the adjustment of the input sensitivity of the analogue inputs (in Volts RMS) so that each one achieves the optimum dynamic range and sounds similar in loudness to the others. Available level settings are: Low 1V, Reference 2V, Medium 4V, High 8V. The reference level of 2V should be appropriate for most inputs. To ensure the correct level is set up, first ensure that all source levels are set to Reference 2V.
To save the AV9 set-up: 1. Press MENU to go to the Setup Menu Index at the Save Setup point. 2. Press OK to go to the Save Settings menu. User Presets All the settings you have made on the previous screens can be saved as a user profile and stored as one of five ‘Presets’. A choice of setup presets caters for different events such as movies or sport, and for different user preferences. 3. Press B C to select the desired preset in which to save the setting.
Front panel controls 1 bp 2 3 4 THX SURROUND EX bo AV8 PREAMP PROCESSOR To n e Vol: An. PLII +8 Movie 5 THX EFFECT MODE DISPLAY MENU OK 6 7 8 DVD SAT AV VCR PHONO/AUX CD TUNER TAPE bk 9 DIRECT DVD A bl bm 1 Remote control receiver. This is positioned behind the FMJ badge. Ensure the receiver is in a clear line of sight from the remote control for operation. If this is not possible, use a separate sensor connected to the IR input on the rear panel. 2 THX.
English Remote control The CR80 remote control is a multi-function unit that controls the AV9 and up to seven other devices. The instructions on this page only refer to the control of the Arcam FMJ AV9. For information on using the remote control for other devices, and a full list of features, see the instruction booklet supplied with the CR80. Device selection IMPORTANT: Press the AMP button first to operate the AV9.
Operating your AV9 Introduction For information display we recommend you use the OSD on your TV/screen whenever possible. However all key information is also duplicated one line at a time on the front panel display of the AV9. Using the controls Switching on Press the power button in. Between one and five seconds later, the power LED will then come on (first as yellow), the front panel display window shows ‘ARCAM’, followed by ‘initialising’.
VCR Operation < < Pressing the VCR button selects audio and video from the VCR input. < If the Record to VCR option is set to a specific input, the VCR LED illuminates as well as the input selected in the VCR menu. English The AV9 has a fully independent VCR loop for audio and video (Composite and S-video only). This can be configured to record the source you are watching to or to record any other input using the Record to VCR option in the ‘Main Menu Screen 2’.
Effects/FX The EFFECT button (FX on the remote) cycles through the available effect modes. The effects are only available when the AV9 is in stereo mode. Effect Description None No effects active, stereo signal For more information on the effects, see the section ‘DSP Effects Modes’. Music Extracted ambience and centre information Party All speakers on THX Club Small room This button cycles through the available THX modes.
Using the Main menu screens English Three Main Menu screens allow day-to-day changes to be made to the way the AV9 operates. Examples include adjusting the tone control for a particular input, recording one source while listening to another or configuring the headphone output. The three Main menu screens are available on your display device. The selected line of each screen is also displayed on the front panel of the AV9.
Main menu screen 2 Record to Tape: Allows any analogue input to be directed to the tape output, independently of the input that is being listened to. You cannot select tape as a record source: if allowed this would cause feedback through the tape recorder. If Record to VCR is set to the tape input, you cannot select the VCR input as a Record to Tape option. If allowed this would cause feedback through the VCR.
English Using Zone 2 Introduction Zone 2 provides the option for the occupants of the master bedroom, children’s room or kitchen to view or listen to a different source at a different volume level from the main zone (zone 1). If a video feed is provided to Zone 2, then the following menu, unique to a Zone 2 IR receiver, can be called up using the MENU button on a CR80 remote control. Control via Zone 2 menu Vol: Shows present volume being used in Zone 2, which can be adjusted from here.
Surround modes Introduction Your AV9 processor provides all the key decoding and processing modes for analogue and digital signals. Modes for Digital sources Digital recordings are usually encoded to include information about their format type. The AV9 detects automatically the relevant format in a digital signal, such as Dolby Digital or DTS, and switches in the appropriate decoding.
< Movie Mode: This is intended for use with ‘cinematic’ material, which is mixed and monitored in a calibrated multi-channel environment. Movie mode is a ‘fixed’ mode that is designed to give a similar sound when listening using a home cinema system to that obtained in a cinema. < Music Mode: Stereo music is not designed for surround processing, although good surround effects can be obtained through careful production.
Dolby Digital 5.1 Surround Ex: This is accessed from the MODE button. THX Surround Ex encoded source material automatically selects THX Surround Ex selection (when activated). DTS 5.1: Less common than the Dolby Digital format, but generally recognised within the audio industry as being of superior sound quality. DTS 5.1 delivers surround sound with five full range channels plus an LFE channel. DTS-ES 6.1 Matrix: This is a 6.1 channel format based on DTS 5.1.
DSP Effects Modes English The AV9 has a number of effects modes that can be used to enhance a stereo signal and to make use of the surround loudspeakers. DSP effects modes are only available with stereo source signals. You can listen to the influence of any effect mode by playing a CD, then pressing pause, when the decaying reverberation effect can be heard. Available effects modes Music: Music surround makes full use of the additional speakers placed at the centre, sides and rear of the room.
Speaker Installation The AV9 allows you to connect up to seven channels of amplification and three active subwoofers in the main system. The output channels correspond to speakers installed in the front left, centre, front right, surround left, surround right, surround back left, surround back right and an active subwoofer (see diagram). All speakers, with the exception of the subwoofer, should be arranged around your normal viewing/listening position (see diagram).
English Troubleshooting There are no lights on the unit: Check that: < the power cord is plugged into the AV9 and the mains socket outlet it is plugged into is switched on. < the power button is pressed in. If a red LED is present, the AV9 is in standby mode. Press any source button on the front panel or on the remote control. The unit responds erratically or not at all to the remote control: Check that: < < there are fresh batteries in the remote control.
No sound is produced: Check that: < < < the correct input has been selected. < < < your power amplifier(s) are turned on and working correctly. the source equipment is on, is operating normally, and is in ‘play’ mode if appropriate. the volume is turned up to a reasonable level and ‘MUTE’ is not displayed on the front panel display. you have assigned the digital input to the correct source button.
The source switching changes randomly or freezes on one source: < English Check that: there are no static or impulse interference problems caused by nearby power equipment switching, e.g., heating or air conditioning control. Switch the AV9 off, wait ten seconds, then switch it on again to clear an operating problem. Contact your installer if the problem returns or persists.
Technical specifications Audio Line input sensitivity (set to Reference) 2V rms Input impedance 10kΩ Preamp output level (nominal) 2V rms Output impedance 25Ω Signal/noise ratio (unwtd 20Hz–20kHz) – analogue >100dB Signal/noise ratio (unwtd 20Hz–20kHz) – digital (24-bit) >98dB THD+N – analogue 0.0012% THD+N – digital (24-bit) 0.
English Additional technical information Radio interference The AV9 is a digital audio device which has been designed to very high standards of electromagnetic compatibility. The unit can radiate RF (radio frequency) energy. In some cases this can cause interference with FM and AM radio reception. If this is the case, keep the AV9 player and its connecting cables as far from the tuner and its aerials as possible.
SCART connections These pinouts describe the signal connections between the AV9 and your display device input.
English IR remote codes The following information is supplied for owners of advanced programmable remote controls, such as the Philips ‘Pronto’ and similar devices, where it is possible to program remote codes directly into the device. The coding system for the AV9 is based on the Philips RC-5 standard. The main system control uses RC-5 system code ‘16’, so for example, to program in a ‘Standby’ command, use the command ‘16-124’.
Guarantee Worldwide Guarantee This entitles you to have the unit repaired free of charge, during the first two years after purchase, at any authorised Arcam distributor provided that it was originally purchased from an authorised Arcam dealer or distributor. This period can be extended to five years if the completed registration card is returned to Arcam.
This section of the document details the serial command set of the AV9 software. Data transfer format < < Transfer rate: 38,400bps. 1 start bit, 8 data bits, 1 stop bit, no parity, no flow control. Command lines must be terminated by an ASCII line feed (0x0A hexadecimal) and be no longer than 64 bytes (including the line feed terminator). For example: to turn zone 1 on, send: Z1PWR1 where is an ASCII line feed.
Command descriptions / Descriptions des commandes / Beschreibung der Befehle / Opvraagcommando’s ?zPWR MUT ?zMUT EFF ?EFF THX ?THX DEC ?DEC Response/ Réponse/ Werte/ Antwoord Parameters/ Paramètres/ Parameters/ Parameters PWR Description/ Description/ Beschreibung/ Beschrijving Command/ Commande/ Befehl/ Commando Query commands / Commandes d’interrogation / Abfragebefehle / Vraagcommando’s g Query Power State f Interroger état M/A d Ein/Aus abfragen n Spanningsstatus opvraag zPWRx, z = zone
English g Query Zone Status. f Interroger état Zone d Zustand der Zone abfragen n Zone status opvraag Response/ Réponse/ Werte/ Antwoord Parameters/ Paramètres/ Parameters/ Parameters ?zSTS Description/ Description/ Beschreibung/ Beschrijving Command/ Commande/ Befehl/ Commando STS g Reports the current state of Audio, Video, Volume, Mute, Audio Signal Type, *Decode/Downmix Mode, *Effect Mode, *THX Mode.
FAN zFANx EFF ?EFFy THX ?THXy DEC ?DECy Parameterwaarden ?zMUTx Mögliche Werte/ MUT Valeurs des paramètres/ ?zPWRx Parameter values/ Parameters/ Paramètres/ Parameters/ Parameters PWR Description/ Description/ Beschreibung/ Beschrijving Command/ Commande/ Befehl/ Commando General operation commands / Commandes de foncionnenment général / Allgemeine Betriebsbefehle / Commando’s algemene werking g Power on/off f Power marche/arrêt d Gerät ein/aus n Spanningsstatus aan/uit g Mute on/off f M
English Parameterwaarden Mögliche Werte/ Description/ Description/ Beschreibung/ Beschrijving g Zone Status. Displays current Valeurs des paramètres/ Parameters/ Paramètres/ Parameters/ Parameters ?zSTS Parameter values/ Command/ Commande/ Befehl/ Commando STS state of Audio, Video, Volume, Mute, Audio Signal Type, *Decode/Downmix Mode, *Effect Mode, *THX Mode. * Zone 1 only f État Zone.
RCT RCTi RCV RCVi COM COMy LIP LIPy DIM DIMy g Record To Tape Select f Sélectionner ‘Record To Tape’ g Bandaufzeichnung auswählen n Bandopname selectie g Record To VCR Select f Sélectionner ‘Record To VCR’ d Videoaufzeichnung auswählen n VCR opname selectie g Compression f Compression d Komprimierung n Compressie y 0 1 2 g Lip Sync Control f Synchronisation son/image d Lippen-synchronisation n Lippensynchronisatie controle y = -1 — +44: -1 = –5ms +44 = +220ms g Pro Logic II MusicMode Dimension
English Setup commands – Basic / Commandes de base / Befehle des Setup-Menüs (Basic) / Set-up commando’s – basis MXO zMXOy g Maximum Volume f Volume max. d Max. Lautstärke n Maximaal volume For Zone 1: y = -43 — +19: -43 = –43dB +19 = +19dB g Max On Volume f Volume max. à la mise en marche d Max.
g Speaker Level settings f Réglages des niveaux enceintes d Lautsprecherpegel n Luidspreker niveau-instellingen Parameterwaarden Mögliche Werte/ Valeurs des paramètres/ LVLsy Parameter values/ Parameters/ Paramètres/ Parameters/ Parameters LVL Description/ Description/ Beschreibung/ Beschrijving Command/ Commande/ Befehl/ Commando LEVELS / NIVEAUX / PEGELEINSTELLUNGEN / NIVEAUS y = -10 — +10: -10 = –10dB +10 = +10dB in 0.
English Setup commands – Advanced / Réglages : Commandes avancées / Befehle des Setup-Menüs (Advanced) / Set-up commando’s – geavanceerd STB STBx g Bass Levels f Niveaux grave d Tiefenpegel n Lage tonen niveaus y = -6 — +6: -6 = –6dB +6 = +6dB g Treble Levels f Niveau aigu d Höhenpegel n Hoge tonen niveaus y = -6 — +6: -6 = –6dB +6 = +6dB Parameterwaarden TRBsy Mögliche Werte/ TRB Valeurs des paramètres/ BASsy Parameter values/ Parameters/ Paramètres/ Parameters/ Parameters BAS Description/
CZI CZIx ACC ACCix Parameterwaarden zSBYy Mögliche Werte/ SBY Valeurs des paramètres/ FVLx Parameter values/ Parameters/ Paramètres/ Parameters/ Parameters FVL Description/ Description/ Beschreibung/ Beschrijving Command/ Commande/ Befehl/ Commando ADV 4 – ZONE 2 / ZONE 2 / ZONE 2 / ZONE 2 g Zone 2 Fix Volume f Volume fixe Zone 2 d Feste Lautstärke von Zone 2 n Zone 2 vast volume g Standby f Veille d Stand-by n Stand-by y = 0 — 1: 0 =Local Only 1 = All Off.
English Parameterwaarden y = 0 — 5: 0 = Current Preset / Présélection Actuelle / Aktuelle Voreinstellung / Gangbare preselectie 1 = Preset 1, 2 = Preset 2, …, 5 = Preset 5.
LOC Parameterwaarden Mögliche Werte/ Valeurs des paramètres/ Parameter values/ Description/ Description/ Beschreibung/ Beschrijving Parameters/ Paramètres/ Parameters/ Parameters Command/ Commande/ Befehl/ Commando Multi-button presses / Touches multiples / Drücken mehrerer Tasten / Meerdere toetsen drukacties g Setup Menu Lock f Verrouiller les menus de réglage d Setup-Menü sperren n Instelmenu vergrendeling TST g Test VFD and LEDs f Tester affichage et LEDs d Display und LEDs testen n Test VFD
English Parameterwaarden Mögliche Werte/ Valeurs des paramètres/ Parameter values/ Description/ Description/ Beschreibung/ Beschrijving Parameters/ Paramètres/ Parameters/ Parameters Command/ Commande/ Befehl/ Commando LS g Display LipSync Shortcut f Afficher raccourci synchronisation d Verknüpfung zu „LipSync‘ anzeigen n Lippensynchronisatie kortweg aanduiding SW g Display Subwoofer Shortcut f Afficher raccourci caisson d Verknüpfung zu „Subwoofer‘ anzeigen n Subwoofer kortweg aanduiding Möglich
Pembroke Avenue, Waterbeach, CAMBRIDGE CB5 9QR, England Issue B SH170