
Operation Manual


AV9
E-18
English
AV9
E-19
English
Saving Settings, User Presets and Exiting the Setup Menu
To save the AV9 set-up:
1. Press MENU to go to the Setup Menu Index at the Save Setup point.
2. Press OK to go to the Save Settings menu.
User Presets
All the settings you have made on the previous screens can be saved as a user pro le
and stored as one of ve ‘Presets’. A choice of setup presets caters for different events
such as movies or sport, and for different user preferences.
3. Press
B
C
to select the desired preset in which to save the setting.
To make these customised settings easier to retrieve, you can give each preset a
memorable name, such as ‘John’, ‘Jacky’, ‘Movies’, ‘Sport’, ‘Rock’, etc.
The presets can be used to create different listening preferences. You may wish to set up different
presets for listening to music, watching DVD, watching TV material or for different listening positions.
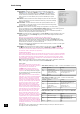
To change the name of a preset, highlight it by using the navigation
B
and
C
buttons. Press the OK
button to edit. Using the
B
and
C
navigation buttons, cycle through and select lower case letters
(a…z), upper case letters (A…Z) and numbers (0…9). Move along the line using the
D
and
E
buttons.
When you are satis ed with the text you have written, press OK to specify the preset saving options.
Preset saving options
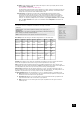
This menu gives you the option to change which settings are saved for each preset.
The following options are available:
Volume setting: If Yes is selected, the volume for Zone 1 is recalled on loading this preset.
Input source: If Yes is selected, the audio and video input souces are recalled on loading this preset.
Src speci c items (Source-speci c items): Each source has its own value for each of the settings
listed below. If Yes is selected, the preset stores all of the following settings for each source:
<
Decode mode
<
THX setting
<
Downmix setting
<
Effect mode
From Main Menu Screen 1:
<
Video Type
<
Treble
<
Bass
From Main Menu Screen 2:
<
Lip Sync.
<
Record to VCR
<
Record to Tape
From Advanced Menu 4 – Zone 2:
<
Zone 2 max. volume
<
Zone 2 OSD setting
<
Zone 2 xed volume
<
Zone 2 access settings
<
Zone 2 max. on volume
From Advanced Menu 5 – Input Trims:
<
Analogue Input gain settings for all sources.
Other Zone 2 settings:
<
Zone 2 audio source
<
Zone 2 video source
Once you have speci ed the settings you wish to save, highlight the Save text and press OK.
4. After the AV9 has nished saving, press OK to return to the ‘Setup Menu Index’.
5. Press OK to select ‘Exit Setup’ and exit system con guration.
Exit without saving
If you choose to ‘Exit Setup’ without rst saving the changes, then these new settings will be used by
the AV9 until you recall a preset or press FAV on the remote control, when the last used preset will be
recalled. This is the case even if the AV9 is put into stand-by or turned off.
1. Press MENU to go to the Setup Menu Index at the Save Setup point.
2. Press
E
to select Exit Setup.
3. Press OK when Exit Setup is selected to exit system con guration.
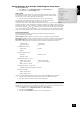
Save Settings
No Save - Return to index
Save as:Preset 1*
Preset 2
Preset 3
Preset 4
Preset 5
Press OK to edit- OK to save