Pre Amplifier C30 Power Amplifier P35 Power Amplifier P1 Préamplificateur C30 Amplificateur de Puissance P35 Amplificateur de Puissance P1 Vorverstärker C30 Vollverstärker P35 Vollverstärker P1
Safety guidelines CAUTION ATTENTION RISK OF ELECTRIC SHOCK DO NOT OPEN RISQUE DE CHOC ELECTRIQUE NE PAS OUVRIR 8. Cleaning Unplug the unit from the mains supply before cleaning. The case should normally only require a wipe with a soft, damp, lintfree cloth. Do not use paint thinners or other chemical solvents for cleaning. CAUTION:To reduce the risk of electric shock, do not remove cover (or back). No user serviceable parts inside. Refer servicing to qualified service personnel.
Thank you for buying this quality Arcam product. CONTENTS This handbook is for the following items: C30 pre-amplifier P35 power amplifier P1 power amplifier. Safety guidelines ............................................................................. 2 Important safety instructions ...........................................................2 Safety compliance...................................................................................
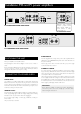
Installation: C30 pre-amplifier L PHONO R VOLTAGE SELECT POWER INLET TRIG OUT REMOTE IN L L R R 115/230V R BUFFERED DIRECT L PRE OUT MM MC RECORD PLAY OUT IN TAPE/PROC RECORD PLAY OUT IN VCR/TAPE 2 DVD AV TUNER CD AUX the amplifier. This is perfectly normal. If the unit is to be left unused for an extended period, we recommend that it is disconnected from the mains supply by switching it off at the wall socket. POSITIONING THE UNIT Place your amplifier on a level, firm surface.
3 TRIG OUT and REMOTE IN (12V in and out) – These connections are intended for use in multi-room installations. CONNECTING TO OTHER EQUIPMENT – This output provides a 12V signal whenever the unit is switched on (i.e., not off or in standby).This signal can be used to switch on automatically power amplifiers (or other equipment) connected to the C30, as they will come on when the C30 is activated. This is useful if the power amplifier is remote from the C30, or otherwise difficult to access.
Using your C30 pre-amplifier C30 PRE-AMPLIFIER ENTER MODE RECORD SELECT PHONO/AUX CD If your amplifier has not been installed for you, you should first read the section ‘Installation: C30 pre-amplifier’ on page 5. bn Switches the unit on and off. VCR TAPE TONE MUTE DISPLAY PHONES POWER It is possible to compensate for these input level differences by using the ‘Input trims’ menu item. See page 9 for further details on how to do this.
RECORDING With the C30 it is possible to listen to and record from one source, or to listen to one source while recording another. RECORD Englis h Both sets of tape sockets are identical in sensitivity and suitable for use with almost any type of recorder (cassette, CDR, MD, VCR, reel-toreel, etc.). The record signal is sent to both the TAPE and VCR output sockets. 3 To record the currently selected source, press RECORD until the display shows ‘RECORD SOURCE’.
Setting up your C30 pre-amplifier INTRODUCTION Volume Resolution – Standard, fine or Reference. ‘Standard’ and ‘Fine’ represent different levels of volume control sensitivity. The ‘Reference’ setting gives absolute increments in 0.5dB steps. The C30 allows you to adjust listening settings to suit your taste, and to customize various features of the amplifier to fit your system. Use this diagram to help you navigate through the settings available.
Using the remote control CR-389 Remote Control Englis h The CR-389 remote control gives access to all functions available on the front panel of the C30. It also has controls to operate Arcam CD players, AM/FM tuners and DAB tuners. The remote control transmits Philips RC-5 type codes. TUNER These buttons are used to control tuner functions. Note that the FM/DAB lights indicate into which mode you are switching the remote control. The lights only illuminate for five seconds to conserve battery power.
Installation: P35 and P1 power amplifiers + R/CH1 – + L/CH2 – + CTR/CH3 – SP2 SP2 4 – 16 OHMS TRIG OUT 230V VOLTAGE SELECT SP1 REMOTE IN POWER INLET + R/CH1 – AUDIO LINK SP1 R + L/CH2 – CTR/CH3 4 – 16 OHMS L IN AUDIO IN OUT + CTR/CH3 – OUT Optional Third Channel Module – provides a third 90W channel suitable for Home Cinema or multichannel audio use.
There are two options for connecting the speaker cable to the amplifier: CONNECTING TO OTHER EQUIPMENT AUDIO IN (P35) AUDIO IN and BALANCED AUDIO IN (P1) 1. Strip back the insulation on the wire to reveal about 2cm of conductor (the metal inside the cable). Connect one of these inputs to the output sockets of your preamplifier or the PRE OUT sockets of an integrated amplifier.
Using your power amplifier P35 POWER AMPLIFIER SP1 SP2 POWER P35 POWER AMPLIFIER: FRONT PANEL P1 POWER AMPLIFIER POWER P1 POWER AMPLIFIER: FRONT PANEL POWER (AND POWER INDICATOR LIGHT) SP1 AND SP2 (P35 ONLY) This button switches the unit on and off. The light indicates the status of the amplifier. These buttons allow you to switch on and off the main (SP1) and secondary (SP2) sets of speakers attached to your amplifier.
BEFORE YOU START BI-AMPING YOUR SYSTEM The performance of your system can be further enhanced over that achieved with bi-wiring, by extending the principle one stage further to include separate amplification for the low and high frequency drive units in each loudspeaker enclosure. WARNING: Do not make any connections to your amplifier while it is switched on or connected to the mains supply.
Technical specifications C30 P35 Continuous power output (20Hz—20kHz at 0.5% THD), per channel Both channels, 8Ω, 20Hz—20kHz Single channel, 8Ω, 20Hz—20kHz Both channels, 4Ω, 20Hz—20kHz Single channel, 4Ω, at 1kHz Three channels, 8Ω, 20Hz—20kHz Harmonic distortion, 80% power, 8Ω at 1kHz Inputs Phono cartridge: Input sensitivity Input impedance Signal/noise ratio (CCIR) Overload margin Line and tape inputs: Nominal sensitivity Input impedance Signal/noise ratio (CCIR) Tone controls, max.
Remote-control codes Englis h The following table gives the IR-commands accepted by the C30.
Service information Before returning your amplifier for service, please check the following: AMPLIFIER DOES NOT SWITCH BACK ON SOUND CUTS OUT FOR NO REASON The C30, P35 and P1 amplifiers have a protection mechanism which is activated if you switch the unit on immediately after turning it off. If this mechanism activates, wait 30 seconds then try again. If the temperature of the internal heatsink rises above a safe level, then a thermal cutout inside the amplifier will operate.
Englis h NOTES 17
Consignes de sécurité CAUTION ATTENTION RISK OF ELECTRIC SHOCK DO NOT OPEN RISQUE DE CHOC ELECTRIQUE NE PAS OUVRIR 8. Nettoyage Débranchez l’appareil du secteur avant de le nettoyer. Pour le nettoyage, utilisez un chiffon doux, humide et non pelucheux. N’utilisez pas de diluant pour peinture ou de solvant chimique. ATTENTION : Pour éviter tout risque de choc électrique, ne pas enlever le couvercle (ou le panneau arrière). Aucune intervention n’est possible pour l’utilisateur.
Utilisation de ce manuel Merci d’avoir acheté cet appareil Arcam de qualité. TABLE DES MATIÈRES Cette notice porte sur les appareils suivants : Préamplificateur C30 Amplificateur de puissance P35 Amplificateur de puissance P1. Consignes de sécurité ................................................................ 18 Conseils de sécurité importants ................................................. 18 Conformité aux normes de sécurité........................................
Installation : Préamplificateur C30 L PHONO R VOLTAGE SELECT POWER INLET TRIG OUT REMOTE IN L L R R 115/230V R BUFFERED DIRECT L PRE OUT MM MC RECORD PLAY OUT IN TAPE/PROC RECORD PLAY OUT IN VCR/TAPE 2 DVD AV TUNER CD AUX Cela signifie que même si l’interrupteur est éteint, il se peut que le transformateur secteur qui se trouve dans l’amplificateur émette un léger ronflement résiduel. Cela est tout à fait normal.
3 TRIG OUT et REMOTE IN (entrée et sortie 12 V) – Ces connexions sont prévues pour les installations multipièces. BRANCHEMENT SUR UN AUTRE APPAREIL – Cette sortie émet un signal de 12 V chaque fois que l’appareil est allumé (c’est-à-dire lorsqu’il n’est pas éteint ou en stand-by). Ce signal peut être utilisé pour allumer automatiquement les amplificateurs de puissance (ou tout autre appareil) branchés sur le C30, du fait qu’ils s’allumeront lorsque le C30 sera activé.
Utilisation du préamplificateur C30 C30 PRE-AMPLIFIER ENTER MODE RECORD SELECT PHONO/AUX CD Si votre amplificateur n’a pas été installé par le concessionnaire, lisez d’abord la section Installation : Préamplificateur C30, à la page 20. bn Allume et éteint l’appareil. Le voyant de mise sous tension (qui se trouve directement au-dessus de l’interrupteur) reflète l’état de l’amplificateur.
ENREGISTREMENT Le C30 permet d’écouter et d’enregistrer à partir d’une même source ou d’écouter à partir d’une source et d’enregistrer à partir d’une autre. Les deux ensembles de bornes sont identiques en terme de sensibilité et acceptent à peu près tous les types d’appareils d’enregistrement (cassette, lecteur de CD, MD, magnétoscope, bobine, etc.). Le signal d’enregistrement est envoyé aux deux bornes, TAPE et VCR.
Réglage du préamplificateur C30 INTRODUCTION Le C30 peut être réglé en fonction de vos préférences d’écoute et diverses fonctions permettent de l’adapter à votre système. Référezvous à ce schéma pour naviguer parmi les divers réglages. Les boutons ENTER et SELECT qui se trouvent sur le panneau avant sont représentés sur le schéma par les symboles respectivement.
La télécommande TÉLÉCOMMANDE CR-389 Fra nça is La télécommande CR-389 permet d’accéder à toutes les fonctions du panneau avant du C30. Elle est aussi dotée de boutons commandant les lecteurs de CD, les syntoniseurs AM/FM et les syntoniseurs radio numériques Arcam. Cette télécommande transmet les codes Philips de type RC-5. SYNTONISEUR Ces boutons servent à contrôler les fonctions du syntoniseur. Notez que les voyants FM/DAB indiquent dans quel mode vous passez la télécommande.
Installation: Amplificateurs de puissance P35 et P1 + R/CH1 – + L/CH2 – + CTR/CH3 – SP2 SP2 4 – 16 OHMS TRIG OUT VOLTAGE SELECT 230V SP1 REMOTE IN + R/CH1 – POWER INLET AUDIO LINK SP1 R + L/CH2 – CTR/CH3 4 – 16 OHMS L IN AUDIO IN OUT + CTR/CH3 – OUT Module troisième canal en option – fournit un troisième canal de 90 W pour cinéma maison ou système d’amplification à canaux multiples.
Le fil du haut-parleur peut être branché sur l’amplificateur de deux façons : BRANCHEMENT SUR UN AUTRE APPAREIL Les amplificateurs P35 et P1 permettent les branchements suivants : 1. AUDIO IN (P35) AUDIO IN et BALANCED AUDIO IN (P1) Retirez l’isolant pour dégager environ 2 cm de conducteur (le métal à l’intérieur du fil) ; 2. Branchez l’une de ces entrées sur les sorties du préamplificateur ou sur les bornes PRE OUT d’un amplificateur intégré.
Utilisation de l’amplificateur de puissance P35 POWER AMPLIFIER SP1 SP2 POWER AMPLIFICATEUR DE PUISSANCE P35 : PANNEAU AVANT P1 POWER AMPLIFIER POWER AMPLIFICATEUR DE PUISSANCE P1 : PANNEAU AVANT POWER (ET VOYANT DE MISE SOUS TENSION) SP1 ET SP2 (P35 UNIQUEMENT) Ce bouton allume et éteint l’appareil. Le voyant reflète l’état de l’amplificateur. Ces boutons vous permettent d’allumer et d’éteindre les ensembles de haut-parleurs principal (SP1) et auxiliaire (SP2) branchés sur l’amplificateur.
Bi-câblage et bi-amplification des haut-parleurs AVANT DE COMMENCER SYSTÈME À DOUBLE AMPLIFICATION sur Avant de l’allumer, vérifiez avec soin toutes les connexions, pour vous assurer qu’il n’y a pas de fil nu en contact avec l’amplificateur là où il ne faut pas (ce qui pourrait causer un court-circuit), et que vous avez bien raccordé toutes les bornes positives (+) aux bornes positives et les bornes négatives (–) aux bornes négatives.
Spécifications techniques C30 P35 Puissance de sortie continue (20Hz—20kHz à 0,5 % THD), par canal Deux canaux, 8Ω, 20Hz—20kHz Un canal, 8Ω, 20Hz—20kHz Deux canaux, 4Ω, 20Hz—20kHz Un canal, 4Ω, à 1kHz Trois canaux, 8Ω, 20Hz—20kHz Harmonic distortion, 80% power, 8Ω à 1kHz Entrées Cartouche phono : Sensibilité d’entrée Impédance d’entrée Rapport signal/bruit (CCIR) Marge de surcharge Entrées de ligne et de bande : Sensibilité nominale Impédance d’entrée Rapport signal/bruit (CCIR) Commandes de tonalité, amp
Tableau des commandes IR Le tableau qui suit indique les commandes infrarouges acceptées par le modèle C30.
Service Avant d’envoyer votre amplificateur pour le faire réparer, vérifiez ce qui suit : Notez que, étant donné la tension de sortie élevée du lecteur de CD, il est possible de faire fonctionner le P35/P1 à pleine puissance même si la puissance du C30 n’est pas réglée au maximum. COUPURE DU SON SANS RAISON L’AMPLIFICATEUR NE SE RALLUME PAS Si la température de la plaque de refroidissement interne dépasse le seuil de sécurité, un coupe-circuit qui se trouve à l’intérieur de l’amplificateur se déclenche.
Fra nça is NOTES 33
Sicherheitsrichtlinien CAUTION ATTENTION RISK OF ELECTRIC SHOCK DO NOT OPEN RISQUE DE CHOC ELECTRIQUE NE PAS OUVRIR 7. Racks und Regale Benutzen Sie nur Racks und Regale, die für die Verwendung mit Audiogeräten geeignet sind. Bewegen Sie die Anlage sehr vorsichtig, wenn sie sich auf einem fahrbaren Regal befindet, um ein Umfallen zu vermeiden. ACHTUNG: Um das Risiko eines Elektroschocks zu minimieren, sollten Sie die Abdeckung (Rückseite) nicht entfernen.
Hinweise zum Handbuch Danke, dass Sie sich für dieses Qualitätsprodukt von Arcam entschieden haben. INHALT Dieses Handbuch dient für die folgenden Artikel: Sicherheitsrichtlinien................................................................... 34 Wichtige Sicherheitsanweisungen.............................................. 34 Einhaltung von Sicherheitsbestimmungen.............................. 34 C30 Vorverstärker P35 Vollverstärker P1 Vollverstärker. Hinweise zum Handbuch .....................
Montage: Der C30 Vorverstärker L PHONO R VOLTAGE SELECT POWER INLET TRIG OUT REMOTE IN L L R R 115/230V R BUFFERED DIRECT L MM MC RECORD PLAY OUT IN TAPE/PROC PRE OUT RECORD PLAY OUT IN VCR/TAPE 2 DVD AV TUNER CD AUX kommt. Das ist vollkommen normal. Wenn das Gerät längere Zeit nicht verwendet wird, nehmen Sie es vom Netz und ziehen Sie den Stecker aus der Steckdose. AUFSTELLEN DES GERÄTS Stellen Sie Ihren Verstärker auf eine ebene, feste Unterlage.
Der C30 bietet folgende Anschlüsse: 3 TRIG OUT und REMOTE IN (12V Ein und Aus) – Diese Anschlüsse sind für den Gebrauch in Mehrraum-Installationen gedacht. 7 TAPE/PROC RECORD OUT – Schließen Sie diese Ausganganschlüsse an die Einganganschlüsse Ihres Kassettendecks an (normalerweise als RECORD auf dem Kassettendeck gekennzeichnet). TRIG OUT – Dieser Ausgang bietet ein 12V-Signal, wo immer das Gerät eingeschal-tet wird (d.h. nicht Aus oder im Standby-Modus).
Verwendung Ihres Vorverstärkers C30 C30 PRE-AMPLIFIER ENTER MODE RECORD SELECT PHONO/AUX CD Wenn Ihr Verstärker nicht für Sie montiert wurde, lesen Sie bitte zunächst das Kapitel ‚Montage’: Der C30 Vorverstärker‘ auf Seite 36. bn Schalten das Gerät ein und aus. 1 Gerätauswahl Der Infrarotempfänger der Fernbedienung liegt hinter der ‚FMJ‘-Marke. Stellen Sie sicher, dass der Empfänger von der Fernbedienung aus gesehen wird, damit die Signale empfangen werden können.
AUFNAHME Mit dem C30 können mit einem Gerät hören und aufnehmen oder mit einem Gerät hören und einem weiteren aufnehmen. Beide Kassettenbuchsen sind gleich empfindlich und geeignet für die Verwendung mit fast jedem Recordertyp (Kassetten, CRD, MD, VCR, Spulengeräte etc.). Das Aufnahmesignal wird sowohl an die TAPE(Band) als auf VCR-Ausgangbuchsen gesendet. RECORD (Aufnahme) 3 Um vom ausgewählten Gerät aufzunehmen, halten Sie RECORD gedrückt, bis auf der Anzeige ‚RECORD SOURCE‘ (Aufnahmegerät) erscheint.
Einstellen Ihres Vorverstärkers Typ C30 EINLEITUNG Mit dem C30 können Sie die Abhöreigenschaften nach Belieben einstellen und den Verstärker an Ihr System anpassen. Verwenden Sie dieses Schaubild, um durch die verschiedenen Einstellmöglichkeiten zu navigieren. Die ENTER und SELECT-Knöpfe auf der Frontblende werden auf dem Schaubild mit den Symbolen bzw. .
Verwendung der Fernbedienung CR-389 FERNBEDIENUNG Mit der Fernbedienung CR-389 können alle Funktionen auf der Frontblende des C30 bedient werden, ebenso Arcam CD-Player, AM/ FM-Tuner und DAB-Tuner. Die Fernbedienung überträgt Philips-codes Typ RC-5. Tuner Wenn keine Leuchte an ist, bedeutet dies nicht, dass die Fernbedienung nicht funktioniert! (nach OBEN und nach UNTEN) Haben dieselbe Funktion wie die Knöpfe auf der Frontblende (s. Seite 38).
Montage:Vollverstärker P35 und P1 + R/CH1 – + L/CH2 – + CTR/CH3 – SP2 SP2 4 – 16 OHMS TRIG OUT VOLTAGE SELECT 230V SP1 REMOTE IN POWER INLET + R/CH1 – AUDIO LINK SP1 R + L/CH2 – CTR/CH3 4 – 16 OHMS L IN AUDIO IN OUT + CTR/CH3 – OUT Optional drittes Kanalmodul – bietet einen dritten 90WKanal für Heimkino mit Mehrkanalaudioanwendung.
LEITUNGEN MIT BLANKEN DRAHTENDEN: ANSCHLUSS AN ANDERE GERÄTE Die Verstärker P35 und P1 haben die folgenden Anschlüsse: 1. Isolierung auf dem Draht abziehen und ca. 2 cm des Leiters freigeben (das Metall im Kabel). 2. Wenn der Leiter verseilt ist, verwinden Sie die beiden Stränge fest miteinander, damit keine losen Stränge mit dem angrenzenden Anschluss oder der rückseitigen Blende Kontakt haben. 3. Lockern Sie den Anschluss, indem Sie ihn gegen den Uhrzeigersinn drehen. 4.
Verwendung Ihres Vollverstärkers P35 POWER AMPLIFIER SP1 SP2 POWER P35 VOLLVERSTÄRKER:VORDERE BLENDE P1 POWER AMPLIFIER POWER P1 VOLLVERSTÄRKER:VORDERE BLENDE NETZSCHALTER (UND NETZKONTROLLLEUCHTE) SP1 UND SP2 (NUR P35) Mit diesen Knöpfen können Sie die Haupt-(SP1) und Zweitsatz (SP2) der Lautsprecher, die mit Ihrem Verstärker verbunden sind, bedienen. Wenn Die Kontrollleuchte (über dem Schalter) an ist, so bedeutet dies, dass der Ausgang für die Lautsprecher eingeschaltet ist.
Doppelte Verkabelung und Verstärkung von Lautsprechern DOPPELTE VERSTÄRKUNG IHRES SYSTEMS VORBEREITUNGSMAßNAHMEN Die Leistung Ihres Systems kann über die doppelte Verkabelung hinaus weiter verbessert werden, indem Sie die das System mit einer separaten Verstärkung der Antriebe für die niedrigen und hohen Frequenzen in jedem Lautsprecher erweitern. WARNUNG: Nehmen Sie keine Anschlüsse an Ihrem Verstärker vor, wenn er eingeschaltet ist oder am Netz hängt.
Technische Spezifikationen C30 P35 Kontinuierliche Nutzleistung (20Hz—20kHz bei 0,5% THD), pro Kanal Beide Kanäle, 8Ω, 20Hz—20kHz Einzelner Kanal, 8Ω, 20Hz—20kHz Beide Kanäle, 4Ω, 20Hz—20kHz Einzelner Kanal, 4Ω, bei 1kHz Drei Kanäle, 8Ω, 20Hz—20kHz Harmonieverzerrung, 80% Leistung, 8Ω bei 1kHz Eingang Phonokassette: Eingangsempfindlichkeit Eingangsimpedanz Signal-/Geräuschverhältnis (CCIR) Überlastmarge Leistungssignal und Bandeingang: Nominale Empfindlichkeit Eingangsimpedanz Signal-/Geräuschverhältnis (
Codes für die Fernbedienung Die folgende Tabelle zeigt die Infrarotbefehle, die vom C30 akzeptiert werden.
Kundendienstinformation VERSTÄRKER SCHALTET NICHT WIEDER EIN Bevor Sie Ihren Verstärker zur Reparatur einreichen, prüfen Sie bitte wie folgt: Die Verstärker C30, P35 und P1 haben einen Schutzmechanismus, der aktiviert wird, wenn Sie das Gerät sofort nach Abschalten wieder Einschalten. Wenn dieser Mechanismus aktiviert wird, warten Sie 30 Sekunden und versuchen Sie es noch einmal.
D e ut s ch NOTIZEN 49
NOTIZEN 50
D e ut s ch NOTIZEN 51
PEMBROKE AVENUE, WATERBEACH, CAMBRIDGE CB5 9QR, ENGLAND telephone +44 (0)1223 203200 fax +44 (0)1223 863384 email support@arcam.co.uk website www.arcam.co.