H A N DBOOK AVR350 Arcam AVR350 surround sound receiver English
Safety guidelines CAUTION ATTENTION RISK OF ELECTRIC SHOCK DO NOT OPEN RISQUE DE CHOC ELECTRIQUE NE PAS OUVRIR CAUTION: To reduce the risk of electric shock, do not remove cover (or back). No user serviceable parts inside. Refer servicing to qualified service personnel. WARNING: To reduce the risk of fire or electric shock, do not expose this apparatus to rain or moisture.
Contents Safety guidelines....................................... E-2 English Important safety instructions............................. E-2 Safety compliance............................................ E-2 Before you start!....................................... E-4 Installation............................................... E-6 Positioning the unit........................................... E-6 Notes on installing the AVR350........................... E-6 Audio connections..............................
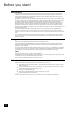
Before you start! Introduction The AVR350 is a high quality and high performance home cinema processor and multi-channel audio amplifier built to Arcam’s traditional high quality design and manufacturing standards. It combines high resolution digital processing with high performance audio and video components to bring you an unrivalled home entertainment centre.
Before making connections Before connecting your equipment it is important to think about the following points, as these will affect your choice of connections and subsequent use of the system. Audio English Wherever possible, connect both analogue and digital outputs of digital sources. This enables use of a digital input for the main zone with the corresponding analogue input used for recording onto an analogue tape deck or VCR, or for the Zone 2 output.
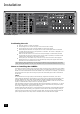
Installation ������� �� �� ���� � ��� �� ������ ����� ��� ��� ��� ��� ������� ������������� ��� �� �� ��� ��� ��� ��� �� �� ������� ��� �� �� ���� ������� ������� ��� �� �� ��� ��� ��� ��� ��� ��� ��� ���������� ������ �� ������ ���� ��� �� ��� �������� � �� � � �� � ������ � ����� ���� � � ����� ���������� The AVR350 rear panel Positioning the unit < < < < Place the receiver on a level, firm surface.
< Wherever possible, connect both the analogue and digital outputs of digital sources. This enables use of a digital input for the main zone and the corresponding analogue input for recording onto an analogue tape deck or VCR, and for the Zone 2 output if used. < Take care to place the audio cables as far from any power supply cabling as is practically possible to reduce hum and other noise problems. Analogue audio connections Stereo Inputs 2 VCR, 4 PVR, 5 AV, 6 SAT, 7 DVD, br TAPE IN, bs CD.
Video connections The AVR350 allows for conversion between different video formats. This means that the AVR350 can convert between composite, S-video and component, if required. For example, if you are watching a composite input from a VCR, you may view it from the S-video or Component/RGB video outputs of the AVR350. This allows you to use a single (typically high-quality Component/RGB) connection between the AVR350 and your display device. The record loops do not work from the video converter.
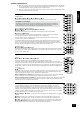
HDMI An HDMI connection between a source and your display device offers the best possible picture quality. This connection type is, however, the most limiting in terms of routing, advised cable length and conversion. DVD HDMI IN SAT HDMI OUT English The AVR350 provides two HDMI inputs; these are labelled ‘DVD’ and ‘SAT’ in anticipation of the most common use for these connectors, but they may be used for any HDMI source.
Zone 2 connections The AVR350 allows independent routing and control of analogue audio and composite video to a second room such as a kitchen, bedroom or lounge. This second room is known as ‘Zone 2’. ZONE 2 For Zone 2, the AVR350 outputs a line-level audio signal taken from the stereo analogue audio, and a composite video signal taken from the composite video input (for a given source).
Control connections es (REMOTE) OUT. This outputs any remote control signal that is received by one of the two remote �� �� �� control inputs described below (but not signals received from the front-panel). It allows remote control of source components; control is possible by either connecting this output to the devices to be controlled via the 3.
Configuring the AVR350 The AVR350 ‘Set-up Menu’ has six ‘Basic’ and five ‘Advanced’ menu screens that take you through the configuration process. The ‘Basic’ menus enable you to match your AVR350 to your speakers; the ‘Advanced’ menus allow you to optimise the operation of your system. Screen shots of these menus are shown in shaded boxes on the following pages. The best way to set up the AVR350 is using the on-screen display (OSD).
The ‘Basic’ Set-up Menus 1 – General Settings: Max Volume: This limits the maximum volume setting the system can be turned up to. This is a useful feature to prevent accidental overdriving of low powerhandling speakers, for example. English Max On Volume: Limits the maximum volume the system operates at when it is first switched on. The system comes on at the ‘Max On Volume’ if the last used (possibly very loud) volume exceeds this value.
HQ Video: Choose between RGB or YUV; if you have a YUV display, set this item to YUV, otherwise set it to RGB. Note that this setting has no effect on the HDMI output. This setting controls the routing of the HQ-video within the AVR350, either as 3-wire YUV or 4wire RGB signals (with the synchronisation signal on composite for RGB). In addition, it controls the operation of the S-video/composite-to-HQ video converter.
Sub Stereo: This setting allows the volume level of the subwoofer to be adjusted for when the subwoofer is being used with 2-channel (stereo) sources. The subwoofer level for stereo music often needs to be set at a lower level than that for cinema use; use this trim setting, with a stereo source, to reduce the subwoofer output in stereo playback to an acceptable level. The level required depends on various factors such as speakers, the types and styles of music to be played and personal taste.
5 – Level settings The relative sensitivity of different speakers can lead to some speakers sounding disproportionately loud or quiet, relative to others in the system. The level settings of your AVR350 can help to address this inbalance. It is important to calibrate the speakers correctly to achieve an accurately centred sound stage. If possible, we recommend you use a sound pressure level meter (SPL meter) to perform this part of the set-up as it is difficult to judge the levels accurately by ear alone.
The ‘Advanced’ Set-up Menus ADV 1 – Speaker Eq. English This allows fine adjustment of bass and treble in 1dB steps (up to ±6dB) for each of the speakers in the system. Use these adjustments sparingly to compensate for speaker response problems caused by positioning, adjacent surface textures, or mixed brands of loudspeakers.
ADV 4 – Zone 2 Settings Zone2 vol: Sets the volume for Zone 2. Max Vol 20–83: Limits the maximum volume setting for Zone 2. This is a useful feature to prevent accidental overdriving of low power-handling speakers, for example. Fix Vol: This selects between fixed and variable audio output to Zone 2. If No is selected, the output level can be controlled from Zone 2 or the main system. If you wish to fix the volume level, first set the Zone 2 volume to the desired level, then select Yes.
Remote control For information on using the remote control for other devices, and a full list of features, see the instruction booklet supplied with the CR80. English The CR80 remote control is a multi-function unit that controls the AVR350 and up to seven other devices. The instructions on this page only refer to the control of the Arcam AVR350. Device selection IMPORTANT: Press the ‘AMP’ button first to operate the AVR350.
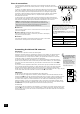
Operating your AVR350 ��������������������������� �������� �������� ���� ����� ������ ������� ���� ������� � � � � � � � �� � ������������� ������������������������������������������ ������ ��� ������ ������ ������ ���� ���� ���� �� ��� ��� �� ��� ��� ���� �� �� �� ��� ������ ������ ������� ���� ����� For information display we recommend you use the OSD on your TV/screen whenever possible.
Input selection To select a particular source, press the corresponding button on the front panel or on the remote control. There are eight inputs available: DVD, Sat, AV, PVR, VCR, Tape, CD and MCH (DVD-A multi-channel). In addition, AM and FM radio reception can be selected from the built-in tuner. Any picture signal associated with the selected input is switched to the monitor output.
Effects/FX Effect Description The EFFECT button (FX on the remote) cycles through the available effect modes. The effects are only available when the AVR350 is in stereo mode. None No effects active, stereo signal Music Extracted ambience and centre information For more information on the effects, see the section ‘DSP Effects Modes’, page 25.
Using the tuner The AVR350’s radio tuner can be controlled from the upper row of front panel buttons (see diagram, below) or from the remote control handset. Note that the tuner behaviour can be seen only via the frontpanel display, as there is no on-screen display for the tuner. Tuning to a station �������� �������� ���� ����� ������� ���� ������� English Pressing the PRESET/TUNE button (or TM on the remote) toggles between the two tuning modes of the unit – ‘Tune’ or ‘Preset’.
FM Mute/Mono The AVR350’s tuner has an auto-muting circuit that, when engaged, mutes any signal that is of insufficient strength for listening. To engage this circuit press the FM MUTE/MONO button on the front panel: ‘FM MUTE’ is shown in the display. If a signal is muted you will hear no sound through the loudspeakers. Should you wish to listen to a station that is ‘auto muted’ press the FM MUTE/MONO button again to disengage the muting circuit.
Main Menu Screen 2 English Compression: Allows selection of three different compression ratios (off, medium and high), where the higher compression is intended for ‘late night’ listening. The compression effect increases the volume of the quiet passages and decreases the volume of the louder passages. Compression can be disabled by setting this item to Off. Compression is only available on Dolby Digital recordings and on some DTS recordings.
Surround modes Introduction Your AVR350 processor provides all the key decoding and processing modes for analogue and digital signals. Modes for Digital sources Digital recordings are usually encoded to include information about their format type. The AVR350 detects automatically the relevant format in a digital signal, such as Dolby Digital or DTS, and switches in the appropriate decoding.
Two-channel source modes The following decoding and surround modes are available: < < < < Mono Stereo Pro Logic II/IIx Movie < < < Pro Logic Emulation Neo:6 Cinema Neo:6 Music Pro Logic II/IIx Music English These modes are available with two-channel analogue and two-channel PCM digital sources (although a Dolby Digital 2.0 source may only be decoded as Mono, Stereo or Pro Logic IIx Movie). Mono: The AVR350 will combine the left and right audio channels from a stereo signal to produce a mono signal.
DTS-ES 6.1 Discrete: This is a true discrete 6.1 channel sound format (unlike DTS-ES 6.1 Matrix where the sixth (surround centre) channel information is extracted from the two surround channels). DTS-ES 6.1 Discrete mode operates only on sources with DTS-ES 6.1 Discrete audio encoding, such as certain DVD discs. A list of available software titles with DTS-ES 6.1 Matrix and DTS-ES 6.1 Discrete titles can be found at www.dtsonline.com.
Bi-wiring and bi-amping loudspeakers Bi-wiring improves the sound of your system as it divides the high and low frequency signal currents into separate speaker cables. The performance of your system can be further enhanced over that achieved with bi-wiring by extending the principle one stage further to include separate amplification for the low English and high frequency drive units in each loudspeaker enclosure. This is called ‘bi-amping’. Before you start – important information! 1.
Bi-amping using an external power-amplifier To bi-amplify your speakers using one or more external power amplifiers, you will need as many channels of amplification as there are channels you wish to bi-amplify. For example, to bi-amplify just the front left and right channels, a two-channel amplifier such as the Arcam P90 is required; to biamplify all seven channels, either multiple two-channel amplifiers or a single seven-channel amplifier (or some variation thereof) are required.
There are no lights on the unit: No On-Screen Display (OSD) overlaid on video: Check that: The AVR350 cannot overlay video onto progressive scan or HDTV signals. In this case, the AVR350 creates a full screen display with a black background for the menus and turns off the pop up messages. < the power cord is plugged into the AVR350 and the mains socket outlet it is plugged into is switched on. < < the power button is pressed in. the mains fuse in the plug (if applicable) has not blown.
When playing a Dolby Digital DVD, the AVR350 selects Dolby Pro Logic: No centre image (vocal) in Zone 2 when using the multi-channel input: Check that: Most DVD/SACD players are unable to provide a twochannel down-mix of source material at the same time as decoding a multi-channel audio stream. Therefore, only the front left and right channels from the multi-channel mix will be available in Zone 2. To overcome this, play the stereo mix from the DVD-audio disc instead.
IR Remote Codes The following information is supplied for owners of advanced programmable remote controls, such as the Philips ‘Pronto’ and similar devices, where it is possible to program remote codes directly into the device. English The coding system for the AVR350 is based on the Philips RC-5 standard. The main system control uses RC-5 system codes ‘16’, with the tuner section using system code ‘17’ (this is to provide compatability with existing ARCAM tuners).
These extra commands on code 17 allow full control of the tuner in the AVR350 using the remote control supplied with the T61/T31. The AVR350 responds to these commands in both the main zone and Zone 2. System code 17.
SCART connections These pinouts describe the signal connections between the AVR350 and your display device input.
Technical specifications Analogue audio inputs Line input sensitivity Overload margin Input impedance 0.5/1/2/4V rms (2V rms normal) +2dB >22kΩ Analogue audio outputs Level (at 0dB gain) 2V rms Maximum level 3.5V rms Impedance 600Ω Signal/Noise ratio (analogue input) 100dB unweighted (measurement bandwidth 22kHz) Signal/Noise ratio (digital input) 100dB unweighted (measurement bandwidth 22kHz) THD+N (analogue input) 90dB (0.003%) (measurement bandwidth 22kHz) THD+N (digital input) 90dB (0.
Guarantee Worldwide Guarantee English This entitles you to have the unit repaired free of charge, during the first two years after purchase, at any authorised Arcam distributor provided that it was originally purchased from an authorised Arcam dealer or distributor.
Appendix: Serial programming interface Introduction This section describes the remote control protocol for controlling the AVR350 via the RS232 interface. Conventions < All values in this section are hexadecimal values, unless otherwise specified. Data transfer format < < Transfer rate: 38,400bps. 1 start bit, 8 data bits, 1 stop bit, no parity, no flow control.
Command Specifications / Spécifications des commandes / Befehlsspezifikationen / Opdrachtspecificaties g Change the stand-by state of a zone. f Modifiez l’état de veille d’une zone. d Ändern des Stand-by-Zustands einer Zone. n De standby-status van een zone wijzigen.
Close a menu / Fermeture d’un menu / Schließen eines Menüs / Een menu sluiten Command: g Close one of the menus of the AVR350. Byte: Description: An error message is returned if the close instruction relates to a menu that is not open. For example, if the Main menu is open and a close instruction for the Set-up menu is received, then an error is returned. CC ‘-’ (0x2d) (Command code) P1 Zone: f Fermez l’un des menus du système AVR350.
Volume change / Modification du volume / Ändern der Lautstärke / Volumewijziging Command: g Increment/decrement the audio volume in a zone. Byte: Description: The value returned for the new volume is offset by 0x30. To obtain the correct value, subtract 0x30 from the reported value.
Volume set / Réglage du volume / Einstellen der Lautstärke / Volume-instelling Command: g Set the volume of a zone. Byte: Description: The value transmitted for the new volume must be offset by 0x30. CC ‘0’ (0x30) (Command code) P1 Zone: < Formula: transmitted volume = (required volume + 0x30) ‘1’ (0x31) – Zone 1 The value returned for the new volume is offset by 0x30. To obtain the correct value, subtract 0x30 from the reported value.
g Change the stand-by state of a zone. f Modifiez l’état de veille d’une zone. d Ändern des Stand-by-Zustands einer Zone. n De standby-status van een zone wijzigen.
Decode mode – multi-channel / Mode de décodage – multicanal / Dekodiermodus – Mehrkanal / Decoderingsmodus – meerkanaals g Set the decode mode for multi-channel material. f Réglez le mode de décodage pour le matériau multicanal. d Einstellen des Dekodiermodus auf Mehrkanalmaterial. n De decoderingsmodus voor meerkanaals materiaal instellen.
Select analogue/digital / Sélection analogique/numérique / Analog/digital auswählen Analoog/digitaal selecteren g Select an analogue/digital audio input for the current source. f Sélectionnez une entrée audio analogique/numérique pour la source actuelle. d Auswählen einer analogen oder digitalen Audioquelle als aktuelle Quelle. n Een analoge/digitale geluidsingang voor de huidige bron selecteren.
Increment/Decrement Preset / Augmentation/diminution de la présélection/ Erhöhen/Verringern der Voreinstellung/ De voorinstelling verhogen/verlagen g Increment/decrement the current tuner preset. The value returned for the new preset is offset by 0x30. To obtain the correct value, subtract 0x30 from the reported value. < Formula: actual preset = (reported preset – 0x30) f Augmentation/diminution de la présélection actuelle du tuner.
Example / Exemple / Beispiel / Voorbeeld g Command/response sequence to increment the FM tuning from 85.0MHz to 85.
Pembroke Avenue, Waterbeach, CAMBRIDGE CB5 9QR, England www.arcam.co.