
Specifications
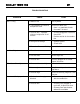


Chalet 1800 Ins 26
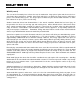
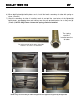
BRICK INSTALLATION
The firebox of your CHALET 1800 WOOD Fireplace Insert is lined with high quality firebrick,
which has exceptional insulating properties. There is no need to use a grate; simply build the
fire on the firebox floor of your insert. Do not operate this insert without the firebrick.
The Firebrick is also intended to extend the life of your insert and radiate heat more evenly.
Install the bricks as in the photos and then cap them with the supplied channel capping mate-
rial. All the bricks are the same size except for bricks #6 and #7 in the back (you can switch
bricks #5 & #6 and #7 & #8 around without affecting the performance of the insert). Brick #21
at the bottom front is also shorter (you can switch brick #21 & #22 around without affecting the
performance of the insert).
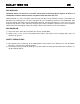
AIR TUBE INSTALLATION
The Air Tubes in the CHALET 1800 WOOD Fireplace Insert come already assembled with the
baffle plates installed. If for some reason they need to be installed or removed, the following
guidelines must be adhered to.
1) Open the CHALET 1800 WOOD Fireplace Insert door.
2) You may have to slip the “spring retainers” over the air tubes before installation or removal
3) To install, slide the tube into the right hand side hole as far as possible and then bring it
back into the hole on the left hand side lining up the “relief or notch” cut into the tube on that
side until it locks into position and tap the spring retainer to the right . If the tube will not
slide in easily, simply use a pair of vise grips or pliers and tap it into place with a hammer.
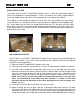
NOTE: The holes in the two back tubes are larger than the holes in the two front
tubes. The left hand side of the tubes have little “notches” or “reliefs” cut into them
that mate with the left hand side of the insert that align the air hole for proper com-
bustion. (Photo 1)
4) Continue to install the other three tubes in the same manner.
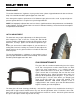
5) Before installing the final air tube, slide the a lightweight baffle plate over the air tubes
(leaving the step joint in the middle) from the front and then push it to the back and over to
side of the insert as far as it can go. Do the same with the other lightweight baffle plate en-
suring that the step in the middle will overlap the previous lightweight baffle plate. (Photo 2)