
Specification Sheet

Plastic Address Plaque (Model 3460)
Instructions
Thank you for purchasing this premium mailbox accessory item. We know you’ll be satisfied
with the years of service it will provide. If you have any questions about how to mount or use
this plaque, or if you need any replacement parts, please call us directly at (800) 464-7491 or
contact us at www.architecturalmailboxes.com.
© 2016, Architectural Mailboxes, LLC Rev. B
www.architecturalmailboxes.com (800) 464-7491
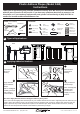
Tools (not included)
Screwdriver
Power
screwdriver
Contents
1
Types of Applications
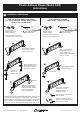
Applying Adhesive Numbers
2
wood/
sheet metal
screws (x2)
phillips
screws (x2)
Wrench
Drill bit
small
hex bolts (x2)
hex nuts (x2)
rubber
washers (x2)
plastic
adapters (x10)
cap nuts (x2)
Alcohol
Wipe
alcohol swab
packet (x1)
reflective
tape (x2)
Wood or Metal
Post
Mailbox
Gate
Storefront
Doorway
1
Peel reflective
tape from
backing.
Apply reflective
tape to address
plaque.
2
4
Apply numbers to
refective tape.
Note: If misaligned,
carefully peel
numbers and
reapply in correct
location.
adhesive
squares (x2)
adhesive
numbers x74
Note: 6 and 9
can be used
interchangeably.
1 2 2 6
2 5 6 7
612
380
1 0 0 9
Peel numbers
off the paper
backing.
3
5
6
5
Note: If misaligned,
carefully peel tape
and reapply in
correct location.
2
4
DIY Hint to Apply Numbers Stickers Straight and Evenly, Every Time!
R
Use a clear ruler and lightly stick the lower part of your number stickers onto the ruler’s edge using the ruler marks as your
guide to space the numbers evenly. Let the upper portion of the letters stick out the top. Set the ruler down and use your
finger to press the top of each sticker down in place on the reflective tape. When all the stickers are secure, carefully
remove the ruler and press the bottoms of the stickers in place with your finger.