
Installation Guide

Your new mailbox comes completely assembled. To begin using your mailbox, it must be properly mounted in accordance
with USPS requirements to facilitate carrier access, described below. You can mount your mailbox on one of the optional
mailbox posts we offer, or you can mount it to a wooden post. If mounting to a wooden post, please consult a qualified
carpenter to assist you.
CUSTOMERS ARE REQUIRED TO CONTACT THE LOCAL POST OFFICE BEFORE INSTALLING THE MAILBOX TO
ENSURE ITS CORRECT PLACEMENT AND HEIGHT AT THE STREET. GENERALLY, MAILBOXES ARE INSTALLED AT
A HEIGHT OF 41-45 INCHES FROM THE ROAD SURFACE TO INSIDE FLOOR OF THE MAILBOX OR POINT OF MAIL
ENTRY (LOCKED DESIGNS) AND ARE SET BACK 6-8 INCHES FROM THE FRONT FACE OF CURB OR ROAD EDGE
TO THE MAILBOX DOOR.
Series 5500 Mailbox
Mounting Instructions
Mounting Instructions
Thank you for purchasing this premium mailbox. We know you'll be satisfied with the years of
service it will provide. If you have any questions about how to mount or use this mailbox, or if
you need any replacement parts, please call us directly at (800) 464-7491 or contact us at
www.architecturalmailboxes.com.
© 2006, Architectural Mailboxes Rev. D
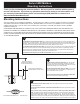
Height per local post
office, typically between
41 and 45 inches to floor.
Set back per local post office,
typically between 6 and 8 inches.
For Standard In-ground Post item 5525: Dig a hole deep enough to allow the box to sit at the specified height,
as required by your local post office. The height from the road level to the mailbox floor is typically between 41 and
45 inches. Make sure the hole is set back from the road such that the distance from the curb or the road edge to
the mailbox face meets local post office requirements, typically between 6 and 8 inches.
For Standard Surface Mount Post item 5526: If using j-bolts, dig a hole deep enough to properly support the box
(about 18") and to allow the box to sit at the specified height. If using concrete anchors in preexisting concrete,
make sure the anchor positions allow the box to sit at the specified height. Also, make sure the bolt or anchor
positions allow for the specified set-back, typically 6 to 8 inches from curb.
For Decorative Post item 5515, or Grande Post item 5565: Refer to the instructions included with the post.
1
For Standard In-ground Post item 5525: Pour the concrete
(at least 1 cubic foot recommended) completely around the
post, making sure the post and mailbox are level and correctly
positioned according to your local post office.
For Standard Surface Mount Post item 5526: Pour concrete
around j-bolts held in the correct pattern, or install anchors in
the correct pattern into dry concrete.
For Decorative Post item 5515, or Grande Post item 5565:
Refer to the instructions included with the post.
2
For Standard Post items 5525 or 5526: Attach the mailbox to the post using the hardware
included with the post.
For Decorative Post item 5515, or Grande Post item 5565: Refer to the instructions included
with the post.
Note - If you are using a mounting method other than an optional post (items 5525, 5526 or
5515): The mailbox has two different mounting bolt patterns on the bottom that are designed to
provide adequate mounting strength and stability for long term use. Do not drill new mounting
holes into the mailbox floor. Instead, you or your carpenter should create a bracket to attach the
mailbox to the post using the existing holes in the mailbox floor. Drilling new holes or modifying the
mailbox in any way may compromise the function, strength or corrosion resistance of the product.
3
www.architecturalmailboxes.com (800) 464-7491
ARCHITECTURAL MAILBOXES