
Installation Guide

Y o u r n e w m a i l b o x o r d r o p b o x c o m e s c o m p l e t e l y a s s e m b l e d . T o b e g i n u s i n g y o u r b o x , i t m u s t b e p r o p e r l y m o u n t e d . I f y o u
a r e u s i n g y o u r b o x f o r U S P S m a i l d e l i v e r y , y o u a r e r e q u i r e d t o m o u n t i t i n a c c o r d a n c e w i t h U S P S r e q u i r e m e n t s t o f a c i l i t a t e
c a r r i e r a c c e s s , d e s c r i b e d b e l o w . I f y o u a r e u s i n g y o u r b o x f o r p r i v a t e u s e , t h e s e p o s i t i o n i n g r e q u i r e m e n t s d o n o t a p p l y a n d
y o u c a n m o u n t t h e b o x t o s u i t y o u r n e e d s . R e ga r d l e s s o f i n t e n d e d u s e , y o u c a n m o u n t y o u r b o x i n o n e o f s e v e r a l w a y s :
1 ) Y o u c a n u s e t h e o p t i o n a l i n - g r o u n d ( i t e m 5 1 0 5 o r 5 5 2 5 ) o r s u r f a c e m o u n t ( i t e m 5 1 0 6 o r 5 5 2 6 ) p o s t . I n s t r u c t i o n s a r e
p r o v i d e d b e l o w f o r m o u n t i n g o n t h e s e p o s t s .
2 ) Y o u c a n m o u n t y o u r b o x i n a m a s o n r y p i l a s t e r o r o n t o p o f a m a s o n r y c o l u m n . Y o u m ay w a n t t o c o n s u l t a q u a l i f i e d
m a s o n t o a s s i s t w i t h t h e s e m o u n t i n g o p t i o n s .
3 ) You can mount your box onto a wooden post using our optional 4x4 adapter plate (item 7530). You may want to consult a
qualified carpenter to assist with this mounting option.
F o r m a i l b o x ( m o d e l s 5 1 0 0 a n d 6 2 0 0 ) i n s t a l l a t i o n s i n t e n d e d f o r U S P S m a i l d e l i v e r y , C U S T O M E R S A R E R E Q U I R E D T O
C O N T A C T T H E L O C A L P O S T O F F I C E B E F O R E I N S T A L L I N G T H E M A I L B O X T O E N S U R E I T S C O R R E C T P L A C E M E N T
A N D H E I G H T A T T H E S T R E E T . G E N E R A L L Y , M A I L B O X E S A R E I N S T A L L E D A T A H E I G H T O F 4 1 - 4 5 I N C H E S F R O M
T H E R O A D S U R F A C E T O I N S I D E F L O O R O F T H E M A I L B O X O R P O I N T O F M A I L E N T R Y ( L O C K E D D E S I G N S ) A N D
A R E S E T B A C K 6 - 8 I N C H E S F R O M T H E F R O N T F A C E O F C U R B O R R O A D E D G E T O T H E M A I L B O X D O O R .
O a s i s M a i l b o x , D r o p B o x ( M o d e l s 5 1 0 0 , 5 1 0 3 & 6 2 0 0 )
M o u n t i n g a n d U s e I n s t r u c t i o n s
M o u n t i n g y o u r n e w m a i l b o x o r d r o p b o x
T h a n k y o u f o r p u r c h a s i n g t h i s p r e m i u m l o c k i n g m a i l b o x / d r o p b o x . W e k n o w y o u ' l l b e s a t i s f i e d
w i t h t h e y e a r s o f s e r v i c e i t w i l l p r o v i d e . I f y o u h a v e a n y q u e s t i o n s a b o u t h o w t o m o u n t o r u s e
t h i s b o x , o r i f y o u n e e d a n y r e p l a c e m e n t p a r t s , p l e a s e c a l l u s d i r e c t l y a t ( 8 0 0 ) 4 6 4 - 7 4 9 1 o r
c o n t a c t u s a t w w w . a r c h i t e c t u r a l m a i l b o x e s . c o m .
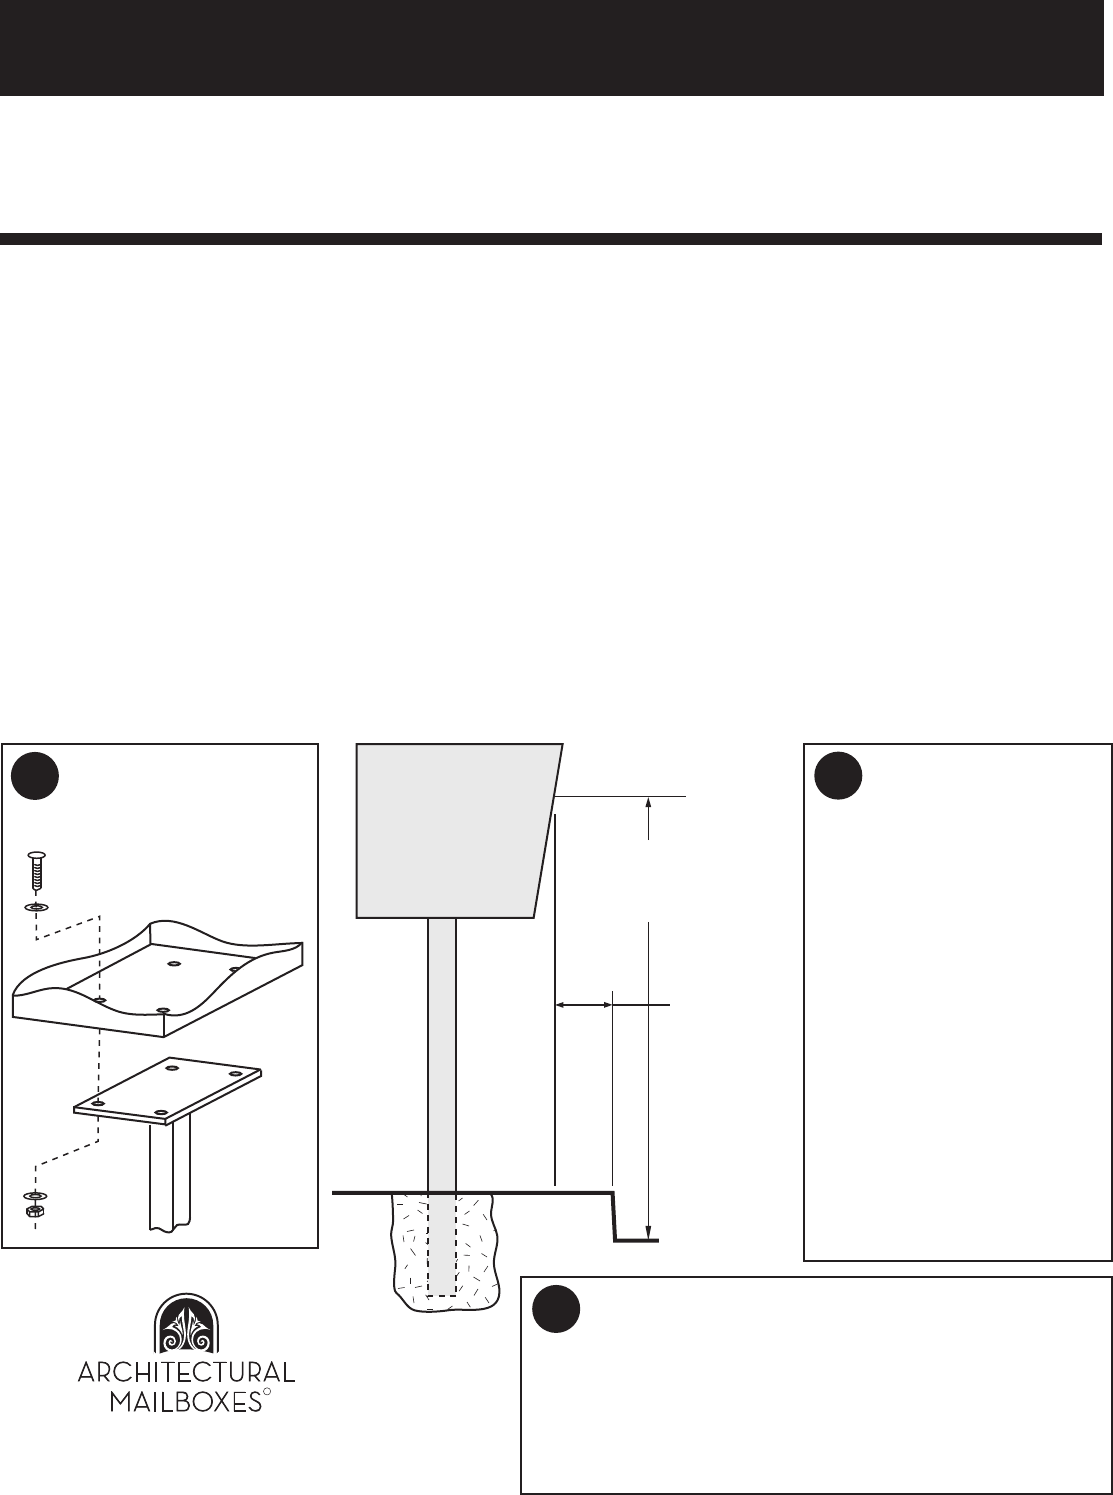
Set back per
local post
office, typically
between 6 and
8 inches.
© 2010, Architectural Mailboxes Rev. G
1
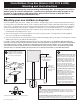
Attach the mailbox to the post
using the 4 bolt sets included
with the post, as shown below.
Be sure to use the washers.
Post
Mailbox
Bottom
x 4
3
For In-ground Post (items 5105 and 5525): Pour the concrete (at least 1 cubic
foot recommended) completely around the post, making sure the post and
mailbox are level and correctly positioned according to your local post office.
Allow concrete to set before use.
For Surface Mount Post (items 5106 and 5526): Pour concrete around j-bolts
held in the correct pattern and allow concrete to set, or install anchors in the
correct pattern into dry concrete. Attach the post to the j-
bolts o
r anchor bolts.
For Surface Mount Post (items 5106
and 5526): If using j-bolts (not
included), dig a hole deep enough to
properly support the box (at least 18")
and to allow the box to sit at the
specified height. If using concrete
anchors (not included) in preexisting
concrete, make sure the anchor
positions allow the box to sit at the
specified height. Also, make sure the
bolt or anchor positions allow for the
specified set-back, typically 6 to 8
2
www.architecturalmailboxes.com (800) 464-7491
R
Height per local post
office, typically between
41 and 45 inches to
mail entry point.
For In-ground Post (items 5105 and
5525): Dig a hole deep enough to allow
the box to sit at the specified height, as
required by your local post office. The
height from the road level to the mail
entry point is typically betwenn 41 and
45 inches. Make sure the hole is set
back from the road such that the
distance from the curb to the mail entry
point meets local post offcie require-
ments, typically between 6 and 8 inches.