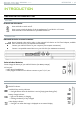
ENGLISH ENGLISH USER MANUAL Version 1.0 Please visit www.archos.com/manuals to download the latest version of this manual. Dear Customer, thank you for choosing this ARCHOS product. We hope that you will enjoy using it and that it will give you entire satisfaction for many years to come. Please do register your product on our website (www.archos.com/register) to ensure that you get access to our help line and to be informed of free software updates for your product.
MANUAL V1.0 Table of CONTENTS > p. Table Of Contents Introduction.................................................................................................................................... 4 ARCHOS device description. . . . . . . . . . . . . . . . . . . . . . . . . . . . . . . . . . . . . . . . . . . . . . . . . 4 Using the TouchScreen . . . . . . . . . . . . . . . . . . . . . . . . . . . . . . . . . . . . . . . . . . . . . . . . . . . . 6 INTERFACE LANGUAGE . . . . . . . . . . . . . . . . .
MANUAL V1.0 Table of CONTENTS > p. 7. USB connections................................................................................................................. 36 7.1 Computer Connection. . . . . . . . . . . . . . . . . . . . . . . . . . . . . . . . . . . . . . . . . . . . . . . . . 36 7.2 USB Host Connection. . . . . . . . . . . . . . . . . . . . . . . . . . . . . . . . . . . . . . . . . . . . . . . . . . 38 8. setup screen.....................................................................
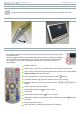
MANUAL V1.0 Introduction > p. Introduction ARCHOS device description Buttons On the left side of the device: Press and hold to switch on/off. Press once to switch the display of the image between TV and built-in LCD screen. Press and hold to lock the buttons of your ARCHOS device. Connectors Underneath the device are several connectors: DVR Record external video and/or audio via the optional DVR Station or DVR Travel Adapter, available STATION from www.archos.com (see Optional Functionalities).
Introduction > p. MANUAL V1.0 Built-in Loudspeakers The built-in stereo loudspeakers are on the front of the device, on both sides below the screen. leg stand remote control • The ARCHOS 704 WIFI has an infrared receiver located on the front of the device, in the bottom left corner. • Point the supplied remote control towards the infrared receiver to control your ARCHOS device.
MANUAL V1.0 Introduction > p. Using the TouchScreen Your ARCHOS 704 WIFI device is equipped with a touchscreen. Most screen areas will react when you tap on them using the included stylus or your fingernail. Below is a description of the main tactile screen areas and a few tips on how to use the touchscreen.
MANUAL V1.0 Introduction > p. The Resume Icon • Sometimes the Resume icon is highlighted in the Home Screen when you turn on the ARCHOS. This means that you can resume the last-played music or video file, if it was interrupted before the end. • If the Resume icon is grayed out, it means that no music or video file playback can be resumed. INTERFACE LANGUAGE Changing the Language • The interface of your ARCHOS device is available in various languages.
MANUAL V1.0 Introduction > p. To replace the battery, follow these steps: PRODUCT CARE Caring for your ARCHOS Device Your ARCHOS device is an electronic product that needs to be treated with care: • • • • • • • Do not subject it to unnecessary shock or vibration. Do not subject it to heat, keep it ventilated (especially when connected to a computer). Keep it away from water and excessively humid areas. Keep it away from high electromagnetic fields.
MANUAL V1.0 Introduction > p. system recovery • If your ARCHOS device does not respond correctly, or does not show certain songs or videos that you have copied to it, try using the repair and format tools (see: System Settings). • If once turned on, the ARCHOS does not show the Home Screen, you can try a system recovery. It allows you to repair the hard drive, format it, or force the touchscreen calibration when you cannot access the touchscreen settings (see: Display Settings). 1.
MANUAL V1.0 PLAYING VIDEO > p. 10 1. Playing Video In the Home Screen, tap on the Video icon to highlight it, then tap on it again to enter the Video mode. 1.1 BROWSING THROUGH YOUR VIDEOS • There are two types of views for you to browse through your videos: the Video List and the Video Browser. • You can switch between the two views by tapping on at any time while browsing in video mode. • When browsing in video mode, only video files are shown.
MANUAL V1.0 PLAYING VIDEO > p. 11 Video List & Browser Menu Items Info - displays a message box with all the available information about the highlighted video file. - tap on to close the Info screen. Delete - allows you to delete the highlighted video file. A confirmation screen will pop up. Rename - allows you to change the name of the highlighted video file using the virtual keyboard. - see: Using the Virtual Keyboard. Resume video - will resume playing the highlighted video from the bookmark.
PLAYING VIDEO > p. 12 MANUAL V1.0 Video Playback Menu Items Info - displays a message box with all the available information about the current video file. - tap on to close the Info screen. Format - allows to change the way the image is displayed. - Auto: adjusts the video size to best adapt to the built-in screen or TV. - Full Screen: enlarges the picture to fill the screen and cuts some of the image. - Maximized: enlarges the picture to fill the screen, considering the image is encoded in 2.
PLAYING VIDEO > p. 13 MANUAL V1.0 PlayMode (a status bar icon shows the current mode) - Single: plays only one video file and stops. - Folder: plays all video files in the current folder. Repeat & Shuffle (a status bar icon shows the current mode) - - Normal: plays the video selection once and stops. - Repeat: plays the video selection repeatedly - Shuffle: plays videos in a random order LCD Brightness - adjusts the level of brightness of the built-in screen 1.
MANUAL V1.0 PLAYING MUSIC > p. 14 2. Playing Music In the Home Screen, tap on the Music icon to highlight it, then tap on it again to enter the Music mode. 2.1 browsing through your music files • There are two types of views for you to browse through your songs: the ARCLibrary and the Music Browser. • When browsing through your music, only music files are shown. The ArcLibrary • The ArcLibrary (default view) shows your music sorted in categories (Artist, Album, Title, Genre, etc.
PLAYING MUSIC > p. 15 MANUAL V1.0 Delete - allows you to delete the highlighted music file. A confirmation screen will pop up. Rename - allows you to change the name of the highlighted music file using the virtual keyboard. - see: Using the Virtual Keyboard. Resume song - will resume playing the highlighted music file from the bookmark. Clear bookmark - will remove the bookmark from the highlighted music file.
PLAYING MUSIC > p. 16 MANUAL V1.0 Playback Status Icons Status bar icons tell you if your ARCHOS is: playing paused stopped Music Playback Menu Items Info - displays a message box with all the available information about the current music file. - tap on to close the info screen. Home - allows you to go back to the Home Screen while playing music, in order to browse your hard drive, play a photo slideshow, read a PDF file, etc. Playlist - opens the playlist editor (see: Playlists).
MANUAL V1.0 PLAYING MUSIC > p. 17 PlayMode (a status bar icon shows the current mode) - Single: plays only one music file and stops. - Folder: plays all music files in the current folder or album. - All: plays all music files in the ARCHOS device. - Queue: allows you to select a track to be played after the current one is finished. - while a track is playing, tap on to switch to the browser window and tap on a track to select it: this is your queued track, and the status bar icon will change.
MANUAL V1.0 PLAYING MUSIC > p. 18 Preset - allows you to quickly select a sound profile. Set equalizer - allows you to use a custom sound profile. Tap on this button to enter the equalizer screen (see next section). Balance - allows you to balance the sound between the left and right speakers. Reset - highlight and tap on it to reset sound parameters to the default values. Equalizer Screen • Your ARCHOS device features a 5-band equalizer. • Tap directly on a band (Bass, Mid. bass, Mid. range, Mid.
PLAYING MUSIC > p. 19 MANUAL V1.0 Creating a Playlist • Select the Show playlist menu item while you are in the Music browser. A playlist panel will open on the right: you can now start adding songs to the current playlist. • In the left panel, locate the songs you would like to add to your playlist. Tap on a song to add it to the playlist (the song’s icon in the left panel will change to , indicating that it is part of the current playlist). • Repeat this operation with all the tracks you want.
MANUAL V1.0 PLAYING MUSIC > p. 20 Editing a Playlist To edit an existing playlist: • Highlight the playlist and use the Show playlist menu item. • You can now add, shuffle, move or remove tracks within the playlist, using the appropriate menu items. • An asterisk (*) appears after the playlist’s name in the right panel to indicate that modifications were made to the playlist and that it is unsaved.
VIEWING PHOTOS > p. 21 MANUAL V1.0 3. Viewing Photos In the Home Screen, tap on the Photo icon to highlight it, then tap on it again to enter the Photo viewer. 3.1 browsing through your photos • There are three types of views for you to browse through your photos: the Photo Wall, the PhotoLibrary and the Photo Browser. • When browsing through your photos, only picture files are shown.
MANUAL V1.0 VIEWING PHOTOS > p. 22 The Photo Browser • The Photo Browser allows you to navigate the Pictures folder of your device’s hard drive. It is based on the ARCHOS File Browser. • To use it, select Browse Hard Drive in the PhotoLibrary view. • See: Using the Browser. Photo Wall, PhotoLibrary and Photo Browser Menu Items Info - displays a message box with all the available information about the highlighted picture. - tap on to close the Info screen.
VIEWING PHOTOS > p. 23 MANUAL V1.0 3.2 Photo Viewer Tap on a picture file, then tap again to view it. The menu overlay will disappear automatically after a few seconds. Photo Viewer Screen and TouchScreen Controls • To display the menu overlay, tap once anywhere in the picture (to make it disappear again, tap on ). • To display the next/previous picture, use / . • Another way to go to the next picture is to drag the stylus on the screen from point ‘A’ to point ‘B’.
MANUAL V1.0 VIEWING PHOTOS > p. 24 3.3 PHOTO SETTINGS You can access the Photo Settings screen via the Settings menu item while viewing pictures. Tap on the buttons to select a different setting for a parameter. / Picture Pause - defines the time that each picture will be displayed during a slideshow. Transition - defines the transition effect to be used between two pictures. There are several cool effects that you can choose from. 3.
MANUAL V1.0 VIEWING PHOTOS > p. 25 3.6 putting photos on to your ARCHOS DEVICE There are several methods for you to transfer your own photos to the Pictures folder of the ARCHOS: • Connect your ARCHOS device to your computer and copy the pictures from your computer’s hard drive to the ARCHOS (see: Computer Connection), or sync them using Windows Media® Player 10 or 11 (in ‘Windows Media Device’ mode only).
MANUAL V1.0 USING THE BROWSER > p. 26 4. Using the Browser The ARCHOS File Browser gives you the possibility to navigate the file system of your ARCHOS device’s hard drive. In the Home Screen, tap on the Browser icon to highlight it, then tap again on it to enter the File Browser.
MANUAL V1.0 USING THE BROWSER > p. 27 Copy - allows you to copy the highlighted file or folder to the location defined in the other browser panel. Copy all files - allows you to copy all the files in the current folder to the location defined in the other browser panel. Move - allows you to move the highlighted file or folder to the location defined in the other browser panel. Sound - will display the Sound settings screen (see: Sound Settings). Tap on to exit this screen.
MANUAL V1.0 USING THE BROWSER > p. 28 4.3 Browsing OTHER COMPUTERS ON the Network • When you are connected to a Windows® network, you can browse* the shared folders of other computers in the network, using the Archos File Browser. • From the Home Screen, select the Browser icon. Once in the browser, select Network. Your device will search for other computers in the Windows® network and you can start browsing their shared contents.
MANUAL V1.0 USING THE BROWSER > p. 29 PDF Reader Menu Items To display the menu overlay while viewing a PDF document, tap once in the bottom right corner of the screen (see following picture). Hide text overlay - will hide all overlaid graphics (status bar, menu items, etc.) to only show the PFD document. Home - allows you to go back to the Home Screen. Zoom in - magnifies the document. Zoom out - demagnifies the document. Link back - will take you back to the page that you came from.
MANUAL V1.0 Connecting to a WiFi Network > p. 30 5. Connecting to a WiFi Network Your ARCHOS 704 WIFI can connect to a variety of wireless networks, thus enabling you to browse the Internet or share and play files from other computers. 5.1 Playing Media Files from a Network • Once you set up your ARCHOS to communicate over WiFi to your home network (explained in the sections below), some very neat possibilities open up. You may have heard of streaming media.
Connecting to a WiFi Network > p. 31 MANUAL V1.0 5.2 WiFi Connection Procedure ENABLING WiFi From the Home Screen, select the Enable WiFi menu item . Your device will scan for available WiFi networks. • The first time you use your device, you may get a message “No configured networks found”. Highlight View available networks and tap on it again. The list of available networks will be displayed.
MANUAL V1.0 Connecting to a WiFi Network > p. 32 • To select a network and start the connection process, simply tap on the one that you want to connect to (your home wireless network or a free hotspot). • You will be taken to the configuration screen for this network, where you will have to enter some information to set up your access to this network. 5.3 WiFi Network Configuration In order to connect to a wireless network, the ARCHOS 704 WIFI will need some specific information about the network.
MANUAL V1.0 Connecting to a WiFi Network > p. 33 You will have to specify the following settings: Key length (for WEP networks only) - the authentication key can be 10 characters long (64bit) or 26 characters long (128bit) (hexadecimal characters). Key - type in the authentication key. - you will be taken to a virtual numeric keyboard. - type in the key and tap on OK when you have finished.
MANUAL V1.0 Browsing the Web > p. 34 6. Browsing the Web Your ARCHOS 704 WIFI features a Web browser that was designed especially for this ARCHOS device. It allows you to browse websites, use web-base e-mailing, download content, etc. 6.1 Launching the web browser From the Home Screen, tap on directly the Web Icon. • If you are already connected to a network, the Web browser will simply open and you can start browsing the Web.
MANUAL V1.0 Browsing the Web > p. 35 Browser Menu Items Navigation - Forward: will go to the next page in your browsing history, if you used Back before. - Stop: will stop loading the Web page. - Back: will go back to the previous page that you browsed. Bookmarks - will open the Bookmark manager. Here you can sort your bookmarks, delete them, etc. - select a bookmark and tap on it to open this Web address in a new tab.
usb CONNECTIONs > p. 36 MANUAL V1.0 7. USB connections 7.1 Computer Connection ‘Windows Media Device’ or ‘PC Hard Drive’ • There are two connection modes for your ARCHOS device to connect to your computer. When your ARCHOS device is turned on and you connect it to a computer, a screen will pop up on the ARCHOS asking you to choose the connection mode to be used for this connection (see next section).
MANUAL V1.0 usb CONNECTIONs > p. 37 Windows® XP & WMP10 or Higher (Windows Media Device Mode) • Follow the previous steps to connect the ARCHOS device, and select Windows Media Device as the connection mode. • The ARCHOS device will appear in My Computer. • You can now put your own files onto the ARCHOS: • Synchronize your music, videos or photos to the ARCHOS using Windows Media® Player 10 or higher.
MANUAL V1.0 usb CONNECTIONs > p. 38 • Once all your transfers are finished, click on the ‘safely remove’ icon in the system tray, next to the clock. Windows® 2000 / ME Windows® XP • Click on the ‘safely remove’ message. • A message will pop up, telling you that it is now safe to disconnect the device*. You can now safely unplug the USB cable from your ARCHOS device and/or computer.
usb CONNECTIONs > p. 39 MANUAL V1.0 A To connect a USB device to your ARCHOS device: 1. Turn on your ARCHOS device. 2. Plug the ‘mini’ end of the supplied USB host adapter into the ARCHOS device (A port). 3. Connect the external USB device (use a standard USB cable if needed) to the other end of the supplied USB host adapter. 4. Turn on the external USB device if needed (check the documentation of your external USB device). 5.
MANUAL V1.0 SETUP SCREEN > p. 40 8. setup screen In the Home Screen, tap on Screen). to enter the Setup Screen (tap on if you want to go back to the Home • Tap on one of the settings icons (Language, Display, Appearance, etc.) and tap on it again to enter the corresponding settings screen. • Once you are in a settings screen: - tap on a parameter to highlight it. - use / to select a different setting.
MANUAL V1.0 SETUP SCREEN > p. 41 TV Format - 4:3 or 16:9 - the format used by your television set to display images. - the option Wide screen becomes available when you set the TV standard parameter to PAL (Europe). Video Output - choose between Internal LCD and External TV (to do this, you can also press the button on the device). External Display - choose between Composite / S-Video / Component / RGB. Use this setting based on how you have cabled the video out of your DVR station to your television.
MANUAL V1.0 SETUP SCREEN > p. 42 Picture name - allows you to select a picture to use as a background image. - you can choose between all default backgrounds and images that you have previously set as wallpapers. - you can also set a picture as wallpaper from the photo and video modes. Theme - defines the theme color for your icons (and for the background, if you have disabled use of a wallpaper). Font color - defines the font color.
MANUAL V1.0 SETUP SCREEN > p. 43 Battery operation Power Off - the amount of time of user inactivity before the system shuts down. - the system will not shut down during a slideshow or audio/video playback. Backlight Off - the amount of time of user inactivity before the LCD display turns off. - the display will not turn off while a video or slideshow is playing. Webbrowser - normal power off: while browsing the web, the system will shut down according to the setting selected for the Power Off parameter.
MANUAL V1.0 SETUP SCREEN > p. 44 • This settings screen will allow you to configure several key features of your ARCHOS device, such as your preferred USB port mode, repair and format tools, firmware updates, WiFi region selection. • It will also give you information about the current plugins and firmware version, the product key, the MAC address and the storage space that is currently used/available.
MANUAL V1.0 SETUP SCREEN > p. 45 Select Wifi region - use the arrow in the bottom left corner of the screen to view the Select Wifi region button. - tap on it to access the Select Wifi region settings screen. - select your region in the list and tap on to return to the System settings screen. Note: reported number of megabytes is binary-based counting (1Kb=1024 bytes). Thus each reported Mb represents approximately 1.05 megabytes (decimal). Formatting also takes up space. 8.
MANUAL V1.0 SETUP SCREEN > p. 46 Password - only appears if the Write access parameter is set to On. Type in the password for other computers to be able to write to your hard drive (see Using the Virtual Keyboard). Enable file server - tap on this button to turn on the file server. Note: some networks filter MAC addresses. You can find your device’s MAC address in the System Settings screen (see: System Settings). 8.
MANUAL V1.0 SETUP SCREEN > p. 47 3. Activate the Update: • Go to the System Settings screen of your ARCHOS device. • Tap on Update Firmware. • Your ARCHOS device will ask you to plug in the charger/adapter. Do so and then tap on the screen to continue. • The new firmware will be installed on your device.
MANUAL V1.0 Optional Functionalities > p. 48 9. Optional Functionalities 9.1 DVR Station & DVR Travel Adapter presentation • You can record from an external video source if you use the optional DVR Station or DVR Travel Adapter. • The ARCHOS DVR Station stays connected to your home entertainment system and allows you to quickly connect your ARCHOS to watch its contents on your TV, record from your satellite or cable box, etc.
MANUAL V1.0 Optional Functionalities > p. 49 pre-recording screen menu items Open scheduler - will take you directly to the Scheduler screen (see Setting the Scheduler). - tap on to go back to the pre-recording screen. Hide text overlay - will hide all overlaid graphics (status bar, menu items, etc.) to only show the video image. Start recording - will start recording right away. Settings - will open the Videocorder settings screen (see next section).
MANUAL V1.0 Optional Functionalities > p. 50 Widescreen - options: Auto/On/Off. - If your tuner (cable box, satellite receiver, etc.) outputs a video signal in widescreen, you can force the ARCHOS to recognize this signal. - This should be set to On if recordings show people that look unusually tall and thin. But in most cases you can just leave it on Auto. Bitrate - options: 500kb/s, 1000kb/s, 1500kb/s, 2000kb/s, 2500kb/s. - use this to set the encoding quality.
Optional Functionalities > p. 51 MANUAL V1.0 9.3 Editing Video Files • Video files recorded with the ARCHOS DVR Station or Travel Adapter can be edited by deleting the sections you do not wish included. The editing you can do is either cropping or cutting of particular segments of the video file. • You will mark a segment of your video file, and then you will tell the ARCHOS to delete everything except the marked segment or to delete the marked segment from the video file.
MANUAL V1.0 Optional Functionalities > p. 52 9.4 Setting the Scheduler From the Home Screen, tap on the Scheduler icon to highlight it and tap on it again to enter the Scheduler screen. main steps 1. Tap on the line you want to edit to highlight it, then tap on it again to start editing. 2. Set each line to the desired date, time (and channel if you are using the infrared emitter to control a VCR, cable box or satellite receiver). 3.
MANUAL V1.0 Optional Functionalities > p. 53 Post-record - This is a safety margin added to the end of a scheduled recording which was set via the My Yahoo!® TV scheduler of your personal calendar. It affects ONLY these recordings. This is just in case the clocks between your ARCHOS device and the broadcast station are different or if the broadcast station runs overtime.
MANUAL V1.0 Optional Functionalities > p. 54 • If a personal calendar recording event does not find the station name in your list of channels, it will put the event into the scheduler and mark it with a ?, indicating that you must assign a channel number to the name. Tap on the line containing the ? and select the Set Channel menu item. You can now scroll through the channel numbers and assign a number to the station name for that event. You only have to do this once.
MANUAL V1.0 Optional Functionalities > p. 55 Part 1: Choose your Device and Brand • Select the type of device that you want to control with the IR Emitter. • Select the brand of your device. The TV Channels button allows you to give names to each channel. For example, if channel 6 is CNN where you live, then you can give channel 6 that name in this screen.
MANUAL V1.0 Optional Functionalities > p. 56 Key: Enter - Set this to On if normally, you have to press the OK button on your device’s remote control after you enter the channel number. Example: If you normally press 1, 3, OK for channel 13, then you would need to set this parameter to On. Key Delay - Change the delay between the emission of each digit of a channel. You may need to adjust this if the ARCHOS device seems to send only half the digits of a channel or more digits of a channel.
Optional Functionalities > p. 57 MANUAL V1.0 recording procedure Connect the AV cable to an audio source (hi-fi, turntable, boombox, etc.) and then the other end to the IN connector of the DVR Station or DVR Travel Adapter. 1. In the pre-recording screen, adjust the recording level using not the recording volume). 2. Choose the Start recording menu item to start recording. 3. You can pause and resume your recording at any time. 4. Tap on to stop recording.
MANUAL V1.0 Technical Specifications > p. 58 Technical Specifications Capacity: • 40GB* Hard Drive to store up to 35 Movies(1), 400,000 photos(1) or 10,000 songs(1). • 80GB* Hard Drive to store up to 70 Movies(1), 800,000 photos(1) or 20,000 songs(1). Display: • 7’’ TFT Touchscreen (800x480 pixels), 260,000 colors. Video playback** • MPEG-4(2) (ASP@L5 AVI, up to DVD resolution). • WMV (MP@ML, up to DVD resolution). • With optional software plug-ins (available on www.archos.com): - H.
MANUAL V1.0 Technical Specifications > p. 59 Dimensions & weight • Approx. 182 x 128 x 20 mm; 7.05” x 4.96” x 7.75” - foldout leg-stand. • Approx. 630 gr.; 22 oz. Packages includes • ARCHOS 704 WIFI, headphones, USB 2.0 cable, USB 2.0 host adapter, DVR Station saddle, stylus, remote control, power adapter/charger, protective pouch, Quick Start Guide, legal and safety notice. Computer System Requirements • • • • • For Computer PC with Windows® ME, 2000, XP, Media Center.
MANUAL V1.0 Technical Support information > p. 60 Technical Support information Need Help? You can find the information you need: • On our Website: see the frequently asked questions section on www.archos.com/faq • By asking our technical support team: visit www.archos.com/support for e-mail support. • U.S. & Canada: Call 877-300-8879 (toll free). All brands and product names are registered trademarks and the property of their respective owners.