
User Guide


- 9 -
"PAN & ZOOM"
Note: "Pan & Zoom" is available for DVD projects only.
"Pan & Zoom" can be used to add some real neat effects to your slide shows. They can be used to add scrolling
motion and zoom to each and every photo. You can have lots of fun with this effect because you design the
movements yourself. The program can also apply random Pan & Zoom effects to every slide in your slide show
automatically (check the "Auto-Pan and Zoom" box).
CUSTOM PAN & ZOOM
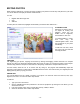
When creating a slide show, click "Custom Pan and Zoom" to create a custom Pan & Zoom effect for a specific
slide. Pan & Zoom works by setting the beginning and ending focus points on a picture. When the Pan & Zoom
effect runs, it simply shifts from one focus point to another.
The top portion of the screen consists of two smaller windows, "Begin" and "End." Here is where you determine
the focus for the beginning and end of the slide. Notice in each window there is a box (in the "Begin" window it's
green; in the "End" window it's red). These boxes set the focus of the slide and determine what is shown on the
screen. The focus shifts from the "Begin" window to the "End" window. For example, if the "Begin" area is set
around the entire photo and the "End" area is set around a specific spot, the resulting Pan & Zoom effect will
show the entire photo, then zoom in to the selected area.
• You can modify the "Begin" and "End" boxes by clicking and dragging on various the various spots. Click
and drag within a box to move it around the photo. Click and drag the rotate icon to rotate the box.
• The center points within both the "Begin" and "End" boxes represent the points around which the boxes
can be revolved. For example, if you move the center point and then rotate the box, the applied effect will
show the boxed area revolving around the center point.
• Check "Pan Only" to keep both the green "Begin" box and red "End" box the same size/proportion.
• Check "Snap to Grid" to make it easier to move and align the boxes. A grid will appear over the windows
to serve as a guide.
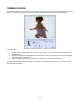
Take a look at the Pan and Zoom Duration section:
There are two pointers that can be adjusted. In the sample here, the 10%
indicates that for the first 10% of the slide duration, the focus will be held to
the area bounded by the Begin box. After the allotted time, the Pan and
Zoom effect will take place, until the remaining 20% of the slide duration is
met. At that point, the focus will be held to the area bounded by the End box.