
Operation Manual


31
Chapter 4: Actions Bar Commands
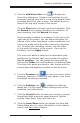
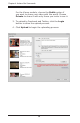
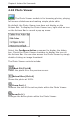
4. Click the Add Voice-Over icon to display the
Voice-Over dialog box. Connect a microphone to your
computer, making sure that it is set as the default audio
recording device for your system. The default device is
listed in the top right corner of the screen.
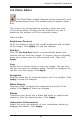
Click the Play button to begin the movie playback. Click
the Record icon to begin recording your narration. To
stop recording, click the Record icon again.
Each recording is added, in sequence, to the list on the
right side of the screen. You can adjust and mute the
volume of the video soundtrack, music soundtrack, and
voice-over audio using the sliders above the narration
list. To adjust the recording volume, use the slider
in the lower left corner of the screen. Once you're
satised, click the Apply button.
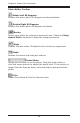
The voice-over audio is saved to the destination path
specied in the bottom right corner under the section
labeled Location. You can change this save path by
clicking the Folder icon and browsing to a desired folder.
The voice-over audio are saved in .wav format with the
current date and sequence number as the le name.
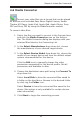
5. Click the Preview icon to view your movie before
saving or sharing it. Controls to play, pause, stop, mute,
and adjust volume are included.
6. Click the Settings icon to display the Settings
dialog box. You can apply default settings and use the
advanced text editing tools.
7. Click the Project button to save your movies in project
format and open previously saved projects. Options
include: New, Open, Save, and Save As.
8. Click the Save/Share button to display the Save and
Share dialog box. For more information on this feature,
refer to the Save/Share feature.