
User Guide


Working with Albums
Photo albums allow easy identification and access to images for
viewing, editing, printing, etc. Simply click on the Get Photo button
on the Main Screen, and select Album to view the album options. It is
important to remember that albums do not store images. When an
album is created, thumbnails are generated and a reference to where
the files are located is recorded in the album file. For example, if a
thumbnail is added into an album from a floppy disk, that floppy disk
must be in the floppy drive in order to view the file.
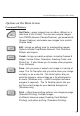
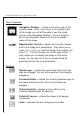
Album Tools:
Select Album – allows you to view your albums through a pull-down. You
can also create new albums. You can give new albums unique names by
typing over the existing name.
Add to Album – launches an Open dialog that allows you to
browse your system to select files you'd like to add to the current
album.
Search – launches a Find dialog, allowing you to find image files
in an album or on your system.
Sort – allows you to sort the thumbnails in your album by name, type,
size, or date. You can also sort in reverse order.
Slide Show – launches the Slide Show dialog with options that
allow you to run a slide show of the images in the current album.
You can include transitions and even have a soundtrack.
View Album (Windows only) – runs a full-screen image viewer,
which displays the images in the current album in a "notebook. It
flips through each image, displaying one image per page.
ArcSoft PhotoImpression Quick Start Guide
11