
Operator`s manual

76
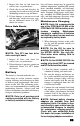
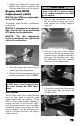
5. Remove the wheel.
6. Install the wheel and install the lug
nuts.
7. Tighten the nuts in a crisscross pat-
tern in 20 ft-lb increments to 40 ft-lb
(steel wheels) or 80 ft-lb (aluminum
wheels).
8. Remove the jack.
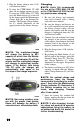
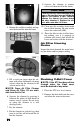
Muffler/Spark Arrester
The muffler has a spark arrester which
must be periodically cleaned. At the
intervals shown in the Maintenance
Schedule, clean the spark arrester using
the following procedure.
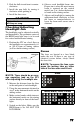
1. Remove the three cap screws secur-
ing the spark arrester assembly to
the muffler.
CF105A
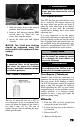
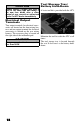
2. Using a suitable brush, clean the car-
bon deposits from the screen taking
care not to damage the screen.
CF104
NOTE: If the screen or gasket is
damaged in any way, it must be
replaced.
3. Install the spark arrester assembly
and secure with the three cap screws.
Tighten cap screws to 48 in.-lb.
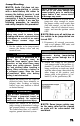
Light Bulb
Replacement
The wattage rating of each bulb is shown
in the chart. When replacing a burned
bulb, always use the same wattage rating.
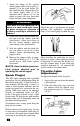
NOTE: The bulb portion of the
headlight is fragile. HANDLE WITH
CARE. When replacing the head-
light bulb, do not touch the glass
portion of the bulb. If the glass is
touched, it must be cleaned with a
dry cloth before installing. Skin oil
residue on the bulb will shorten
the life of the bulb.
To replace the headlight bulb, use the fol-
lowing procedure.
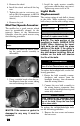
1. Rotate the bulb assembly counter-
clockwise and remove from the
headlight housing; then disconnect
from the wiring harness.
2. Connect the new bulb assembly to
the wiring harness connector; then
insert into the headlight housing and
rotate fully clockwise.
To replace the taillight/brakelight bulb,
use the following procedure.
1. Remove the two screws and remove
the lens cover.
! WARNING
Wait until the muffler cools to avoid
burns.
Headlight 12V/27W (4)
Taillight/Brakelight 12V/8W/27W
CAUTION
Use only specified bulbs indicated in
the chart as replacement bulbs.
! WARNING
Do not attempt to remove the bulb
when it is hot. Severe burns may result.
CAUTION
When replacing the headlight bulb,
be careful not to touch the glass por-
tion of the bulb. Grasp the new bulb
with a clean cloth.