Range Hoods Owner’s Manual Pour version française, visitez notre site à l’adresse www.ardaappliances.
1. IMPORTANT SAFETY INFORMATION ! Intended for Domestic Kitchen Use Only * Important: Read the complete manual carefully before installation* For accuracy, measurements and rough openings should be done based on the actual hood. Warnings: TO REDUCE THE RISK OF FIRE, ELECTRICAL SHOCK OR PERSONAL INJURY, PLEASE OBSERVE THE FOLLOWING: 1. Installation and electrical work must be done by a qualified TECHNICIAN in accordance with all applicable codes and standards. 2.
Important safety information ! 1. 2. 3. 4. TO REDUCE THE RISK OF INJURY TO PERSONS IN THE EVENT OF A RANGE TOP GREASE FIRE, OBSERVE THE FOLLOWING: SMOTHER FLAMES with a close-fitting lid, cookie sheet or metal tray, and then turn off the burner. If the flames do not go out immediately, evacuate and call the fire department. NEVER PICK UP A FLAMING PAN. – You may be burned. DO NOT USE WATER, including wet dishcloths or towels – a violent steam explosion may result.
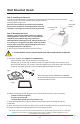
2. WALL MOUNTED HOOD -- INSTALLATION Fig. 1 1. Read this manual carefully and completely. Outlet Cover 2. ARDA range hoods conform to ETL/CSA standards. Check your local building codes for any additional requirements. Grounding Pin 3. The appliance has been manufactured as Class I, therefore a ground connection is necessary. A 110/120V power cord with plug is provided. The range hood must be installed so that the plug is easily accessible (Fig. 1). 4.
Wall Mounted Hoods Fig. 3 Step C. Installing the Ductwork 1. Arda hoods exhaust vertically up through the ceiling to the roof (Fig. 3). They can be ducted to the rear behind the decorative Roof Cap chimney duct through an outside wall. 2. Plan where the ductwork will run between the hood and the outside. 3. A short straight duct run will produce the most air flow. Longer lengths and elbow ducts will reduce the efficiency of the blower. Wall Cap 4. Install a roof or wall cap outside your home.
Wall Mounted Hoods Step E. Installing the Electrical 1. Install a 110/120V electric receptacle on the wall within the dimensions of the decorative chimney (Fig. 6). Note that removal of the plug will void the Fig.6 warranty of the range hood. Grounded Note: All electrical wiring must be done by a qualified Outlet person and in accordance with all applicable codes and Center/plumb standards. This range hood must be properly grounded. Line B Step F.
Wall Mounted Hoods 7. Mount the hood on the mounting screws. When the hood has been leveled, secure unit by tightening screws. Note: Depending on the hood type, before doing the final tightening of the mounting screws, the chimney needs to be placed on the hood in order to secure the lips of the chimney when tightening the screws. 8. Connect a 6” aluminum duct tube (not included) between your hood and duct path. Ensure that the damper flaps are free to open. Seal all seams using duct tape. Fig.10 D Step G.
3. ISLAND HOOD -- INSTALLATION Step A. Before You Start... 1. Read this manual carefully and completely. 2. ARDA range hoods conform to ETL/CSA standards. Please check your local building codes for any additional requirements. 3. The appliance has been manufactured as Class I, therefore ground connection is necessary. A 110/120V plug is provided. The range hood must be installed so that that the plug is easily accessible (Fig. 11). 4.
Island Mounted Hoods Step C. Installing the Ductwork Fig. 13 1. Arda hoods exhaust vertically up through the ceiling to the roof Roof Cap (Fig. 13). They can be ducted to the rear behind the decorative chimney duct through an outside wall. 2. Plan where the ductwork will run between the hood and the outside. 3. A short straight duct run will produce the most air flow. Longer Wall Cap lengths and elbow ducts will reduce the efficiency of the blower. 4. Install a roof or wall cap outside your home.
Island Mounted Hoods Step F. Mounting Height Calculation 1. For an island hood installation, you will need to consider the following when calculating the mounting height (C - Fig. 12 on p.8): Z The minimum mounting height. In general the Telescopic minimum mounting height above an electric range is 24” and above a gas range is 30”. Check your range’s installation manual for the correct minimum mounting height for your installation. Y Your eye level.
Island Mounted Hoods Step H. Installing the Decorative Chimney 1. Attach 6” aluminum duct (not included) to the prepared duct work in the ceiling. Seal all seams. If using the recirculation kit (not provided), the air deflector is installed at this step. Please see instructions provided with kit. 2. Carefully separate the telescopic chimney duct pieces. 3. Attach the inner piece of the decorative chimney to the top of the cage with screws provided (Fig. 17). 4.
4. USE & CARE INSTRUCTIONS Controls 1. Arda hoods come with a variey of controls depending on the model choice (see below). 2. Delay timers, when included, turn off the hood in a set amount of time. 3. Use the lights only when cooking.
Use & Care Instructions Operation 1. For optimum performance in removing cooking odours, it is recommended that you turn on your range hood prior to cooking and you leave it operating for 15 minutes after cooking. 2. Clean the surfaces of the range hood regularly using a non-abrasive detergent. 3. The grease filters capture the grease particles suspended in the air. They will accumulate grease and dirt depending on the frequency of the use of your range/cooktop. 4.
Use & Care Instructions Incandescent Bulb Replacement 1. Allow the bulb to cool for 10 minutes; remove the grease filter for easy access. 2. Carefully unscrew the bulb to avoid glass breakage. Ensure that the replacement bulb has the same voltage and wattage specification as the old bulb. Install new bulb in the light fixture by screwing it into the fixture socket. 3. Replace the grease filter. Halogen Bulb Replacement Note: Replacement halogen bulbs are available at hardware stores.
Trouble-Shooting Guide Problem Possible Reason Solution Ensure the plug is connected Hood doesn’t turn on Poor airflow No electrical supply Ensure the main switch is turned on Power cord is damaged Call ARDA service Aluminum grease filters clogged Clean the filters and replace when dry Charcoal filters clogged (recirculating mode only) Replace the charcoal filters Hood is not secured in place Check the installation of hood Tighten mounting screws Motor running but no airflow, or air comes bac
5. LIMITED WARRANTY This warranty applies only to the original purchaser and may not be transferred. This warranty is applicable within North America only, to hoods installed for normal, non-commercial use in PRIVATE SINGLE FAMILY HOUSEHOLDS. Arda Appliances North America (hereafter “Arda”) warrants its products to be free from defects in materials or workmanship for a period of ONE YEAR from the date of original purchase. It further warrants the motor (part only) for an additional ONE YEAR.
Place photocopy of proof of purchase here We do the utmost to ensure that the provided information is complete and accurate; however, images and specifications are subject to change without notice. Visit our website at www.ardaappliances.com for the latest version of this manual.
Distributed by Arda Appliances NA. 501 Oakdale Road, Toronto, Ontario M3N 1W7 Tel: 416-646-2500 Fax: 416-646-2505 1-800-387-3924 or 1-800-268-4086 www.ardaappliances.