
Installation Guide


We do the utmost to ensure that the provided informaon is complete and accurate; however, images and
specicaons are subject to change without noce. Visit our website at www.ardaappliances.com
for the latest version of this manual.
- 8 -
1. Read this manual carefully and completely.
2. ARDA range hoods conform to ETL/CSA standards. Please check your local building codes for any
addional requirements.
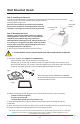
3. The appliance has been manufactured as Class I, therefore ground connecon is necessary.
A 110/120V plug is provided. The range hood must be installed so that that the plug is easily
accessible (Fig. 11).
4.If appliance has been designed for use in both ducted and recirculang modes, follow the
appropriate installaon method. (For recirculaon mode a kit is required – not included. Contact
Integrated Appliances to determine if a kit is available for your hood.)
1. Measure:
a. The oor to ceiling height (A - Fig. 12).
b. The distance from your cooking surface to your ceiling. (B)
c. Check your range/cooktop user manual for the specied min/
max hood distance (C) above your cooking surface.
2. Decide where the ductwork will run between the hood and the
outside. Short straight duct runs will provide the most air ow.
3. Find the centre point of your range/cooktop. Drop a plumb line
from your ceiling to this point on your cooking surface.
Mark the ceiling where the plumb line starts.
4. Calculate the required height of the mounng cage and
decorave chimney. ARDA range hoods will usually t on walls between 8 ½’ and 9 ½’ depending
on the mounng height of the range hood. For a shorter installaon you may need to have the
provided chimney and/or mounng cage cut. For a taller installaon you may need to fabricate an
extension piece.
A - Floor to Ceiling height
B - Ceiling to Cooking Surface (center/plumb line height
C - Cooking surface to boom of hood height
Outlet Cover
Grounding Pin
Grounded Outlet
Plug
Fig.11
C
B
A
Fig.12