FORCED AIR WOOD FURNACE Box 3637, Smithers, BC V0J 2N0 F75R and F101 INSTALLATION AND OPERATION INSTRUCTION MANUAL PLEASE KEEP THESE INSTRUCTIONS FOR FUTURE REFERENCE Operation Maintenance Installation furnace/jc/june96
Dear Customer, You have purchased one of the finest wood burning heating systems in North America. You will find that your Ardent Energy furnace will operate much differently than the old fashioned fireboxes of the past. You will experience a new level of heating comfort and convenience, with greater control, longer burn times and reduced creosote deposits. Please take the time to become familiar with your Ardent Energy heating system.
Furnace Operation SAFETY WARNING: If this furnace is not properly installed, a house fire may result. For your safety, follow the installation directions. Contact local building or fire officials about restrictions and installation requirements in your area. NOTE: We strongly recommend installers to be WETT or WHERF certified. To ANYONE using this furnace: 3. DO NOT use gasoline type lantern fuel, kerosene, charcoal lighter fluid or similar liquids to start or freshen up the fire in this furnace.
Furnace Operation The chimney should be inspected periodically during the heating season to see if a creosote build-up has occurred. If a significant layer of creosote has accumulated (1/4" or more), it should be removed to reduce the risk of chimney fire. Running the furnace at maximum with the bypass pulled out for 1 to 2 hours about once a week will minimize creosote buildup. OPERATION INSTRUCTIONS The following operating instructions must be followed carefully for satisfactory operation.
Furnace Operation WALLTHERMOSTAT OPERATION FURNACE MAINTENANCE Set the thermostat to the temperature desired. When the furnace is warming up a cold room, there will be an initial temperature overrun, then the temperature will stabilize. DAILY REFUELLING 1. Have wood on hand to load the firebox. 2. Open the bypass damper for 30 seconds 3. Open the door slowly. Allow the chimney to draw off smoke. 4. Load as much wood as you need (right up to the top in cold weather). 5.
Furnace Installation IFYOU HAVE AN OILADD-ON Operate the oil fired unit periodically to ensure that it will operate satisfactorily when you would like to use it. DOOR The door is a unique adjustable centre-push design to ensure trouble-free, air tight operation for years to come. When you close the door, there should be a slight resistance. If there is not, the door needs adjusting.
Furnace Installation FLOOR PROTECTION If the floor is combustible, it must be protected by 7 mm (9/32") or thicker of noncombustible material extending 150 mm (6") from the sides and rear, and 460 mm (18") from the front. DUCT WORK Minimum sizes: F75R Return air: 1520 sq. cm (220 sq. in) Supply air: 1290 sq. cm (200 sq. in) F101 Return air: 1610 sq. cm (250 sq. in) Supply air: 1420 sq. cm (220 sq. in) NOTE: The height of the return air inlet must not be higher than the warm air registers.
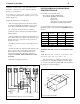
Furnace Installation damper motor wood section fan limit control wood section room thermostat wood supply air 12" x 18" connecting duct plenum 24 v white white existing oil furnace black black red wood furnace blower Figure 7: Connection to an oil furnace 120 v 3.
Furnace Installation NOTE: The installation must comply with CAS Standard B365-M87 - "Installation Code For Solid Fuel Burning Appliances And Equipment." INSTALLATIONASANADD-ON TOAN ELECTRIC FURNACE If any changes are required on the oil furnace, these must comply with CSA Standard B139 "Installation Code for Oil Burning Equipment.
Furnace Options aux. limit 140° F blower & wood limit 250° F limit limit damper motor blower (not used) wood thermostat blower electric, oil or gas thermostat When you connect the piping to the range boiler you must strictly follow the diagram in figure 11. The two shut-off valves must be no smaller than 3/4" GATE valves. Make certain that the PRV (Watts 3L) and the P&TRV (Watts 100 XL) are installed in their respective locations and not vice versa.
Furnace Options for circulation, disconnect and remove the coil. To seal the holes, use two 25 mm (1") diameter standard washers per hole, and use a 19 mm x 25 mm (3/4" x 1") bolt to hold the washers together. PAINT You may touch up the face of the furnace with STOVE BRIGHT Satin Black 1990 high temperature paint. The correct paint is available from your dealer. When you paint the face of the furnace, cover the area surrounding the furnace with newspaper. Follow the directions outlined on the spray can.
Replacement Parts F75R Replacement Parts ITEM QTY/UNIT DESCRIPTION PART# 1 2 3 4 5 6 8 9 10 11 12 13 14 15 16 17 18 19 20 21 22 23 24 25 26 27 28 29 1 1 1 1 1 2 1 1 1 1 1 1 2 1 30" 1 1 1 2 60" 1 1 KIT 1 1 1 1 1 1 rear top shroud back shroud liner assy bypass damper assy bypass lever flame deflector outside fin water coil (optional) side shroud door bypass assembly Scandinavian baffle bypass frame bottom baffle down draft smoke shield assembly door liner cross draft angle assy side shroud assy bal
Replacement Parts 8 25 13 1 14 26 2 15 9 16 10 27 12 17 3 28 4 11 29 18 19 20 6 21 22 23 24 7
F75R & F101 FURNACE WARRANTY FIVE YEAR LIMITED WARRANTY Ardent Energy Inc warrants the F75R and F101 furnaces against defects in material and workmanship for a period of five years from the date received, with the exception of items listed hereafter in the "Exclusions" section. Ardent Energy Inc, at its option, will replace, repair or cause to be repaired any part found to be defective upon inspection by an authorized Ardent Energy Inc representative. EXCLUSIONS 1.