Synchronized Stereo Camera HAT for Raspberry Pi Datasheet Rev 1.
Synchronized Stereo CAMERA HAT Table of Contents 1 Introduction ............................................................................................................................. 2 2 Features & Key Specifications ............................................................................................... 3 3 Application............................................................................................................................... 3 4 Assembly Instruction .......................
Synchronized Stereo CAMERA HAT 1 Introduction Now Arducam released a stereo camera HAT for Raspberry Pi which allows you to connect two 5MP OV5647 or two 8MP IMX219 pi cameras to a single standard pi board, and takes images or video at the same time, even more important they are fully synchronized.
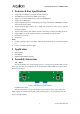
Synchronized Stereo CAMERA HAT 2 Features & Key Specifications Support all series Raspberry Pi boards, Pi HAT board style Two MIPI camera inputs and one MIPI camera output Support 1, 2 and 4 lane MIPI cameras input up-to 800Mbps/lane Support 2 lane MIPI output Support Raspistill (preview) and Raspivid (processing) commands for 5MP/8MP pi cameras with half resolution combine Support Arducam RPI cameras up to 16MP with proprietary camera driver with full resolution combine Support camera
Synchronized Stereo CAMERA HAT Figure 3 8MP V2 Pi Camera Rework Instruction For 5MP V1.3 Pi Camera Removing the oscillator IC marked in circle from one of the camera board, and using jumping wires soldered to the pads as shown in the Figure 4, twist the jumping wires will improve the signal quality. Figure 4 5MP V1.3 Pi Camera Rework Instruction 4.2 Step 2 Attach the 22pin-15pin ribbon cable to the stereo camera HAT (22pin end) and Raspberry Pi CSI port (15pin end).
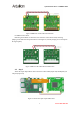
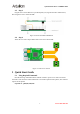
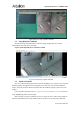
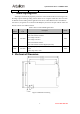
Synchronized Stereo CAMERA HAT 4.3 Step 3 Plug the stereo camera HAT on top of the Raspberry Pi, align the HAT Pin1 to RPI’s Pin1, then using the screws to fasten the HAT. Figure 6 Connect the HAT to RPi Board 4.4 Step 4 Attach the two camera 22pin ribbon cable to the stereo camera HAT. Figure 7 Connect two cameras 5 Quick Start Guide 5.1 Using Raspistill Command Run the following command from the terminal window to preview two camera feed at the same time.
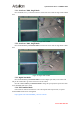
Synchronized Stereo CAMERA HAT Figure 8 Preview using raspistill command 5.2 Using Raspivid Command Run the following command from the terminal window, and playback the recorded video.h264 file from VLC player or similar. raspivid -p 800,100,1024,768 -o video.h264 -t 20000 Figure 9 Record using raspivid command 5.3 Advanced Controls The stereo camera HAT support channel selection and digital pan, it requires to write onboard ArduChip registers through I2C-0 bus on Raspberry Pi.
Synchronized Stereo CAMERA HAT 5.3.1 Switch to CAM0, Single Mode Run command i2cset -y 0 0x24 0x24 0x01 to switch from stereo mode to single mode CAM0 feed. Figure 10 Single mode CAM0 5.3.2 Switch to CAM1, Single Mode Run command i2cset -y 0 0x24 0x24 0x02 to switch from stereo mode to single mode CAM1 feed. Figure 11 Single mode CAM1 5.3.
Synchronized Stereo CAMERA HAT 6 Pin Definition Table 1 MIPI CAM 0 and MIPI CAM 1 Input Ports Pin No.
Synchronized Stereo CAMERA HAT 6 7 GND Ground Power Ground ArduChip Registers ArduChip is the Arducam proprietary solution to control all the hardware internal logic to do the image capture and merge timing controls. There are set of register which allow users to switch to different mode according to their application. The stereo camera HAT acts like a standard I2C slave device, its registers are accessed from the Raspberry Pi Camera CSI port with I2C-0 bus and default 7-bit I2C slave address is 0x24.