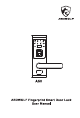
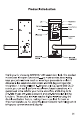
Product Introduction ® ® Left —— Up/Increase 2 38 of —sign e Key board 5 17H Down/Reduce Reset Lear Cancel Io Enter 0 od Petersen | screen a (5 Fingerprint Sensor perishes ® the Arrow Miro USB charging port Thank you for choosing HARDWOOD A50 smart door lock. This product makes your life super more worries about losing keys, you just need one touch or entering a pass code to unlock it. Adopted a live semiconductor sensor and 360 degree fingerprint recognition, it works well with 4--80 years old.
1.Features ® Unlock by fingerprint, code, fingerprint + code, fingerprint + fingerprint, code+ code, and keys; © UP to 200 user IDs could be registered to the lock and both fingerprint and code unlock ways are available for each ID; « Password protection: Add any quantity of 0-6 number before and after the real password, you can still open the lock, highly advanced anti-peep function; © Double ID combination mode: there must be 2 user IDs involved when you enable this function.
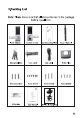
3.Packing List Note: Please make sure that all accessories are in the package before installation.
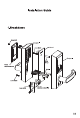
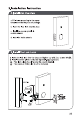
2.Installation Instruction fA provenience. = © | Installation Overview a. Drill holes according to the paper template inside the product package. b. Insert the lock latch into the door. a ¢. Install the square spindle & outside chassis. d. Install the inside chassis. 0) J B Install The Lock Latch a. Insert the lock latch into the door, and tighten up with PCs screws Mdx20. b. Install the strike plate and fix with PCs self tapping screws. A : The latch slope should face to the outside deadbolt.
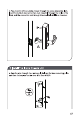
et Sel Sel ee ¢. Pass the square spindle through the latch and ins it into square hole on the back of the outside chassis. If the door thickness is less than 2°, the spring side should face the inside housing. (Note: If the door thickness is over 2°, the spring side should face the opposite direction.). unit: inch 159 ~ 216 Adjusting Spring Of Adjusting Spring Of Thickness Thickness a. Fix the PCs connection rods to the back of the outside chassis.
b. Pass the wire of the outside chassis through the space above the latch. Insert the bottom two connection rods smoothly through the holes in the latch, and the connection rod through the small hole drilled on the door. D Install The Inside Chassis Unit a. Pass the wire through the rectangular hole on the base mounting plate and then fix the plate on the door with PCs M4x30.
b. Connect the wire to the battery cable of the chassis. ¢. Insert the square spindle into the inside handle. Please arrange the wire in the empty space and make sure the wire is not twisted or crushed. d.
Eee EE SRL a. Put 4 new AA Alkaline batteries in the battery compartment. b. Put on the battery cover down and fix with a screw c. Never mix new batteries with used batteries. F Testing Lock a. You should be able to push down and lift up the handle. b. You should be able to unlock the lock with mechanical keys. ¢. You should be able to add users and program the lock by following the operation introduction. Note : You can contact customer support team for the installation video.
Operation Introduction 1.Brief Introduction a. Master: who has the highest priority in the locking system, not only can unlock but also set up the lock. 10 users maximum { ID range: 0001-0010}. b. Normal users: whe can only unlock the lock but has no right to set up the lock. 140 users maximum ( ID range: 0011-0150). . Guest user: Who can only to unlock the door within the permitted time(nanny function}, 50 users maximum (ID: 0151-1200). d.
3.Register User ID Factory default ee Active the lock by touching the screen User Empty Enron Master Enroll 3 times press properly Press FP #1 Press FP #2 Press FP #3 FP Enron OK Press.
4 Modify User ID Modify Fingerprint Active the lock by touching the serene Stern Setup Date Transfer A184 renter Press FP #3 ‘Confirm Modify? verier FP Modify OK Modify Password Active the lock by ‘musing the screen enter Verify Master Ve System Menu Enroll User ty sek: Delete User Record Check System Setup Date Transfer A181, Sorter Input PW #1 inf Confirm Modify? Modify Schedule Active the lock by touching the screen verier Verify Master Ver System Setup 1,81, enter D 0181 41.
5.Delete User ID Delete Master Active the lock by touching the senora System Setup Date Transfer 4181, _terser Delete User Dal Master: << Del User Del All Users 4181, perter Master.
6.
7.Record check Unlock Log User Info Active the lock by Active the lock by touching the screen touching the screen enter fe System Menu Env User Moody User Delete User Reconstruct: « System Setup Date Transfer 4181, interpose 4181, Edt 8.0pen Mode When the lock is in the open mode, anybody could open the door by pushing down the handle.
10.Sound Setup Login to the system, go to the menu page, press. to tum on or turn off the key sound or prompt sound. 11.System Nit Login to the system, go to the menu page, press — to confirm. You can reset the system to manufacture default by using this function and all user ID will be removed after resetting. 12.Key unlock Insert a key in the cylinder and rotate 180° counterclockwise, push down the handle to unlock and then rotate a key 180° clockwise to take out the key. 13.
Software-Lock Assistance 1.Software Download Download the software by scanning the code below or from the link : " O00 oT NM 2.Data Transmitting USSR Copy X Herr Data FE Terr Barking Pear Ravens Backup and Recover User Date Under Normal Mode a. Connect the lock to the computer through the USB cable{included). b. Login to the lock system and go to the data transfer function and then open the lock software on the computer. ¢.
3.Set Up and Manage User Data With the “lock Assistant” software, you can set up the lock, manage the user data or unlock records. a. Setting ck Resistant 5 Geminis Toadyism Hi Gino biotin Peseta REE al. Firmware Version: You can check the firmware version in the lock, and update the firmware version. a2. Time Set: You can customize the lock time or sync the lock time with the computer time b.
bi. User Download Load All Users: all users will be downloaded from the lock to the computer. Delete Selected User: ably the selected users will be deleted. Delete All Users: all users will be deleted, including the master user, normal user and guest users. b2. Log Download Load All Records: all records in the lock will be downloaded to the computer. Delete All Records: all unlock records will be cleared from the lock. b3. Log Query You can check the unlock records by selecting the date and user ID.
Warranty Global warranty policy Warranty period for this product is ane year and we provide lifetime after sales services. Warranty Agreement ® Within one year of the purchase date, if the product has any quality or technical problems, we will repair or replace the product for the buyer for free. The warranty period starts from the original order date.
Contact Please contact us for the install video, setup video, lock software or any problem you have of this lock. Service Email: serviceability F @Hardwood Home Security More information you will find at www.