
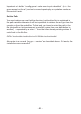
Instructions Circuit Diagram

- 29 -
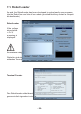
7.2. Connection of the USB interface – Windows
Linux users can skip to the next section!
There are several options to install the USB interface, the easiest being the
installation of the driverBEFOREtherstconnectionofthehardware.
The CD contains an installation program for the driver.
For 32 and 64 Bit Windows 7, XP, Vista, Server 2003 and 2000 systems:
<CD-ROM drive>:\Software\USB_DRIVER\Win2k_XP\CDM_Setup.exe
For old Win98SE/Me systems, such a handy program does unfortunately
not exist. You need to install an older driver manually after connecting the
equipment (see below).
Just execute the installation program. There will just be a short note that the
driver has ben installed and that’s all.
Now you can connect the USB interfac to the PC. PLEASE DO NOT
CONNECT TO THE ROBOT YET! Just connect to the PC via the USB lead.
Please touch the PCB of the USB interface only at the edges or at the USB
plug or at the plastic shell of the programming plug (see safety instructions on
static discharges)! Please avoid touching any of the components on the PCB,
soldering points or contacts of the IDE connector unless absolutely necessary
in order to prevent static discharges!
The previously installed driver will be used automatically for the device without
any help from your side. Under Windows XP/2k small speech bubbles appear
at the bottom above the task bar. The last message should be “The device has
been successfully installed and is ready for use!”.
If you have connected the USB interface before the installation (or use
Win98/Me) – it doesn’t matter so much. Windows will ask you for a driver. This
installation method is also possible. The driver is also in unpacked format on
the CD.