
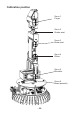
Instructions Circuit Diagram


- 33 -
7.4. Testing the USB Interface and starting the
RobotLoader
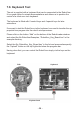
The next step is a test of the program upload via the USB interface. Connect
the USB interface to the PC (always connect the PC rst!) and the other end
of the 10-pin ribbon cable to the “PROG/UART” connector on the Robot Arm.
(Robot Arm MUST BE SWITCHED OFF!) The 10-pin ribbon cable is mechani-
cally protected against polarity inversion. As long as it is not forced, it can’t be
connected the wrong way round.
Once you have selected your language, you have to re-start the Robot Loader
to validate the changes!
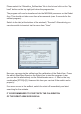
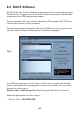
Open a port - Windows
If more ports exist, you can identify the port via the name “Robot USB Inter-
face“ (or „FT232R USB UART“). Behind the port name the programmed serial
number is displayed.
If no ports are displayed, you can refresh the port list via the menu item “Robot-
Loader-->Refresh Portlist“ !
WARNING!
If the voltage drops below < 4,4 V, a warning is displayed.
The maximum voltage that the RobotLoader can measure, is 5.1V!
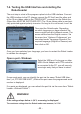
Then start the RobotLoader. Depending
on which language you have selected, the
menus might have a bit different names. The
screen shots show the English version. Via
the menu item “Options->Preferences“ you
can select under “Language /Sprache“ the
required language (English or German) and
then click on OK.
Select the USB port. As long as no other
USB->Serial Adaptor with FTDI controller
is connected to the PC, you will see only
one single entry that you have to select.