AREXX WIRELESS KITS ARX-WRL MANUAL: WRL-03 © AREXX - NETHERLANDS V0512 -1-
Inhaltsverzeichnis 1. Product description WIRELESS KITS 3 2. Warnings 4 3. Bluetooth 5 4. Android 7 5. Wireless Transceiver kit 10 6. PC Wireless communication 14 7. APC-220 16 8. The Bluetooth module 19 9. Android software aplication 22 10.1 APC-220 24 10.2 Bluetooth 24 11. Visual Basic 26 11.1 Software development 28 11.2 Eclipse 29 xx. APPENDIX 31 A. B. C. C. D.
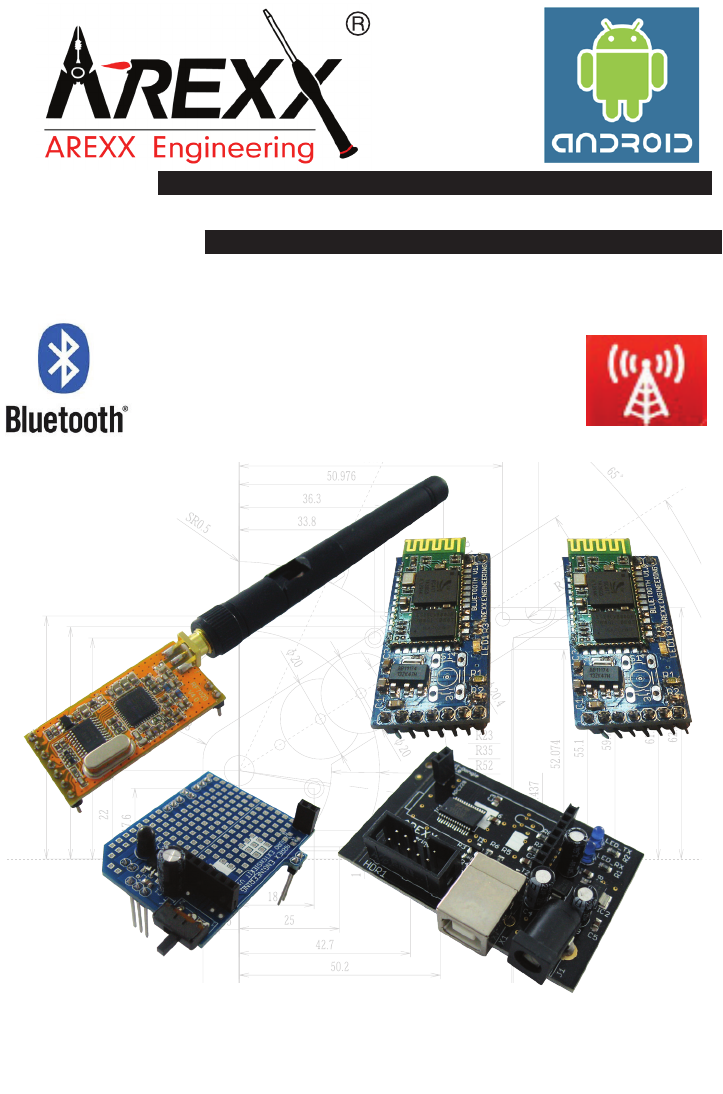
1. PRODUCT DESCRIPTION WIRELESS 1.1. Introduction The „Wireless“ transmission module from AREXX is an extension set for the ASURO robot that is also suitable for other robot models such as the AREXX Arduino (AAR) or the PRO-BOT from Conrad. The „Wireless“ transmission module contains the circuits for standardized infrared communication so that you can continue to use the ASURO USB-IR transceiver with the ASURO Flash software. Moreover this extension module offers space for an APC220 or a Bluetooth module.
2.5.1 CAUTION • • • • • • • Read this manual carefully in advance to fully understand how to assemble this product. Children below 14 should can only assemble this product with the help of adults. Be careful about tools. Especially be careful about sharp tools such as nippers or cutter knife to prevent any injuries or accidents. Never assemble the kit when a younger child is around. The child might touch sharp tools or swallow parts and a vinyl bag. Be careful about sharp edges of parts.
2. Bluetooth 2.1 History The Bluetooth technology was developed by the company Ericsson. Bluetooth is an open standard for wireless transmission between units over short distances. Just imagine mobile radio units with a wireless headphone connection or data transfer between mobile radio units or a GPS receiver that sends wirelessly data to a telephone. In 1994, Ericsson developped Bluetooth as a wireless way of communication between mobile radio units and other systems.
Within a pico network Bluetooth supports a maximum of 8 active units whereas 127 units can operate a communication link that is temporarily kept in a passive state (parked) (fig. 1). Fig. 1 : Scatternet The energy consumption of Bluetooth is extremely low: 30 microamps in passive standby mode and 8 to 30 milli amps in active state. This low consumption allows Bluetooth to be used also in battery powered mobile units.
3. Android 3.1 Background information Android is an „open source“ platform for mobile units such as Smartphones and Tablets that have been developed by the company Android Inc.. In 2005, Android has been taken over by the company Google. The unveiling of the Android distribution in 2007 was announced with the founding of the Open Handset Alliance, a consortium of 40 hardware, software, and telecommunication companies devoted to advancing open standards for mobile devices .
Ice Cream Honeycomb Honeycomb Honeycomb Gingerbread Froyo Eclair Donut Cupcake Erste Publikation Android Android Android Android Android Android Android Android Android Android 4.0 3.2 3.1 3.0 2.3 2.2 2.0 1.6 1.5 1.1 Fig. 2 : Android-version Fig.
3.2 The Software Development Kit (SDK) Google unveiled the SDK software so that users are able to write their own applications for a smartphone, a tablet PC or both. The SDK contains a collection of various helpful tools such as a debugger tool and an emulator plus a series of example applications and tutorials on the website. Open following link to download the SDK: http://developer.Android.com/sdk On this page you will find the installation files and extensive instructions on how to install the SDK. 3.
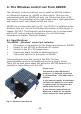
4. The Wireless control set from AREXX The „Wireless“ control set allows you to install an APC220 module or a Bluetooth module on ASURO or other robots. Thus you can communicate with the ASURO not only via Infrared but also via RF frequencies. The advantage of the high frequencies is that transmitter and receiver don’t need visual contact any more. ASURO can communicate with the PC if an APC220 is installed on the Wireless radio set. You will find further information on this subject in chapter ‘APC220’.
4.2 Installation on the ASURO robot The installation of the „Wireless“ radio modules can be explained in 3 steps: Step 1. First of all the ASURO PCB must be prepared as follows for the installation of the „Wireless“ radio module: 1. Unsolder the components at the locations marked in red and remove them from the PCB (fig. 9). Use a specific soldering iron or special unsoldering tin to unsolder the components.
Step 2. Install now the ASURO extension set on the ASURO PCB. The set should fit accurately into the previously installed socket parts. Fig. 6 : ASURO with radio control PCB (Side view) Fig.
Step 3. Install now either the APC220 or the Bluetooth module. Fig. 8 : ASURO with Bluetooth Fig. 9 : ASURO with APC-220 The installation of the hardware is finished. Now you can establish a connection with the various applications. In chapter ‘APC220’ we explain how you can control ASURO via the APC220 module. The chapter ‘Bluetooth module’ explains how the Bluetooth communication will work.
5. APC220/Bluetooth with PC radio data communication In order to install a communication link between the PC and Asuro we need a dongle. We decided to use the RP6v2 Programmer adapter (WT Dongle). Fig. 10 : RP6v2 USB Programmer (WT dongle) For wireless communication from the PC we prefer the APC220 radio data module or a Master Bluetooth module. These modules are modest in energy consumption and easy to install, which are convincing details in choosing the components for robotic designs. 5.
5.2 Preparation for the wireless communication Important! The robot cannot communicate through a wireless connection yet. Besides the hardware modification, when the wireless extension PCB is mounted on the robot, a program must be loaded. 1 2 PC or Phone Robot TRANCEIVER 1 In case of Android communication, an application should be loaded in an Android Smartphone or tablet.
6. APC220 In combination with the APC220 module, ASURO can be controlled via the „ASURO control“ programme that needs to be installed on the PC. “ASURO Control” can be downloaded from the website. The software has been written in Visual Basic and is available to the user as a variable source. The ASURO software needs to be slightly adjusted. This software is also an open source product.
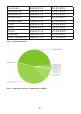
This code shows that the system calls a few functions in Battery () e.g. in order to measure the battery voltage. This function supplies a value between 0 and 255 that is processed in the PC programme and displayed on the terminal. The bytes 10 to 13 are free and can be freely programmed. Fig. 13 : Asuro Control Software (Visual Basic) Once the application ‘ASURO CONTROL’ has been started, the programme displays the screen above. Now you can get in contact with ASURO and control the robot.
The ASURO robot can be controlled via buttons on the right side. The speed is set via a slider on the upper right side. Moreover is it possible to control the robot via a keyboard. To this end, you need to tick on the field ‘Key Control’. W: Forwards A: Left S: Backwards D: Right E: Stop There are several ways to set the operating frequency of the APC220. If several APC220’s are operating close to each other, the protocole will make sure that the data will be sent to the right ASURO.
7. The Bluetooth Module You can control ASURO via a PC or a telephone if you install a Bluetooth Slave module inside the extension module. To do that, you need to install a Bluetooth Master module on the WT dongle. The difference between the Slave and the Master module is shown in fig. 15 and 16. Afb. 15 : Slave Afb. 16 : Master Those Bluetooth modules are only available in the ARX-WRL03 KIT The master module (right-hand side) is marked with a white dot on the upper IC.
This situation is shown by the blue LED. In this procedure following operating modes are defined: Fast flashing: Steady on: Slowly flashing: Slave and Master are not connected together Slave and Master connected together The Master is not connected but it has saved a slave address. In this case you can erase the saved address by pressing the switch. You can chose a name for the Bluetooth Slave module.
Once the Bluetooth Master module has been installed in the WT dongle or the Slave in the ASURO extension kit, a communication link can be established with ASURO exactly as for the APC220. Start the ‘ASURO Control’ programme. The COM port remains the same and the same steps as described in the APC220 chapter are executed.
8. Android mobile phone application If you want to control ASURO via a mobile phone, you need to install the Bluetooth Slave module on the ASURO extension kit. After that, you have to install the ‘ASURO Bluetooth’ application on your mobile phone. This software is available on the AREXX website. In the same area you can download the source code for this application so that you can input the source and match it to your own needs. Most android mobile phones are fitted now with the operating system Android.
As soon as you click on the ‘options’ key of the unit, the programme opens a window with the message ‘Connect a device’ and ‘Disconnect’. These commands are self-explanatory: first of all, the telephone has to establish a connection with the Slave module. With the command ‘Connect a device’ you are asking the telephone to search for Bluetooth units nearby. As soon as the name of a Slave module appears, you can click on the name and the system will establish the connection.
7. Background Information 7.1 APC220 Communication between the PC and Asuro may be accomplished by a APC220 radio data module, which is a transceiver from Appcon Technologies. A transceiver is a combination of a transmitter and a receiver in a single chip, which allows us to transmit and receive signals by using only one singular device. The transceiver has been equipped with a UART-interface, which enables the module to communicate with a PC or a micro-controller. Fig. 19 : APC-220 Fig.
7.2 Bluetooth Bluetooth is an open standard for exchanging data between systems over short distances and has been developed by Ericsson as an RF-communication link between mobile phones and other equipment. Communication uses the 2,45 Ghz-band and does not require a line-of-sight connection. The high GHz-frequency band allows Bluetooth-signals to penetrate and pass concrete materials as long as they do not contain metals.
8. Visual Basic An application will be needed to use a PC to control the Asuro robot. A great variety of programming languages is available for such applications. Initially normal students will not be experienced in developing applications. Therefore we decided to choose Visual Basic, which provides an easy way to develop applications. Visual Basic (VB) is a programming language and a development tool, allowing is to create software for the Windows operating system.
Fig. 21 illustrates the main program’s window. In the left box we may identify the area to insert buttons, timers and text-boxes. As a user you might adapt attributes for these elements’ and refer to these elements in your programming code. If you press the ‘refresh’ - button at the window the button’s driver software will be activated. Private Sub Button_Refresh_Click (ByVal sender As System. Object, ByVal e As System.EventArgs) Handles Button_Refresh.
8.1 Software Development Kit In order to enable users to write their own applications for smart-phones, tablets or both Google released a Software Development Kit (SDK). This SDK provides us with a number of sophisticated tools, such as a debugger and an emulator. The relevant website also contains a great number of sample applications and tutorials. The SDK Manager (figure 22) allows the user to add platforms to his development workspace. He may also choose to install various sample applications. Fig.
The SDK also provides us with a Virtual Device Manager (figure 23). This Android Virtual Device Manager enables the user to define a virtual device, which allows the designer to emulate and debug his newly created software. Fig. 23 : Vritual device manager You may download the SDK from the following website: http://developer.android.com/sdk This site provides us with the installation package including detailed instructions for the SDK’s installation procedure.
7.5 Eclipse Eclipse is an open-source software framework, designed by the Eclipse Foundation for software development purposes. The most popular application is a development environment for the programming language Java. The SDK has been equipped with an Eclipse plugin, which enables a software developer to easily start an Android project, including compiling, debugging and emulating the software. At completion the designer will create an .
APENDIX - 31 -
B.
A.
- 34 E D C B A 1 1 JP3 3 2 1 AVCC_1 PC3(ADC3) PD2(INT0) 2 2 JP3 JP5 GND 2 1 APC220 GND 1 3 5 4 TXD RXD 7 6 3 SET AUX EN PD6(AIN0) GND1 JP4 JP5 SET AUX EN 3 2 1 PB3(MOSI/OSC2) AVCC_2 PC2(ADC2) JP4 3 2 VCC JP6 + GND C2 C1 10uF 220uF C4 V+ GND SFH415-U IR_LED GND 100n MODULE GND IRLED+ 1 2 JP7 4 OUT 5V GND GND C3 GND 4 OUT GND 1 2 JP6 JP7 GND IRLED- SFH5110 GND 5V JP8 1 2 3 JP8 VCC100n 5 2 5 6 6 7 www.arexx.
C.
E.