
Installation/Operating Guide


15
THERMOSTAT INSTALLATION
1. Thermostat should be installed on an inside wall
about four feet above the oor.
2. NEVER install a thermostat on an outside wall.
3. Do not install a thermostat where it will be affected
by sunlight, drafts, televisions, lighting xtures, hot
or cold pipes, replaces, or chimneys.
NOTE: Your new Argo AT Boiler
will work well with all standard
and most programmable set-
back thermostats. In the event
the programmable thermostat
you use causes the boiler con-
trol T-T LED to icker on and off
when there is no call for heat,
your thermostat will require
an external 24V power supply
(transformer) and isolation relay
or an Argo "AR822" control.
! !
! !
It is suggested that a qualied service agency be
employed to make an annual inspection of the boiler
and the heating system. They are experienced in
making the inspection outlined below. In the event
repairs or corrections are necessary they can make
the proper changes for safe operation of the boiler.
CAUTION
Label all wires prior to disconnection when
servicing controls. Wiring errors can cause
improper and dangerous operation. Verify
proper operation after service.
After all procedures have been carefully followed
and completed, the hydronic block is now ready to
be put into service.
1. Check hydronic block circuit breaker or switch at
the service entrance and, depending on the option,
the hydronic block circuit breakers within the unit
to assure that they are in the "Off" position.
WARNING
Only propylene glycol can be used in heating
system to prevent freezing. Recommendation is
a maximum 40% or less propylene glycol mixture
to ensure proper operation of electric boiler.
! !
2. Fill the heating system with water until the pressure
reaches 10-15 PSI. Check for leaks, repair if
necessary, and purge all air from system.
CAUTION
Failure to vent and keep air out of the heating
system will result in damage to heating
elements in the hydronic block. Damage of
this type is not covered by the manufacturer's
warranty.
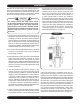
3. Set the boiler operating temperature to designed
heating water temperature by adjusting the
potentiometer dial located on the top center of the
controller (Figure 4). Adjust arrow on temperature
adjustment dial to the water temperature required.
NOTE: This boiler is also equipped with a high-
limit temperature device set at 200°F as a safety
limit control. The high limit temperature device
has an automatic reset function and will reset
at 170°F.
4. Turn on the hydronic block circuit breaker at the
service entrance and/or disconnect switch and,
depending on the option, the 15 amp circuit breaker
on the hydronic block.
5. Set one thermostat above room temperature. The
circulator pump will now operate.
4. Instructions for nal adjustment of the thermo-
stat (adjusting heating anticipator, calibration,
etc.) are packaged with the thermostat. Recom-
mended setting for the heating anticipator is
0.1 amps.
THERMOSTAT INSTALLATION
STARTUP AND SEASONAL MAINTENANCE