EN LOCAL AIR CONDITIONER dados 9/13 plus OPERATING INSTRUCTIONS Read the instructions carefully before operating the appliance or carrying out maintenance work. Observe all the safety instructions; failure to observe the instructions may lead to accidents and/or damage. Keep these instructions in a safe place for future reference.
GENERAL OPERATING AND SAFETY INSTRUCTIONS This appliance is a portable air-conditioner, designed for domestic use. Only use this air-conditioner as described in this manual. Ensure that the required voltage and frequency (220-240V/50Hz) match the available power source. Ensure that the electricity system is able to deliver the operating current needed by the air-conditioner in addition to that normally absorbed by other appliances (electrical appliances, lighting, etc.).
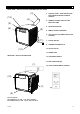
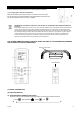
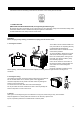
DESCRIPTION OF THE APPLIANCE FRONT VIEW - SIDE FOR COOLING, DEHUMIDIFYING, FAN MODES (3) 1) (13) CONTROL PANEL - FUNCTION BUTTONS FOR OPERATION WITHOUT REMOTE CONTROL 2) (4) 3) TERMINAL CONNECTOR OF THE AIR EXPULSION TUBE 4) AIR EXPULSION TUBE 5) REMOTE CONTROL RECEIVER 6) COOL AIR OUTLET (COMPLETE WITH AIR LOUVERS ) 7) 8) INLET GRILLES 9) CONDENSATE DRAIN HOLE (5) (6) (8) (11) 10) HOT AIR OUTLET (12) 11) POWER CORD REAR VIEW – SIDE FOR HEATING MODE 12) CONCEALED WHEELS 13) BLUE OPE
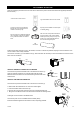
APPLIANCE START-UP Open the packaging and remove the box from above. Remove the product and the other elements supplied (illustrated in the box below). "Touch Screen" remote control Type AAA batteries for the remote control. Circular connection to be positioned between the end of the tube and the terminal connection (A+B). Opening kit for installation in window (also for double glazing).
HOW TO USE THE APPLIANCE This appliance can be used to Cool, Dehumidify, Fan and Heat. In changing from one mode to another, the fan continues operating but the compressor stops; the compressor starts up again 3 and a half minutes later. This delay in start-up protects the compressor from any damages. IMPORTANT! To operate in Cooling, Dehumidifying and Fan mode, the air-conditioner must be positioned with the air outlet fitted with deflectors positioned to the front.
3. HEATING MODE Press FUNCT to select Heating until the relevant icon appears. By default, the temperature is set to 25ºC. The temperature can be adjusted between 15° and 25°C. In this way, each time the Power button is pressed, the unit switches off, the appliance saves the temperature set and when switched back on again, it will retain this setting. In this way, fan speed can be adjusted; the Timer and ECO function can be set.
REMOTE CONTROL OPERATION Insert the batteries into the remote control, respecting polarities specified. Only use type AAA or IEC R03 1.5V batteries. Remove the batteries if the remote control is not used for a month or longer. Do not attempt to recharge the batteries. Change all batteries at the same time. Do not throw batteries onto a fire, they may explode.
(4) TEMPERATURE ADJUSTMENT BUTTON (▲▼) Increase (▲): 1) Enables the adjustment of the temperature desired in Cooling and Heating modes. 2) Each time the (▲) button is pressed, the temperature set increases by 1ºC; by holding the button pressed, the temperature increases continuously.
OPERATION WITHOUT A REMOTE CONTROL If the remote control is not working or has been lost, the button on the control panel can be used. 1. "POWER" BUTTON (SWITCHING ON/FUNCTION SELECTION (Cooling/Heating/Fan/Switching off) By pressing this button consecutively on the control panel, the unit is activated, cooling mode is selected, heating mode is selected, ventilation mode is selected and finally the appliance is deactivated. For Dehumidification mode, always use the remote control.
4. Transport. If possible, transport the air-conditioner in a vertical position. If not possible, lie it on its right side; when you reach your destination, immediately return the appliance to a vertical position and wait at least 4 hours before using it to cool. 5. For complete safety, regularly check the condition of the power cord; if it should be damaged through use, to replace it contact the Service Centre.