EN DEHUMIDIFIER OPERATING INSTRUCTIONS Read the instructions carefully before operating or servicing the dehumidifier. Observe all the safety instructions; failure to observe the instructions may lead to accidents and/or damage. Keep these instructions in a safe place for future reference.
GENERAL OPERATING AND SAFETY INSTRUCTIONS • This appliance is a highly efficient dehumidifier, designed for domestic use only! • Use this dehumidifier only as outlined in this manual. Any other use not recommended by the manufacturer may cause fire, electric shock or malfunctions. • The unit contains refrigerant; keep it vertical at all times. • Once you have opened the unit, keep it vertical to allow the refrigerant to stabilise and wait two hours before operating it.
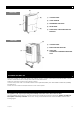
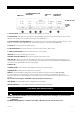
DESCRIPTION OF PARTS (2) FRONT VIEW (1) (4) (3) (5) REAR VIEW 1) CONTROL PANEL 2) CARRY HANDLES 3) DEHUMIDIFIED AIR OUTLET 4) FRONT PANEL 5) WATER TANK; CAN BE REMOVED FOR EMPTYING 6) CONTROL PANEL 7) REAR PANEL WITH AIR FILTER 8) HATCH FOR CONTINUOUS CONDENSATE DRAINAGE HOLE (6) (7) (8) OPERATING INSTRUCTIONS APPLIANCE START-UP Place the product on a flat and stable heat-resistant surface, at least 1 metre away from flammable or heatsensitive materials and 50 cm away from walls or o
WARNING: After each interruption of its operation, at least 3 minutes must pass before the dehumidifier starts up again: this delay prevents the compressor being damaged. If, on the other hand, the set humidity percentage is higher than the level currently found in the room, the dehumidifier will not start.
CONTROL PANEL TIMER LED LOW-MEDIUM-HIGH FAN SPEED LED TANK FULL LED CONTINUOUS OPERATION STAND-BY LED CLEAN FILTER LED 1. ON/OFF BUTTON Press this button to turn the dehumidifier on and off. 2. FILTER BUTTON: After 250 hours of operation, the FILTER RESET led turns on to indicate that it is time to clean the filter. Take the filter out and clean it. Then press the FILTER button. 3.
Use a damp and soft cloth to clean the exterior surface of the dehumidifier. Do not use solvents, petrol, xylene, talcum powder or brushes to clean the unit: these may damage the surface or colour of the casing. CLEANING THE WATER TANK We advise removing the tank once every few weeks to prevent mould and bacteria forming on it. Fill the tank with clean water a small amount of detergent; swill the water around in it, then it out and rinse it thoroughly.