INDICE AVVERTIMENTI/ATTENZIONE ………………………………………………… 0 DESCRIZIONE DEI COMPONENTI/FUNZIONI… ……………………………….. 1 ISTRUZIONI D’USO… ………………………………………………………………. 2 DRENAGGIO CONTINUO… ……………………………………………………….. 3 …………………………………………………………………… 4 AVVERTIMENTI… MANUTENZIONE/EMERGENZA… ………………………………………………... 5 SPECIFICHE… ……………………………………………………………………….
CONTENTS WARNING / CAUTION ................................................................................... 0 DESCRIPTION OF COMPONENTS / FUNCTION EXPLANATION............... 1 OPERATION INSTRUCTIONS …………………………………………………. 2 CONTINUOUS DRAINAGE …………………………………………………….. 3 CAUTIONS ………………………………………………………………………… 4 MAINTENANCE/EMERGENCY …………………………………………………. 5 SPECIFICATIONS...........................................................................................
WARNING ● Do not fold the power cord as shown below! ● Make sure the plug is placed fully & firm into the socket! ● Do not use multiple socket as shown below! ● Make sure the plug is clean! ● After turning the unit off, please take plug out of the socket. ● Do not have wet hands when connecting the power plug. ● Do not place anything on top of the control panel! ● Do not place anything over the inlet or outlet points.
DESCRIPTION OF COMPONENTS CONTROL PANEL HANDLE MOISTAIR INTAKE DEHUMIDIFIED DRYAIR VENT AIR FILTER DRAIN BUCKET CONTINUOUS DRAINAGE OUTLET ROLL CASTORS FUNCTION EXPLANATION BUCKET FULL LAMP Water tank is full,and lamp lights. FAN SPEED High / Low POWER On / Off DEFROST LAMP CURRENT TEMP / TIMER SET DISPLAY When low temperature, unit gets into defrosting mode and lamp lights. When machine is running, it displays the current temperature.
OPERATING INSTRUCTIONS ● Start Operation 1) Place the product in an upright position on a flat, steady, stable, heat-resistant surface. Make sure there is nothing flammable or heat sensitive within 100 cm (39 inches). Operating the product in any other position could cause a hazard. 2) Insert the plug into a suitable wall socket. The dehumidifier is suitable for operation on an electricity supply having the same voltage as that shown on its rating label. 3) Make sure the water tank is correctly located.
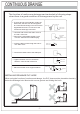
CONTINUOUS DRAINGE The function of continuous drainage can be started in following steps when there is a good condition of drainage near by the unit. 1. To save having to periodically empty the water tank, this unit can be configured for continuous drainage. You can use the supplied drain hose to connect to the continuous drainage connector. Back of the unit Drain hose Drain cover Drain cover 2. Unscrew and remove the drain cover at the rear of the unit. 3. Remove the soft rubber stopper.
CAUTIONS ● Do not pull the power cord to avoid broken cord, which lead to danger. ● Do not use insect, oil or paint spray around the machine, it might cause damage to the plastic parts or start a fire. ● Do not place the machine on an uneven ground, to avoid shaking, noise and leakage of water. ● Please always keep the unit 20 cm away from the wall to dissipate the heat properly. 20 cm ● It is dangerous to put anything into the machine.
MAINTENANCE For safety reasons, make sure the dehumidifier is unplugged before serving or cleaning the machine. 1) Cleaning the shell : A. Wipe the shell with a clean, soft cloth. B. If the dehumidifier is very dirty, use mild detergent then wipe off the detergent with half dried cloth. C. Do not wash the machine with a hose or immerse it in water. The may cause leakage of electricity. 2) Cleaning the air filter : The propose of the air filter is to filter dust and other materials from the air.
SPECIFICATIONS MODEL ECODRYPRO 30 ECODRYPRO 50 POWER SUPPLY 220-240V / 50 Hz MOISTURE REMOVAL 15 L/24h (27° C - 60%RH) 30 L/24h (30°C - 80% RH) 25 L/24h (27°C - 60% RH) 50 L/24h (30° C 80% RH) POWER INPUR 520 W DIMENSIONS ( Height./Width./Depth.) 540x340x252 13.2 kg WEIGHT OPERATING LIMITS 740 W 600x388x282 19.5 kg 5°C ~ 35°C F-GAS REGULATION (EC) no.