EN PORTABLE AIR CONDITIONER (LOCAL) OPERATING INSTRUCTIONS Read the instructions carefully before operating the appliance or carrying out maintenance work. Observe all the safety instructions; failure to observe the instructions may lead to accidents and/or damage. Keep these instructions in a safe place for future reference.
GENERAL OPERATING AND SAFETY INSTRUCTIONS • • • • • • • • • • • • • • • • This appliance is a portable air conditioner, designed for domestic use. Only use this air conditioner as described in this manual. Ensure that the required voltage and frequency (220-240V/50Hz) match the available power source. Ensure that the electricity system is able to deliver the operating current needed by the air conditioner in addition to that normally absorbed by other appliances (electrical appliances, lighting, etc.).
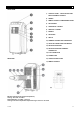
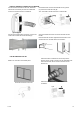
DESCRIPTION OF THE APPLIANCE FRONT VIEW 1) CONTROL PANEL - FUNCTION BUTTONS WITHOUT REMOTE CONTROL 2) HANDLE 3) REMOTE CONTROL COMPARTMENT DOOR 4) AIR DELIVERY 5) HORIZONTAL LOUVERS 6) VERTICAL LOUVERS 7) WHEELS 8) AIR INTAKE 9) GRILLE 10) TERMINAL CONNECTION FOR WINDOW 11) CIRCULAR CONNECTION FOR WINDOW 12) AIR EXPULSION HOSE 13) AIR EXPULSION HOSE TERMINAL CONNECTION 14) FLAT CONNECTION 15) POWER CORD REAR VIEW 16) CORD STORAGE HOOKS 17) REMOTE CONTROL 9) 1 A (17) Min/max operating l
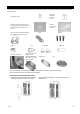
APPLIANCE START-UP Open the packaging and remove the box from above. Remove the product and the other elements supplied (illustrated in the box below). LCD remote control Type AAA batteries for the remote control. Circular connection for window (1) for positioning between the end of the tube and the terminal connection for the window. Terminal connection for window (2). Flat connection for positioning between the air discharge port and the hose Clamp Window unit kit (3 pcs) Hose.
USE WITH TERMINAL CONNECTION FOR WINDOW Connect the flat connection to the hose, extend the Now slide the flat connector downwards into the grooves hose as far as necessary to reach the outside and (A) and secure it with the hook (B). connect it to the back of the air conditioner. The upper side of the flat connector is marked TOP. Connect the circular window connector (1) to the end of the hose and then the window terminal (2). Open the windows and block one of the two leafs with the handle.
The outlet must be between 40 cm and 100 cm off the ground. Avoid tight curves and folds in the hose. When not using the air conditioner, disconnect the hose and fit the closing cap. Connect the power cord to a suitable electrical socket (230V). Insert the provided batteries into the remote control, making sure to observe their indicated polarities. Select the desired operating mode from the remote control. HOW TO USE THE APPLIANCE This appliance can be used to Cool, Dehumidify and Fan.
OPERATING MODES 1. COOL MODE • The first time it is turned on, the air conditioner will operate in Cooling mode with the temperature set to 25ºC by default. • The control panel Cool led will turn on. • The temperature can be adjusted from 16° to 30°C. • In this mode, each time the ON/OFF button is pressed, the unit switches off, the appliance saves the temperature setting and, when switched back on again, it will retain this setting.
3. Screw the drain hose into the drain hole and then secure it with the clip. Fit the other end of the hose into the cap, secure it with the clip and then run it through the clamp. Cooling Ensure that when the unit is operating in Cool mode, the rubber cap closing the drain hole on the back of the appliance is in place. To empty the container, switch the air conditioner off and unplug. Remove the cap form the rear drain hole and route its end over a normal drain.
INFORMATION FOR CORRECT DISPOSAL OF THE PRODUCT IN ACCORDANCE WITH EUROPEAN DIRECTIVE 2006/66/EC Please replace batteries when flat: at the end of their useful life, batteries must not be disposed of with unsorted waste. It must be must be delivered to appropriate separated waste disposal plants or to dealers that provide a similar service.
(1) ON/OFF BUTTON Press the ON/OFF button to switch the unit on or off. When switched on, the appliance will start to operate as it was last set (memory function). (2) MODE BUTTON Press this button to select the different operating modes, according to the following sequence: Cool → Dry → Fan Only → Heat (n/a) (3) TEMPERATURE ▲▼ AND TIMER BUTTON Increase temperature(▲): 1) Enables the adjustment of the temperature desired in Cool mode. 2)Pressing the button (▲) increases the temperature by 1°C.
from 0.5 to 24. Press the TIMER button to confirm. The T-OFF icon will remain on to indicate that the TIMER is running. Cancelling the timer: If the TIMER is set, press TIMER to display the delay. Press TIMER again to cancel the setting. (8) TEMPERATURE AND ERROR DISPLAY Problem E5 Cause Overcurrent protection. H8 Tank full. F1 F2 F0 Temperature sensor failure. Evaporator temperature sensor failure. Refrigerant leak. Air conditioner out of service.
2. Cleaning the casing Use a damp and soft cloth to clean the exterior surface of the air conditioner. Do not use water that is too hot, solvents, petrol or other aggressive chemical compounds, talcum powder or brushes: these may damage the surface or colour of the casing. To remove stains use warm water with a little neutral detergent. Do not pour water onto the air conditioner to clean it: this may damage the internal components or cause a short circuit. 3. Storage.