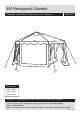
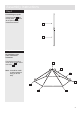
4M Hexagonal Gazebo Assembly Instructions - Please keep for future reference 304/7369 Dimensions Width - 400cm Depth - 400cm Height - 260cm Important - Please read these instructions fully before starting assembly If you need help or have damaged or missing parts, call the Customer Helpline: Argos = 0345 640 0800 Address: 489-499 Avebury Boulevard Saxon Gate West, Central Milton Keynes Bucks,MK9, 2NW Issue 2 - 20 /06/14
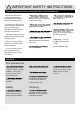
IMPORTANT SAFETY INSTRUCTIONS Read all instruction before using and keep for future reference Read these instructions carefully and familiarise yourself with the procedure before assembling the unit. Check that you have all the component parts following the list on the page 3 and familiarise yourself with each part before proceeding. Take all the fittings out of the plastic bag and separate them into their groups. Ensure you have enough space to lay out all the parts before assembly.
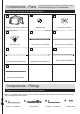
Components - Parts If you have damaged or missing components, call the Customer Helpline: Argos = 0345 640 0800 Please check you have all the parts listed below 2 1 1xGazebo cover with mosquito net 3 1xCentre Connector 6xBase Plate 6 5 4 6xTop Pole (φ18x1015mm) 6xCorner Joint 7 8 6xSupport Pole(φ22x965mm) 6xSupport Pole(φ22x965mm) 6xTop Pole (φ18x1015mm) 10 6xLeg Pole(φ24x1000mm) 11 6xLeg Pole(φ24x1060mm) Components - Fittings Please check you have all the fittings listed below Note: The
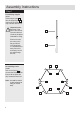
Assembly Instructions Step 1 Assembling support poles Insert support pole 8 into the support pole 7 ensure all the poles are fully inserted and secure. Important note: Because of the size of this unit we recommend that it is built in the place intended for using. 7 Ensure to locate the unite on the flat ground free from obstruction, in a sheltered area away from wind and heavy rain as this will damage the unit.
Assembly Instructions Step 3 Assembling top poles Insert top poles 6 into the top poles 5 .Ensure all the poles are fully inserted and. secure. 6 5 Step 4 Assembling corner joints and centre connector Connect the top pole to corner joints 4 and centre connector 3 3 5 Note: It would be useful to ask someone to help you at this step.
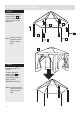
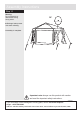
Assembly Instructions Step 5 Assembling Leg poles insert leg poles 10 into the unite. Ensure all the poles are fully inserted and secure. 10 10 10 10 Note: It would be useful to ask someone to help you at this step. 10 1 Step 6 Assembling ga zebo covers Carefully place the gazebo cover 1 over the assembled roof. Then pull the gazebo tightly over the assembled roof frame. Note: It would be useful to ask someone to help you at this step.
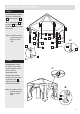
Assembly Instructions Step 7 Assembling base plate a: insert the base plate 2 into the leg pole 11 b: insert leg poles into leg poles 10 Ensure all the poles are fully inserted and secure. 11 10 Note: It would be useful to ask someone to help you at this step.
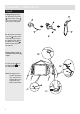
Assembly Instructions Step 9 Fitting the guy ropes a: Attach Insert slatsthe rope into end holes C onto the guy rope B so that the length of guy ropes can be adjusted. C C C B b: attach the end of the guy rope B to the corner of the top cover ring on the gazebo.Then attach the other end to peg A and drive the peg into the ground. a: Repeat above steps to assemble the other guy ropes. b: c: use the peg D to fix C the base plate 2 and the side panels.
Assembly Instructions Step 10 Warning: Do not assemble or disassemble during strong winds. a: a:Drainage holes prevent rain water collecting. Assembly is complete. Important note: always use this product with caution and read the important safety instructions.