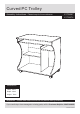
Curved PC Trolley Assembly Instructions - Please keep for future reference 617/9447 617/9674 Dimensions Width - 80cm Depth - 48cm Height - 76cm Important - Please read these instructions fully before starting assembly If you need help or have damaged or missing parts, call the Customer Helpline: 08456 400800 issue 4 3/12/10
Safety and care advice Important - Please read these instructions fully before starting assembly Check you have all the components and tools listed on pages 2 and 3. Remove all fittings from the plastic bags and separate them into their groups. Keep children and animals away from the work area, small parts could choke if swallowed. Make sure you have enough space to layout the parts before starting. ●Only clean using a damp cloth and mild detergent, do no use bleach or abrasive cleaners.
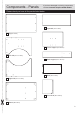
Components - Panels If you have damaged or missing components, call the Customer Helpline:08456 400800 Please check you have all the panels listed below 5 Keyboard (74.6 x 30cm) 1 Top (80 x 48cm) 6 Centre support (48 x 36.8cm) 2 Left side (67.5 x 47.8cm) 7 Back support (76.8 x 16.7cm) 8 Shelf (42.5 x 24cm) 3 Right side (67.5 x 47.8cm) 9 Cross shelf (36 x 32.
Components - Fittings Please check you have all the fittings listed below Note: The quantities below are the correct amount to complete the assembly. In some cases more fittings may be supplied than are required.
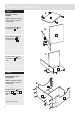
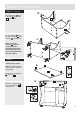
Assembly Instructions Step 1 F G Fitting the runners 2 Note: It would be useful to ask someone to help you at this stage. a: Use Screws the Runner left Left side 22 . a: F to fix G , onto 2 F Slide top of the runner to access the first hole. G Insert Dowel C into Left side 22 . C F G 2 F H 3 b: Use Screws F to fix the Runner right H , onto Right side 3 . b: Slide top of the runner to access the first hole. H F 3 Insert Dowel C into Right side 23 .
Assembly Instructions Step 2 a: Fitting the centre support C 9 Note: It would be useful to ask someone to help you at this stage. a: Insert Dowels C into Cross shelf 9 . b: 6 b: Use Screws D to fix Back support 7 onto Centre support 56 . 7 D c: c: Use Screws D to fix Cross shelf 9 onto the unit. 9 D Step 3 Fitting bottom and side panels Note: It would be useful to ask someone to help you at this stage. a: 2 a: Use Screws D to fix Bottom 4 ,Left side 22 , Right side 3 onto the unit.
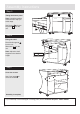
Assembly Instructions Step 3 - continued b: Use Screws b: to fix Left side 22 , Right side 33 onto the unit. D D 2 3 c: Use Screws F to fix the Front castors J and Castors I onto the unit. c: J Note: The Front castors J feature a locking arm. We recommend you lock the castors when you have finally positioned the unit in place. J F F J I Step 4 I Fitting the top panel a: Note: It would be useful to ask someone to help you at this stage. B 1 a: Screw in Locking pins bB onto Top 1 .
Assembly Instructions Step 5 5 Fitting the drawer panel Note: It would be useful to ask someone to help you at this stage. Use Screws F to fix the Keyboard 5 onto the unit. F Step 6 Fitting the shelf Place Shelf supports E into the unit. 8 Slide shelf 8 into the unit. E Note: Adjust the shelf supports to the desired height. Step 7 Cover the screws Use Cover caps K to cover the screws. K Assembly is complete.