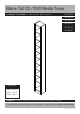
Maine Tall CD / DVD Media Tower Assembly Instructions - Please keep for future reference 932/8594 932/8604 932/8635 932/8642 932/8673 932/8680 Dimensions Width - 19.2cm Depth - 15.
Safety and Care Advice Important - Please read these instructions fully before starting assembly • Check you have all the components and tools listed on pages 2 and 3. rom the plastic bags and separate them into their groups. • Keep children and animals away from the work area, small parts could choke if swallowed. • Make sure you have enough space to layout the parts before starting. • Do not stand on the product, this could cause damage. • Assemble the item as close to room) as possible.
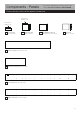
Components - Panels If you have damaged or missing components, call the Customer Helpline: 08456 400800 Please check you have all the panels listed below Pilot holes for guidance only Pilot holes for guidance only 1 Front panel (16.1 x 5.9cm) 2 Bottom panel (16.1 x 14.8cm) 3 Top/Middle support panel x 2 (16.1 x 14.8cm) 4 Shelf x 8 (16.1 x 14.7cm) 5 Top back panel (119.6 x 18.7cm) 6 Bottom back panel (54 x 18.7cm) 7 Left side panel (180 x 14.9cm) 8 Right side panel (180 x 14.
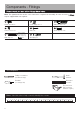
Components - Fittings Note: The quantities below are the correct amount to complete the assembly. in some cases mor may be supplied than are required.
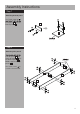
Assembly Instructions Step 1 Attaching bottom panel Use Plastic supports B s A Front panel 1 onto the Bottom panel 2 . A A 1 B B A 2 A back edge Step 2 Attaching side panels C Left side panel 7 and Right side panel 8 onto the Bottom panel 2 , Middle support and Top panels 3 . D D C back edge C Use Screw covers D to cover the Screw heads.
Assembly Instructions Step 3 Fixing back panels E Top back panel 5 and Bottom back panel 6 onto the unit. E 5 Important: The unit MUST be ‘square’ when the back is attached. E back surface 6 Step 4 Attaching shelf panel a: a: lnsert Shelf supports F into the unit. Ensure they F inserting the Shelves. F F F Note: Set the shelf supports to the desired height. F F F F F Continued on next page.
Assembly Instructions Step 4 - continued b: With help, carefully b: stand Media tower upright. Warning: The Media tower is heavy. Lift with care. Slide the Shelves 4 into the unit.
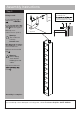
Assembly Instructions Step 5 Fixing to wall It is recommended that the media tower Note: Wall plugs supplied are for solid wall only. A G H G wall be used for your wall, seek professional advice if in doubt G G H A strap G onto the top panel. With help, move media tower into position. Top panel Warning: The media tower is heavy. Lift with care. remove media tower . Drill a hole and insert Wall plug H . Warning: Before drilling, check wall for hidden pipes and cables.
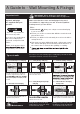
A Guide to - Wall Mounting & Fixings Important: When drilling into walls always Important note: If plastic wall plugs are supplied with your product: check that there are no hidden wires or pipes etc. Make sure that the screws and wall plugs being used are suitable for supporting your unit. Consult a qualified tradesperson if you are unsure. Hints: - these are only suitable for use in masonry walls. If you are in any doubt about the correct wall plugs for your wall, seek professional advice.