Mobile Video HDD User Manual
Contents Introduction 1 About the Remote Controller 2 Parts Name and Functions 3 How to Use the Mobile Video HDD 4 Using the AV Playback Function 5 Connecting to AV Equipment 5 Power Connection 6 Activating the Mobile Video HDD for AV Playback 7 Selecting the Media Files for Playback 7 Introduction and Playback of the Media Files 10 Operations while Playing Back 12 Function Setup 17 PC Operation 21 Software Installation 21 Connecting to PC 22 Disconnecting from PC 23 About th
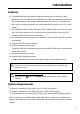
Introduction Features The Mobile Video HDD was specially designed as a dual-use hard disk drive. When attached to a PC, it operates as a Hi-speed USB 2.0 (or IEEE 1394 external hard disk drive), with a large capacity of disk storage.
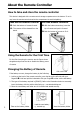
About the Remote Controller How to take and store the remote controller This device is designed with a remote control storage compartment on the bottom. If not in use, have the remote control stored to the compartment to avoid misplacing. Take out the Remote Cntroller Store the Remote Controller n: Push the bottom of remote forward. p: With the buttons toward up, insert the o: The remote will be released from the top of remote and push it forward. stand. q: Push the bottom of remote to fix it.
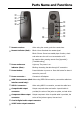
Parts Name and Functions c d e f g ⑪ l h i j k c Remote receiver : When using the remote, point the remote here. d Remote indicator (Red) : Blinks 1 time: Received the remote signal. Blinks 3 times: Cannot use media player function, check and make sure the unit is not connected to a PC. No reaction after pressing remote: See [Appendix] – [Troubleshooting] e Power and access indicator (Blue) : f Power button : Lights up: The power is on. Blinking: Accessing the data through PC connection.
How to Use the Mobile Video HDD Besides being used as a high-speed external hard disk drive to store or access files, this device can also connect to your video equipment to playback all kinds of audio/video file formats. Please read the following sections according to your application.
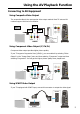
Using the AV Playback Function Connecting to AV Equipment Using Composite Video Output The composite video is the most popular video output method. Most TV sets and AV receivers support this kind of connection. White Fig. 1 Yellow Red INPUT Using Component Video Output (Y/Pb/Pr) Component video output provides higher picture quality.
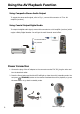
Using the AV Playback Function Using Composite Stereo Audio Output To output the stereo audio signal, refer to Fig. 1, connect this connector to TV or AV amplifier (receiver). Using Coaxial Output Digital Audio To output the digital audio signal, connect this connector to an AV amplifier (receiver) which equips a Dolby Digital decoder. You will get the multi-channel sound effect. The Coaxial cable is not provided INPUT Power Connection 1.
Using the AV Playback Function Activating the Mobile Video HDD for AV Playback 1. Turn on your TV and AV receiver, and switch to the correct input channel. 2. Make sure the Mobile Video HDD is turned on (blue LED lights up) and press (STANDBY) button to activate this unit. If this unit is not turned on, press the Power button to turn it on. 3. Now you can use the remote to operate this unit for playback. 4. After playback, press to go back to standby mode; you don’t need to power off it. 5.
Using the AV Playback Function Operation of “File NAVI” List the folders and media files for selection and playback Selection y y Press button to select a folder or file. You can also press 0~9 buttons to select the number of the target file. If the selected file is playable, it will be play back. (The files in the “ROOT” folder cannot be selected by pressing 0~9 buttons) Playback y Press the PLAY button when a folder is selected.
Using the AV Playback Function Icon Descriptions : : Indicates this is a folder Indicates this file is the “VIDEO_TS.IFO” of the DVD movie. To play back a full function of a DVD movie, you must play this file. ? : Indicates this is the Mpeg1 (VCD) file. The filename extensions are dat, mpeg. : Indicates this is the DivX /XviD movie file. : Indicates this is the DivX /XviD subtitle file. : Indicates this is the Mpeg2 file. The filename extensions are mpg, vob, m2p.
Using the AV Playback Function Hiding Private Folders 1. On “File NAVI” screen, press the TITLE button to go back to “ROOT” folder. 2. Use 0~9 buttons to enter 4 digits of an incorrect password. 3. If the password is incorrect, the private folders will disappear immediately. 4. You can also press button to go back to standby mode. The private folders will be hidden when activating this unit next time.
Using the AV Playback Function VCD and Mpeg1 Files Movie3 Ö The files that meet the Mpeg1 format This kind of media file includes all files that meet the Mpeg1 format (the filename extensions are dat, mpe, mpeg). To play, select a file or a folder which contains the files, and then press PLAY. Mpeg2 Files Movie4 Ö The files that meet the Mpeg2 format This kind of media file includes all files that meet the Mpeg2 format (the filename extensions are mpg, vob, m2p).
Using the AV Playback Function Operations while Playing Back While playing back, you can take enable following operations : [ The icons on the top of table indicate the available media files ] Stop Playback Stops the playback and goes back to “File NAVI” Stop Press button, stops the playback and goes back to “File NAVI”.
Using the AV Playback Function Fast Forward Fast rewind Fast forward: quickly plays the file forward (the speed can be changed). Rewind: quickly plays the file backward (the speed can be changed). Fast forward Press button to change the speed. Rewind Press button to change the speed. Resume Press PLAY button goes back to normal speed. : Change the speed in sequence: [2X Ö 4X Ö 6X Ö 8X Ö Normal]. : Change the speed in sequence: [2X Ö 4X Ö 8X Ö 16X Ö Normal].
Using the AV Playback Function Skip Playback Skip forward or backward for a segment, and then play. Skip forward Press button. Skip backward Press button. Repeat Playback Shuffle Playback Repeat Playback: repeat plays the current file. Shuffle Repeat: randomly play all files in the current folder.
Using the AV Playback Function Time Searching Enter the time desired to play the movie. Display Input Play y Press SEARCH 2 times, the screen displays _ _ : _ _ : _ _ (hh:mm:ss). Press 0~9 or buttons to input the desired value. Press PLAY, the movie will be played at the indicated time. The entered value must be within the length of the movie, or the will appear to indicates it has an error. Change Subtitle Change the subtitle, or disable the subtitle.
Using the AV Playback Function Change View Angle While playing a movie which contains multi view angles, you can change it. Change angle Press ANGLE button. Zoom In Enlarge the image. Zoom in Move Resume Press ZOOM button to enlarge the image. If the image is larger than the screen, press to move it. Press ZOOM again will resume back to normal size. After enlarging a photo, a “Zoom ON” message appears, you can: (DivX is not available for this function) y y Press button to shrink.
Using the AV Playback Function Function Setup Press SETUP to display the “Setup Menu”. See the following to set up the functions: Operation of “Setup Menu” 1. Press to select the sub-menu. 2. Press PLAY to enter the sub-menu. 3. Select “Exit Setup” and press PLAY to exit. 4. You can also press SETUP to exit directly. Operation of the Sub-menu 1. Press to select the function. 2. Press to move to “Options”. 3. Press to select the setting. 4. Press PLAY to confirm. 5. Press to move to “Functions”.
Using the AV Playback Function DVD Subtitle Select the language for the default subtitle when playing a DVD movie. If “OFF” is selected, the subtitle will not be displayed when play back. Audio Setup This sub-menu can be set only after the playback is stopped. DOWNMIX Set this function when output audio signal via Composite connector: LT/RT : Outputs the left or right channel to both channels. Stereo : Outputs stereo audio. SPDIF Output Outputs the Dolby digital sound via the Coaxial connector.
Using the AV Playback Function Video Setup This sub-menu can be set only after the playback is stopped. TV Standard MULTI : According to the TV, outputs the corresponding signal. NTSC : Outputs NTSC signal to TV. PAL : Outputs PAL signal to TV. If the setting is incorrect, the TV screen will not display normally. Switch to the correct setting by pressing and holding button and then press MENU. TV Display 4:3 PS : 4:3 screen TV is connected. Displays the 16:9 images with “Pan Scan”.
Using the AV Playback Function Preferences Setup Screen Saver ON : When the player stops for 5 minutes, the screen saver will start automatically. OFF : Disables the screen saver. Angle Mark When playing a multi angle DVD movie, a mark will be displayed on screen. ON: The angle mark will remain on the screen until the end of the title or chapter. OFF: The angle mark will be displayed on the screen for 3 seconds.
PC Operation The installation CD contains the device driver, utility program and the user’s manual. The utility program allows you to set the folders in Mobile Video HDD as “Private” or “Public”. When using this unit as a Media Player, the “Public Folder” will be displayed on TV, but the “Private folder” will not be displayed. You can use this function to hide the folders that you don’t want other people to playback.
PC Operation Connecting to PC Connecting with USB 2.0 Interface 1. Connect the plug of AC adapter to the connector marked “DC IN”, plug the other end into the electrical outlet. 2. Connect the USB plug to the USB connector. Then connect the other plug to computer’s USB 2.0 port. 3. Press the Power button and the blue LED will light up. 4. The computer will recognize the Mobile Video HDD and you can start accessing the drive. o n p r q Blue LED lights up Connecting with IEEE 1394 Interface 1.
PC Operation Disconnecting from PC When you are ready to disconnect Mobile Video HDD from PC, follow these steps: 1. Close all the programs that are accessing the Mobile Video HDD. 2. Click the safely remove hardware icon ( , or ) in the System Tray and select the drive letter assigned to Mobile Video HDD, when the system message “safely removed” appears, unplug the interface cable from the computer. 3. Press the Power button for about 1 second until both LEDs are off, this unit is turned off.
PC Operation About the File System of Hard Disk The Mobile Video HDD is pre-formatted as a NTFS or FAT32 disk, you can directly access this drive after connected to PC. If you want to re-partition the disk, please note: Although your operating system may support several different file systems, FAT32 or NTFS partitions are strongly recommended. When using the Mobile Video HDD as a media player, it can only read NTFS and FAT32 partition.
PC Operation Copying Media Files for Playback When used as an external hard disk, the Mobile Video HDD can store any type of files. When used as a media player, it can only browse and playback the specific media file formats. Please read the following before using it as a media player. When using the Mobile Video HDD as a media player, it can only browse and play back media files that located in the first “Primary” partition.
PC Operation DivX / Xvid Files Usually, these media files can be downloaded from the Internet. Most of this kind of files are distributed with movie file and subtitle file separately. After downloading the files, create a folder with the name of the movie in the Mobile Video HDD, and then copy the files into the folder just created. If the movie file and subtitle file have the same filename, the subtitle will be displayed automatically when played back.
PC Operation the digital camera stores the photo in JPG file format. Create a folder in the Mobile Video HDD, and then copy the JPG files into the folder just created. The Video Recorded by Capture Card If you use a capture card or TV card to record TV programs or others, usually, the recorded file will be converted to Mpeg1 or Mpeg2 file format (the filename extensions are MPG, MPEG, M2P) directly.
PC Operation Using the Utility Program The name of the utility program is “Private Folder Setup”, it allows you to set the specific folders in Mobile Video HDD as “Private Folders”, and these folders will not be displayed on TV when using the AV playback function. You can use this program to hide the folders that you don’t want others to play back. Up to 16 folders can be set as “Private Folders” under the “Root” folder in the disk. Execute the Utility 1. Connect the Mobile Video HDD to computer.
PC Operation 2. Input 4 digits number in the “Password” field (as f indicated), you will need these numbers to display the “Private Folders” on TV when using the AV playback function. 3. After making the settings, click “Save” button to activate the change (as g indicated). Fig. 2 Set the Folder as “Public Folder” 1. Referring to Fig. 3.
PC Operation How to Partition the Hard Disk Partitioning the Hard Disk under Windows XP/2000 The Mobile Video HDD will not work when initialized as a “Dynamic” disk type. Always use it with the “Basic” disk type. 1. Click “Start” Ö “Settings” Ö “Control Panel” Ö “Administrative Tools” Ö “Computer Management”. This opens the Computer Management Window. 2. Click on “Disk Management”, all disk drives currently connected to the system will be listed on the right side.
PC Operation Partitioning the Hard Disk under Windows Me/98SE FDISK is a program to create one or more partitions on the hard disk drive. (Data can only be written to the drive after the drive is partitioned and formatted). To partition the Mobile Video HDD, you must execute FDISK under the MS-DOS mode. Please follow these steps: 1. Install the Mobile Video HDD under Windows, and confirm that it is properly recognized by the operating system. 2.
Appendix Specifications Playable Media Format: MPEG1, MPEG2, DivX / Xvid, JPEG, MP3, WAV (GMC and Q-PEL pertaining to DivX and Xvid are not supported) Playable Filename Extension: dat, mpg, mpe, mpeg, vob, avi, divx, xvid, jpg, jpeg, mp3, mp2, wav TV Standard: NTSC / PAL Composite AV Output: 3.5Φ connector Component Video Output: 3.5Φ connector Coaxial Audio Output: RCA connector PC Interface: USB model: USB 2.0 interface File System: FAT32 / NTFS Dual interface model: USB 2.
Appendix Troubleshooting Problem Possible Cause TV screen does not display normally ◎Video setting is not correct. No power ◎The plug is not properly (Blue LED is off) the remote controller ◎Press and hold then press MENU until screen displays correctly.
Appendix Problem Possible Cause The “Setup Menu” is ◎Incorrect “OSD Language” not the language you setting Solution ◎Check the “OSD Language” setting in “Setup Menu” have selected No sound ◎Play fast forward or rewind or slow motion ◎Check the audio connection ◎Volume is too low ◎Increase the volume ◎Incorrect audio setting ◎Check the setting in “Setup Menu” ◎Incorrect audio channel, the ◎Press AUDIO button to select the Dolby audio channel ◎Video is not connected ◎Check the video connection
Appendix Error Code Error Code of Hard Disk Drive On the top left corner of the screen, when “HDD FATAL ERROR – ##” (## represents the error code) appears, please check the following chart for the solution : Code 01 ~ 02 : Solution These occur when the hard drive inside the player is not a certified disk by the manufacturing company. 03 : The hard drive is malfunctioning or has the incorrect jumper setting. Check the hard drive and do not set it as “Slave”.
NOTE
NOTE
7450996-51