Figure 4-3 Scan Configuration-3 After you change settings, press the OK button to configure, or press Restore Default to return to the scan default settings. 4.2 Scan driver Scan driver lets you put data into Microsoft Wordpad. Open scan driver and the scan module powers on the scanner. You can then scan barcode. To turn off the power, press Exit on the task bar.
4.3 Scan test The PT-90 has a Scan Test.exe program that allows you to test the barcode scan function. Scan Test.exe is located in directory Desktop→ Utility→ Scan Test.exe. This program shows barcode type and barcode data when pressing the Scan key. Figure 4-5 Scan Test 4.4 Reading barcode Note: Observe handling precautions. Make sure the mobile computer is installed according to instructions. Never remove the main batteries or battery pack while the mobile computer is turned on.
The scanning sequence is defined by the user’s application. A typical sequence is: Point the mobile computer at the barcode and press the Trigger key . Point the LED lightbeam at barcode as shown in the scan position illustration above. The scanner reads the barcode and the results are indicated. A “Good Read” means that the scanner has effectively recognized and decoded the bar code. In most cases, the application program provides an indicator signal to indicate a good read.
5. Utilities 5.1 Function Key Setting To assign your favorite application program or virtual key from F1 ~ F10 and P1~P4 hot keys. Function Key.exe is located in directory Desktop→ Utility→ Function_Key.exe. 1. 2. 3. 4. Choose F1~F10 or P1~P4 from list. Tap Define to define application or virtual key. Tap Apply or OK to set function key setting. Tap the Default to return to default setting.
.2 Timeout & Brightness Timeout&Brightness setting is a tool for changing the LCD backlight and keypad LED. If you wish to save power use this program to change LCD backlight and keypad LED settings. This application supports battery power and external power settings.
. Software Applications The PT-90 includes software applications such as Internet Explorer, Media player, Microsoft WordPad, Remote Desktop Connection, Transcriber, and Windows Explorer. Figure 6-1 Software Applications 6.1 Internet Explorer With Internet Explorer, you can view Web or intranet Web pages on your device. You will need to use WLAN to connect to an Internet server provider (ISP) or network. Figure 6-2 Internet Explorer 6.
6.3 Microsoft WordPad You can create and edit documents and templates in WordPad, using buttons and menu commands that are similar to those used in the desktop version of Microsoft Word. You can work with files Normal or Outline view. WordPad documents are usually saved as .pwd files, but you can also save documents in other file formats, such as .rtf or .doc. Figure 6-4 Microsoft Wordpad 6.
6.6 Windows Explorer Windows Explorer works almost the same on your PDA as it does on your PC. See the topics below for information about the difference in Windows Explorer on your device.
7. Communication Argox PT-90 lets you link to a host computer via RS-232 or USB port for data communication. This chapter gives an overview of PT-90’s communication capabilities.(remove) The Argox PT-90 lets you link to a host computer via RS-232 or USB port for data communication with cable or cradle. This chapter gives an overview of the PT-90’s communication capabilities. 7.
8. Overview of Microsoft Windows CE 6.0 This chapter describes Microsoft Windows CE 6.0, the operating system for the PT-90 This introduction to Microsoft Windows CE 6.0 includes: How to use the main Windows How to use a taskbar How to use settings 8.1 Main Windows When you turn on PT-90, you will see the main Windows of Window CE 6.0, which is similar in appearance to Windows XP. The main window consists of a background screen and taskbar.
Recycle bin: Completely delete or restore files and data. This folder saves deleted files from Windows Explorer or the background screen. You can completely empty or restore files in the recycle bin. Once you have emptied the recycle bin, you cannot restore the files and data previously in the recycle bin. Caution: Taskbar Windows CE 6.0’s taskbar is designed to be simple and user-friendly. The picture below shows the configuration of the taskbar.
8.2 Taskbar Taskbar shows a variety of information including keying in characters, battery, network connection, status of running programs, etc. Open Taskbar and Start Menu setting by selecting Start → Settings → Taskbar and Start Menu from the desktop. There are Always on top, Auto hide and Show Clock setting in General tab. You can choose the check box of desired setting. The following explains the function of icons appearing on the taskbar.
Figure 8-6 Transcriber Keyboard: When Keyboard input panel is running, you will see the icon located in the taskbar. Figure 8-7 Keyboard Input Panel Upper / lower case Selection: Press this icon to select upper and lower case letters. If you select upper case, capital letters and characters appear on the number key pad. It serves the same function with the Shift key. Figure 8-8 Keyboard Input Panel -1 Status Indicator Icon: The following is a list of icons that appear in the taskbar’s status area.
8.3 Setting up the PT-90 You can set up various configurations of the PT-90 such as Date/Time, Network, Display, Volume and Sounds, Power, System, etc. at the control panel. Figure 8-9 Setting up To Tap Start → Settings → Control Panel, the control panel window appears. In the View option in the menu, you can change the view mode into large icons, small icons, details or to arrange icons.
8.3.1 Certificates Application programs use certificates to ensure reliability and safe communication. Figure 8-11 Certificates Authorized certificate providers issue certificates that are valid for a specified period. Windows CE manages several certificate storages. 1. Select Go to Start → Settings → Control Panel. 2. Double click a Certificates to run. Select certificate storage for browsing or correcting through the storage tap list. Trusted Authorities: Includes the top quality certificates.
8.3.2 Date/Time This screen sets date, time, standard time zone. Figure 8-12 Date/Time Date/Time You can set standard time zone, year, day and time. Set as follows: 1. Press the down arrow in the standard time zone until it reaches your location. If the previously set value is appropriate, move on to the following. 2. Select Year and Month in the calendar. If the current year is not correct, press Year and adjust.
8.3.3 Dialing Dialing Properties 1. In the When dialing from list, select the Location where you want to change settings. 2. To create a new location, select New. Enter the name of the location, and then select OK 3. Enter or Edit the area code and local country code as needed. Figure 8-13 Dialing Properties -1 Figure 8-14 Dialing Properties -2 4. In Dial using, select Tone dialing or Pulse dialing. Most phone lines are tone. 5.
8.3.4 Display This screen lets you set the wallpaper image of the PT-90, or change the color of the background screen. Call up the right button menu from desktop and select Properties and you can check the Display Properties window. Figure 8-15 Display Properties Display Change the desktop image of the background screen as follows: 1. Select the Background tab. 2. Click Browse to select an image file. 3. Press OK to apply the setting.
8.3.5 Hot Function Key Please refer to Function Key Setting above. 8.3.6 Input Panel You can set up the Input method and Options. Figure 8-16 Input Panel Properties 1. Select keyboard and press Options. The Soft Keyboard Options window appears. 2. Select the Size of the keys. 3. To Use gestures for Space, Backspace, Shift and Enter, click the gestures check box. 4. Click OK to save the changes of Soft Keyboard Options. 5. Click OK to save the setting of Input Panel Properties.
8.3.7 Internet Options To use the Internet Options, make the following settings. General Click the General tab. 1. 2. 3. Define your own start page and search page on the tab. It also can set the cache size. Click Delete Browsing History button, it can clear temporary internet files, cookies or history. Figure 8-17 Internet Options -1 Connection Click the Connection tab and set Internet connection methods. 1.
Security Under Security page, specify the security option for your browser. Figure 8-19 Internet Options-3 Privacy Under Privacy page, specify the cookies setting include of privacy level. Figure 8-20 Internet Options-4 8.3.8 Keyboard Repeat Tab 1. To change the amount of time between taps before repetition starts, adjust the Repeat delay slider 2. To change the repeat rate, adjust the Repeat rate slider. 3. Test your new setting. 4. Tap OK to exit the Keyboard properties.
8.3.9 Mouse 1. Double-click the checkerboard grid at a comfortable speed. 2. Double-click the Test icon to test your setting. 3. Tap OK to exit the Mouse properties. Figure 8-22 Mouse Properties 8.3.10 Network and Dial-up Connection You can directly link to the network via network (Ethernet, LAN) or phone (modern) connection. You can send or receive emails or access available files on the network server or search the Internet or Intranet.
8.3.11 Owner This function lets you set the PT-90 to display user information at start up, add information on the user, and set up a Network ID. Figure 8-24 Owner Properties Identification Enter information such as Name, Company, Address, company phone number, home phone number in the user information tab. To display the owner information on the start screen for system start, click the Display Owner Identification check box. Notes Enter additional user information or other information in the Notes box.
8.3.12 Password You can set a password to keep unauthorized users from using the PT-90. Figure 8-25 Password Properties To set up a password: 1. Select the Password Setting tab. 2. Enter the password in the password box. 3. Re-enter the password in the password confirmation box. 4. To enable the password protection when the power on, click on the Enable password protection at power-on. You may encounter a request to enter the password if resume or warm/cold boot PT-90.
8.3.13 PC Connection You can set up a PC Connection to synchronize the device with a desktop PC. You can set desktop USB and serial port connections. The following is the procedure required for changes in PC Connection. Begin with Windows CE 6.0. The PT-90 basically supports the Internet functions via USB. If you set up a partnership with PC during ActiveSync, it provides `USB CONNECT link items that enable an Internet connection through the USB connection: Figure 8-26 PC Connection 1.
8.3.14 Power Please refer to the previous section on Power Management. (Page 21 ) 8.3.15 Regional Settings Figure 8-27 Regional Setting Properties You can set up region, numbers, currency, time, and date. 1. Select Go to Start → Settings → Control Panel. 2. Open Regional Settings icon. 3. Select the tab for information to change. 4. Select the < Preferred> option. Available features are dependent on which region you have chosen in the region tab.
8.3.16 Remove Programs Figure 8-28 Remove Programs To remove installed programs: 1. Select Go to Start → Settings → Control Panel. 2. Open the Remove Programs icon. 3. Select the program and click Remove to uninstall program. 4. Click Remove.
8.3.17 Scan Configuration Please refer to the previous section on Scan Configuration. 8.3.18 Storage Manager The storage manager lets you manage storage device. DSK1: NAND FLASH only allows the users to check the store information. DSK2 shall be SD memory card. The storage manager allow SD memory card to format, dismount or make new partition. Figure 8-29 Storage Properties 1. Select the SD memory card form the storage information dropdown list. 2.
8.3.19 Stylus This screen sets Double-Tap sensitivity and calibration. Figure 8-30 Stylus Properties Double Tap To set and test Double-Tap sensitivity: 1. Select Go to Start → Settings → Control Panel. 2. Activate the Stylus and select Double-Tap. Tap the grid and the color of the grid changes. 3. It automatically records the speed of the Double-Tap. 4. Double tap the bottom icon to test the double-tap sensitivity. 5.
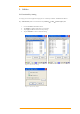
8.3.20 System The System Properties window displays device information such as General, Memory, Device Name and Copyrights. General information contained in the window includes operating system data such as software version, processor and memory etc. Figure 8-31 System Properties The memory of the PT-90 is used for storage and programs. Basic memory capacity is 256MB. You can see the size of the memory cache used for running programs or storing data. To check the Memory: 1.
8.3.21 System Information The System Information properties window displays system information such as Info and Clean boot. Info page contained in the window includes operating system data such as CPU, ROM, RAM, serial number (SN), hardware number (HW) and version details. Clean boot page allow users to clean registry and format user partition. Figure 8-32 System Information 8.3.22 Timeout and Brightness Please refer to the previous section on Timeout and Brightness. 8.3.
Sounds To set the Sounds: 1. Select go to Start → Settings → Control Panel. 2. Open Volume & Sounds icon and select Sounds tab. 3. Select an Event from the event list. 4. Select a sound from the event sound list. 5. To remove the sound from the selected event, choose (None). 6. To save the changes in another scheme, select Save As in another name and name the sound scheme. 7. To remove the sound scheme, select the scheme and then Delete.
9. Trouble Shooting This chapter contains information on solving problems you may encounter when using the mobile computer and/or cradle. If problems occur, first carry out general checks before comparing the problem with the descriptions in this chapter. 9.
Mobile computer will not shut off If the mobile computer is processing data, attach a charging cable to insure the battery isn’t depleted. If the mobile computer is connected to AC power, disconnect. Perform a warm boot – WARNING – Unsaved data will be lost. Perform a cold boot – WARNING – Unsaved data will be lost. Perform a clean boot – WARNING – The mobile computer is reset to default settings and data will be lost. Screen is blank Make sure mobile computer is powered on.
10. Appendix: Updating the OS via Micro SD Card To upgrade or reinstall the PT-90 OS via Micro SD card, you need the CE600.bin and 90Utility.cab file (available from Argox Technical Support): Note: The file name must be “CE600.bin” and “90Utility.cab”– do not rename it. Caution: Users files will be erased! 1. Copy file “CE600.bin” and “90Utility.cab” from the PC to the root directory of the Micro SD card 2. Insert the Micro SD Card into the PT-90 3. Plug the power adapter into the PT-90 4.
FEDERAL COMMUNICATIONS COMMISSION INTERFERENCE STATEMENT This equipment has been tested and found to comply with the limits for a Class B digital device, pursuant to Part 15 of the FCC Rules. These limits are designed to provide reasonable protection against harmful interference in a residential installation. This equipment generates, uses and can radiate radio frequency energy and, if not installed and used in accordance with the instructions, may cause harmful interference to radio communications.