
Installation Guide


Ariel Walkin Bathtub [ Installation Guide ]
Page 5
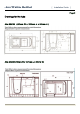
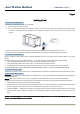
4. Verify the product is completely level by checking tub surface and ensure ALL leveling feet are touching the ground.
5. Electrical connection is made by simply plugging pump cord (shipped with cord and plug) into specified dedicated 120V, 20A,
GFCI outlet.
6. After plumbing and electrical connections have been made the tub should be cleaned of dirt and debris.
7. Installation is not complete until the bath has been tested in place.
OPERATION GUIDE
OPERATION GUIDE
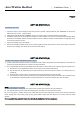
A. When the bathtub is full of water. Turn on the water pump and/or the air pump, by pressing the pneumatic button(s) on the
sidewall of the bathtub.
B. The working condition of the water pump, air pump, and heat pump, is contingent on the presence of adequate power supply,
secure connections of the pneumatic tubes and components, and adequate water level.
C. The heat pump contains safety devices which only allow it to turn on when, a) water pressure is present from the running water
pump, and b) the water temperature is below 104-degrees Fahrenheit.
D. The heat pump is designed to add heat to a body of flowing water, and is only designed to keep warm water warmer longer.
Warning!
A. Make sure the power wires are complying to the installation diagram before turn the electrical system on.
B. Do not turn on the Air pump, Water pump, and Heater without water.
C. Make sure the power supply has adequate load capacity and a ground wire.
D. Turn off power when working with any wiring connections.
RUN CONDITON
A. Power: AC110V, 50/60 Hz
B. Water pump: AC110V, 6.0-7.0 Amps
C. Air pump: AC110V, 4.0-5.0 Amps
D. Heater: AC110V, 12-14 Amps, 1500w
Page 6