
Product Manual
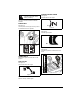
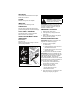
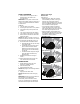

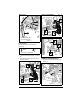
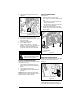
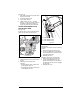
Table Of Contents
- Welcome
- Register Your Product!
- Safety
- Practices & Laws
- Emission Control System
- Required Operator Training
- Safety Alert Symbol
- Signal Words
- Safety Decals
- Safety Rules
- Controls & Features
- Engine Key
- Primer Bulb
- Fuel Valve
- Electric Start Button
- Choke Control Knob
- Throttle Control Knob
- Speed Selector Lever
- Attachment Clutch Lever (Right Side)
- Traction Drive Clutch Lever (Left Side)
- Dual Handle Interlock
- Discharge Chute Rotation Lever
- Discharge Chute Deflector Lever
- Heated Hand Grip Switch
- Scraper Blade
- Skid Shoe
- Auger
- Impeller
- Shear Bolt
- Auto-Turn™ Steering
- Height Adjustment Lever (Right Side)
- Operation
- Emergency Stopping
- Before Operating Unit
- Start The Engine
- Operate Unit
- Stop the Engine
- Transport Unit
- Maintenance
- Service Position
- Maintenance Schedule
- Service Parts
- Add Fuel Stabilizer
- Check Dual Handle Interlock
- Check Fasteners
- Check Clutch Operation
- Check Tire Pressure
- Check Engine Oil
- Change Engine Oil
- Check Auger Gearcase Oil
- Lubricate Unit
- Lubricate Auger Shaft
- Adjustments
- Adjust Scraper Blade
- Adjust Skid Shoes
- Replace Shear bolts
- Adjust Discharge Chute Deflector Lever
- Adjust Discharge Chute
- Adjust Speed Selector Lever
- Adjust Attachment Clutch & Brake
- Adjust Traction Drive Clutch
- Adjust Height Adjustment Cable
- Troubleshooting
- Storage
- Short Term
- Long Term
- Start-of-Season Fuel Preparation
- Accessories
- Specifications
- Warranty

EN - 15
CHANGE ENGINE OIL
Refer to engine manual.
CHECK AUGER GEARCASE OIL
1. Place unit on flat, level surface.
2. Remove oil fill plug and seal washer. See
Figure 16.
IMPORTANT: DO NOT remove gearcase
cover.
3. Check oil level with suitable measuring
device, such as a clean screwdriver, and
add oil if needed. Oil level must be
6.1 cm – 6.7 cm (2.4" – 2.6") from the flat
surface of the gearcase cover.
IMPORTANT: Ariens recommends using only
Ariens L3 synthetic severe duty gear lube
(see Service Parts on page 14). Using other
lubricants will not automatically void unit
warranty, but the warranty will not cover
damage caused by using unauthorized
lubricants.
4. Inspect seal washer for wear or rubber
deterioration and replace if needed.
5. Reinstall seal washer (rubber side down)
and oil fill plug. Torque to 9 N•m
(80 lb-in).
IMPORTANT: DO NOT over torque.
Measurements are given in pound force
inches (lb-in) and not pound force foot (lb-ft).
Incorrect torquing and failure to install or
correctly torque seal washer may void
gearcase warranty.
LUBRICATE UNIT
Ariens recommends using Ariens Hi-Temp
Grease or equivalent (see Service Parts) to
lubricate fittings. Lubricate each season or
every 25 hours of operation.
IMPORTANT: Wipe each fitting clean before
and after lubrication.
IMPORTANT: DO NOT allow grease or oil to
contact friction disc, friction plate or belts.
Remove Bottom Cover
Models 921050, 921051
1. Place unit in service position (see
Figure 15).
2. Remove six hex bolts retaining cover and
remove cover. Save for reinstallation.
Model 921057
See Figure 17.
1. Place unit in service position (see
Figure 15).
2. Remove three top-lock flange nuts
retaining height-adjuster plate to height-
adjuster bracket.
3. Remove height-adjuster plate and three
spacers on the round head square neck
bolts. The height-adjuster stop will be
attached to the rear axle.
4. Slide height-adjuster stop to the right and
rotate it away from frame.
5. Remove six bolts retaining bottom cover
and remove cover. Rotate track carriage
as needed to remove cover.
Figure 16
1. Auger Gearcase Cover
2. Oil Fill Plug
3. Seal Washer
1
2
3
CAUTION: AVOID INJURY. The
track carriage will rotate freely
without the height-adjuster
bracket. Keep fingers and hands
away from pinch points.