
Service manual


6 - 31
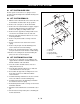
11.Install the swashplate assembly into the housing.
The slot on the swashplate must engage the slot
guide block on the displacement control shaft. Use
a tool such as a screwdriver to hold the guide block
in position while installing the swashplate.
12.Install the thrust washer and pump block spring
onto the pump shaft.
NOTE:
To simplify the installation of the pump block,
wrap a rubber band snugly around the pistons. This is
intended to hold the pistons in their bores as the block
kit is handled during installation. Be certain to remove
the rubber band.
13.With the swashplate in the neutral (0 angle),
lubricate the running surfaces and install the block
kit onto the pump input shaft. Make sure the
splines engage properly.
14.Install the pinion gear and washers onto the
jackshaft. Install the jackshaft assembly into the
housing and torque the bolts from 12-170 in. lbs.
(7.4-10.5 Nm).
15.Install the aligning pins and the bypass actuator
into the housing.
16.Install the washers and lip seal onto the motor
shaft.
17.Install the motor shaft into the center section.
18.Install the bypass plate (small end first) into the
center section.
19.Lubricate the running faces and install the motor
block kit onto the motor shaft.
20.Position the washers and seal and install the
center section assembly onto the aligning pins and
pump input shaft.
21.Insert the three assembly bolts into the center
section and press center section down onto the
aligning pins and pump input shaft until sealed on
mounting bosses. While holding the center section
in position, torque the bolts evenly from 525-700 in.
lbs. (32-43 Nm).
22.Install the motor thrust bearing (with the thicker
race towards the pistons) by compressing the
piston springs and sliding the bearing assembly in
to place.
NOTE:
The tool being shown is an example of what
you will need to compress the pistons and allow the
bearing to be installed.
23.Fill the axle pockets of the upper housing with
Rykon Premium grease (inside of bearing
locations).
NOTE:
This grease is not compatible with all grease
types.
24.Do not overfill, and wipe off any excess grease or
sealant will not cure properly.
25.Install the washers and seals onto the differential
axle assembly and align them for installation.
Figure 37
936-32
Figure 38
936-33
Figure 39
936-21