Sierra ® Owner/Operator Manual Models 936022 - 1340G 936023 - 1540H 936024 - 1548H 936025 - 1648H Twin 936026 - 1540H 936027 - 1640H Twin ENGLISH FRANÇAIS ESPAÑOL 03669800C 05/00 Supercedes 03669800,A,B Printed in USA
A Message to Ariens Customers . . . Welcome to the world of Ariens equipment. We are pleased that you have purchased the best equipment available. The care you give your Ariens equipment will determine the satisfaction and service life you will obtain from it. Use this manual and the engine manual supplied, as your guide. By observing the instructions and suggestions in these manuals, your Ariens equipment will serve you well for many years.
Contents Models Safety Alert and Notations . . . . . . . . . . . . . . . . . . .i Safety Precautions . . . . . . . . . . . . . . . . . . . . . . . .2 Safety Decals . . . . . . . . . . . . . . . . . . . . . . . . . . . .4 Controls and Features . . . . . . . . . . . . . . . . . . . . .6 Operation . . . . . . . . . . . . . . . . . . . . . . . . . . . . . . .7 Lubrication and Maintenance . . . . . . . . . . . . . . .13 Adjustments . . . . . . . . . . . . . . . . . . . . . . . . . . . .20 Storage . . . . . . .
Safety Precautions Safe Operation Practices For Ride-On Mowers Do not operate the machine while under the influence of medication, alcohol or drugs. This cutting machine is capable of amputating hands and feet and throwing objects. Failure to observe the following safety instructions could result in serious injury or death. Your complete and unimpaired attention is required at all times. Watch for traffic when operating near or crossing roadways or drives.
Safety Precautions (Continued) Avoid starting or stopping on a slope. If tires lose traction, disengage mower clutch and proceed slowly straight down the slope. If you must stop when going up the slope and can not safely back down: for gear drive models, depress clutch/brake pedal, disengage mower clutch, place travel speed selector in first gear (low speed) and slowly release the clutch/ brake pedal. Use extra care when approaching blind corners, shrubs, trees, or other objects that may obscure vision.
Safety Precautions (Continued) Grass catcher components are subject to wear, damage, and deterioration, which could expose moving par ts or allow objects to be thrown. Frequently check components and replace, with manufacturer’s recommended parts, when necessary. Check brake operation frequently. Adjust and service as required. Refer to Storage Section of this owners manual if unit is to be stored for extended period. Mower blades are sharp and can cut.
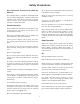
Safety Decals 1. A B E F C D MAX G 10° H A. B. C. D. E. F. G. Attention: Your safety is involved! Read Owner/Operator Manual. Keep people away from unit while operating. Look down and behind before and while backing Do not mow when children or others are around. Never carry children. Always stand clear of discharge area. Remove objects which can be thrown by the blade. DO NOT direct discharge towards people. H. Do not operate on slopes over 10º max. 2. DANGER ROTATING PARTS A. B. C. D.
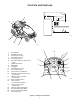
Controls and Features 14 3 13 1 6 077180 OT0020 12 9 11 21 PT0640 4 1. 2. 3. 4. 5. 6. 7. 8. 9. 10. 11. 12. 13. 14. 15. 16. 17. 18. 19. 20. 21.
Operation Hood Safety Interlock System To open the hood, push the hood latch located inside the center of grille to the left. To prevent possible damage, do not slam the hood to close it, use a firm downward push at the center of the hood to ensure that the latch engages. Tractor should not be driven unless the hood is fully closed and latched. Engine must shut off if the operator attempts to leave the seat with the transmission engaged, parking brake disengaged or PTO engaged.
Operation (Continued) Throttle/Choke • • applying load. IMPORTANT: Run engine at 1/2 of (FAST) engine speed for at least five minutes in below freezing temperatures to prevent internal damage to engine and transaxle. FAST ENGINE SLOW CHOKE SPEED Throttle/Choke lever controls engine speed (to increase, push up-to decrease, pull down) and activates choke (push lever up and to right past offset). On the 16 HP B & S twin model, the throttle and choke are separate controls.
Operation (Continued) Parking Brake CAUTION: Before leaving operators position, engage parking brake and lock. 4 3 • 2 Parking Brake is provided to prevent tractor from rolling when parked or left unattended. 1 N Speed Selector USE CLUTCH WHEN SHIFTING • To engage parking brake, shift into neutral, depress clutch/brake pedal and pull parking brake knob out, then release clutch/brake pedal. Parking brake lock is disengaged by depressing clutch/brake pedal.
Operation (Continued) Electric PTO 1 DANGER: Failure of interlock, together with improper operation of unit, could result in severe personal injury. Engine must not start unless Implement Power is disengaged (Off). 2 WARNING: Keep hands, feet, hair and clothing away from rotating parts. • To engage Implement Power, lift switch up to (On) position to start attachment rotation. To disengage, push switch down (Off) position to automatically apply blade brake and stop attachment rotation.
Operation (Continued) NOTE: This product is equipped with an internal combustion engine. DO NOT use on or near any unimproved, forest covered or brush covered land unless the exhaust system is equipped with a spark arrester meeting applicable, local, state or federal laws. A spark arrester, if used, must be maintained in effective working order by the operator. See your Ariens Dealer or engine manufacturer’s service center.
Operation (Continued) • • throttle. This maintains proper blade speed and air flow to facilitate discharging of clippings. Mowing with a lower throttle setting causes blade to tear grass, resulting in poor lawn appearance. Turn clockwise (right turn) when beginning to mow large, open areas. This discharges clippings away from borderline objects (sidewalks, driveways, fences, etc.). After making a clockwise pass, mow in a counterclockwise (left turn) direction.
Lubrication and Maintenance RECOMMENDED SAE VISCOSITY GRADES Briggs Engines Your dealer will provide any service which may be required to keep tractor operating at peak efficiency. Should engine or transaxle service be required, it can be obtained from your dealer or an authorized engine or transaxle manufacturer’s service center. 10W30 30 ** 5W30 10W30 WARNING: ACCIDENTAL ENGINE START UP can cause death or serious injury.
Lubrication and Maintenance (Continued) Changing Oil Discard Filter B and nuts (if service is necessary). Clean inside of cover and body thoroughly. Install new Filter B and new nuts. Tighten nuts finger tight and then turn one (1) more complete turn. Slide foam filter over paper filter. Install cover and wing nuts. Tighten wing nuts. IMPORTANT: Change oil after first 2 hours of operation. Thereafter change oil every 25 hours of operation (more often in dusty, dirty conditions).
Lubrication and Maintenance (Continued) Fuel Filter Spark Plugs Spark plugs should be cleaned or replaced (if necessary) and gap reset to .030” every 100 hours of operation or yearly, whichever comes first. WARNING: Gasoline is flammable and must be handled with care. DO NOT allow open flame, matches or smoking in area. Wipe up any spills. Use approved (RED) fuel container. To clean, remove spark plug from engine, scrape or wire brush, and wash with a commercial solvent. DO NOT blast clean.
Lubrication and Maintenance (Continued) Every 25 hours or each week check electrolyte level of each cell by removing batter y cover. The electrolyte level should be at level indicator. Use distilled watter to fill each cell if needed. Install battery cover after checking. 2 5 3 CAUTION: Connect positive (+) cable first, negative (-) cable last. To charge batter y remove batter y from tractor, remove vents, and charge at a rate of 4 to 6 amps for 10 hours on a fully discharged battery.
Lubrication and Maintenance (Continued) Rotary Mower Belt Replacement (Figure 12) The steer ing system, front axle and wheels, brake/clutch shaft support and pivot points should be lubricated every 50 hours of operation, or every 3 months, whichever occurs first. To replace the belt on the mower deck, first remove mower drive belt per instructions and then disconnect the idler spring from the spring mount post welded to the mower deck. Remove the sheave cover on the left hand sheave.
Lubrication and Maintenance (Continued) Mower Drive Belt (Figure 11) Loosen hardware securing belt fingers at idler and pulleys, depress clutch/brake pedal and remove belt from idler and pulleys. Install new belt in reverse order and secure belt finger hardware with 1/16” to 1/8” clearance between belt fingers and belt. WARNING: Stop engine, remove key and remove wire from spark plug before attempting to replace belts.
Lubrication and Maintenance (Continued) Loosen hardware securing belt fingers at idler and pulleys, depress clutch/brake pedal and remove belt from idler and pulleys. Install new belt in reverse order and secure belt finger hardware with 1/16” to 1/8” clearance between belt fingers and belt. CAUTION: Wear of mower blade will cause structural weakness. DO NOT install new or replacement vanes on worn blades. Tires 2 NOTE: Keep tires properly inflated at all times.
Adjustments Disc Brake (Hydro) Adjustments should be made by your dealer. Your dealer has the knowledge and tools to properly perform adjustments which may be required to keep your equipment operating at peak efficiency. Should you decide to make the following adjustments on your unit yourself. Call your dealer for answers to any questions that might arise. • The brake was factory set for a specific running clearance. • To check for proper setting, place a feeler gage between the two discs.
Adjustments (Continued) Steering Hydro Neutral Adjustment • If looseness is noticed in steering system, check hardware for tightness and wear points for excessive wear. (Replace as needed.) • If unit continues to roll even when foot pedal is not depressed adjust neutral. • • Proper front wheel toe-in is necessary to assure proper steering and to reduce tire wear.
Adjustments (Continued) Mower Level (Side to Side) WARNING: Stop engine, remove key, wait for moving par ts to stop and remove wire from spark plug before attempting the following adjustment procedures. • With blade(s) positioned side to side, measure distance of blade(s) tips to floor at right and left side of mower pan. Rotate blade(s) 180 degrees and check again. The measurement should be equal within 1/8 of an inch side to side.
Adjustments (Continued) Mower Attachment Lift Mower Belt • Depress thumb pin and move attachment lift lever to rear for maximum cutting height (4”). Depress thumb pin and move attachment left lever to forward position for lowest cutting height (1”). Intermediate positions allow selection of cutting heights between these values. • The mower belt idler system is designed to provide constant tension on the belt. To maintain proper belt tension, the idler spring must be extended as shown.
Storage Cleaning and Storage CAUTION: Use non-flammable solvent to clean parts - DO NOT use gasoline. IMPORTANT: NEVER spray unit with water or store unit outdoors to aid in prevention of rust or corrosion. Water can seep into sealed bearings, which are sealed against dirt and debris only, causing reduced component life. Clean unit thoroughly. Touch up all painted areas to avoid rust and store in a cool, dry protected place. If stored for over 30 days, disconnect the positive (+) cable from battery.
Trouble Shooting 1. Starter will not operate when the ignition key is turned to the “S” position. 4. Engine starts but runs roughly.
Specifications Model No. Description Name 936022 Sierra 1340G 936023 Sierra 1540H 936026/936024 Sierra 1540H/1548H Length Height Width Wheel Base Actual Weight 68.25” 41.25” 52.00” 46.00” 457 Lbs. 68.25” 42.00” 52.00” 46.00” 457 Lb. 68.25” 42.00” 52.00” 46.00” 512 Lb. Battery Hour Meter Seat Brakes Steering Turning Radius Tire Size Front Rear Diagnostic Lights Engine Manufacture Fuel and Capacity Idle R.P.M. Governed R.P.M. Crank Case Capacity w/ filter (Oil Filter) Air Cleaner 12 Volt 290 CCA.
Specifications (Continued) Model No. Description Name 936025/936027 Sierra 1648H/1640H Length Height Width Wheel Base Actual Weight 68.25” 42.00” 52.00” 46.00” 512 Lb. Battery Hour Meter Seat Brakes Steering Turning Radius Tire Size Front Rear Diagnostic Lights Engine Manufacture Fuel and Capacity Idle R.P.M. Governed R.P.M. Crank Case Capacity (Oil Filter) Air Cleaner 12 Volt 290 CCA. Optional High Disc.
Attachments See your authorized Ariens dealer to these addition attachments to your Tractor.
2 Year Limited Warranty Ariens Company 655 West Ryan Street P.O. Box 157 Brillion, WI 54110-0157 920-756-2141 Fax 920-756-2407 www.ariens.
Ariens Company 655 West Ryan Street P.O. Box 157 Brillion, WI 54110-0157 920-756-2141 Fax 920-756-2407 www.ariens.