
Installation Guide


3
Parts supplied
Removing the Packaging
CAUTION!
Remove carton carefully, wear gloves to protect against sharp
edges.
WARNING!
Remove the protective lm covering the product before putting
into operation.
• Hood canopy assembly with ventilator and LED lamps
• 6” (15.2 cm) round air transition
• Duct covers
• Hardware bag with:
Part Qty Part Qty
5x45 mm
6
4.2x8 mm
4
8x40 mm
6
Duct cover bracket
1
3.5x9.5 mm
2
Mounting template
1
Tools/Materials required
• Level
• Drill with 1¼” (3.2 cm),
1
⁄8” (3.2 mm), and
1
⁄16” (4,8 mm)
drill bits
• Pencil
• Wire stripper or utility knife
• Tape measure or ruler
• Pliers
• Caulking gun and weatherproof caulking compound
• Vent clamps
• Jigsaw or keyhole saw
• Flat-blade screwdriver
• Metal snips
• Phillips & Torx 20 screwdrive
r
Parts needed
• Home power supply cable
• ½” (12.7 mm) UL listed or CSA approved strain relief
• 3 UL listed wire connectors
For vented installations, you will also need:
• 1 wall or roof cap
• Metal vent system
Tools and Parts
Parts not supplied
Optional Accessories
Kit # Part Kit # Part
No Return
Valve
KIT0102873
CFM
Reduction
EXXCRKR8
Recirculating KIT0102876
Replacement
carbon lters
KIT01658
Extention KIT01609/1
Replacement
grease lters
KIT01668
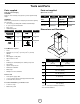
Dimensions and Clearances
E
A
B
D
C
F
G
ADK430SSA ADK436SSA
A
30”
(76.2cm)
36”
(91.4cm)
B 19
11
⁄16” (50cm)
C*
max. 36
7
⁄32” (92cm)
min. 23
5
⁄8” (60cm)
D**
max. 32
13
⁄32” (82.3cm)
min. 20” (50.8cm)
E 6” (15.24cm)
F 13
3
⁄16” (33.5cm)
G 10
7
⁄8” (27.6cm)
*For non-vented (recirculating installations)
**For vented installations