
Installation Guide


7
Mounting the Hood
Wall Installation
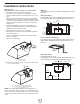
Install framing for hood support
1. Mark the screw hole locations indicated in the “Outside rear
exhaust” gure.
2. If drywall is present, cut away enough drywall to expose 2
vertical studs at the indicated holes location. Install two
horizontal supports between two wall studs at the bottom and
upper mounting holes installation location.
3. The horizontal support must be ush with the room side of the
studs. Use cleats behind both sides of the support to secure
wall studs.
4. Reinstall drywall and renish.
View from rear
Mounting
Support
Centerline of
Installation
Space
IMPORTANT: Framing must be capable of
supporting 100 lbs.
Cleats
5. Cut holes at marked locations for duct and electrical wiring.
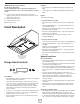
Mounting the hood
1. Drive a mounting screw (from the hardware package) partway
into each center of the narrow neck of the keyhole slots
marked on the cabinet bottom or the wall’s support frame.
NOTE: You should consider the wall’s construction material in or-
der to choose the right wall anchor and screw. For plywood walls
you should use the 10x60 mm wall anchors and the 5.4x75 mm
screws. For concrete walls you should use the 5x45 mm screws.
2. Install the 2 pieces of the selected screws on the mountings
screws location (see the image). Leave a
1
⁄4”
(6.4 mm) gap between the wall and the back of the screw
head to slide range hood into place.
1
⁄4”
(6.4 mm)
3. Fix the wiring conduit of the hood.
4. Slide the hood back against the wall. Tighten the mounting
screws. Be sure the screw heads are in the narrow
neck of the keyhole slot.
1. Remove the grease lters.
2. Remove the blower mounting screws. Put the screws in a
safe place in order to use them again.
3. Set free the two blower springs from the top of the range
hood housing.
4. Flip the blower base to the rear face of the range hood.
5. Insert the two blower springs to the top of the range hood
housing, Secure it with the four mounting screws previously
released.