2600 Operation Manual
Contents Your phone • Keys and connectors Getting started • Installing the SIM card and the battery • Charging the battery • Switching the phone on and off Call functions • Making a call • Answering or rejecting an incoming call • Call waiting • Handling more than one call Menu functions 1. Messages 2. Sound Settings 3. LCD Settings 4. Fun and Tools 5. Call Log 6. Phonebook 7. WAP 8. Phone Settings 9. Call Services 10.
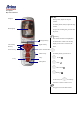
Your phone Keys and connectors Side key Earpiece • During a call, adjusts the earpiece volume. • In standby mode, the keys adjust the ring volume. Main display • To reject an incoming call, press the side key twice. Soft key • Navigation key Left soft key the bottom line of LCD. The soft key display as shortcut to access the sub Right soft key menu.
Getting Started Installing the SIM Card and the Battery You need to insert the SIM card and charge the battery before using the phone. • Keep all miniature SIM cards out of the reach of small children. • Be careful to handle, insert or remove the SIM card since the SIM card and its contacts can easily be damaged by scratched or bending. • Before installing/removing the SIM card, always make sure that the phone is switched off. 1.
3. Engage the battery with the bottom edge of the phone and then lower the other end until it clicks into place. Charging the Battery You must fully charge the battery before using your phone for the first time. 1. Connect the lead from the travel adapter to the socket on the bottom of your phone . 2. Connect the charger to an AC wall outlet. Note: You can use the phone while the charger is connected but charging is suspended during that time.
Basic Operations Switching the Phone on and off • Hold down the key for more than one second to switch the phone on. A start-up welcome message will appear briefly on the display. • Hold down the key for more than one second to switch the phone off. A power-off melody will sound to confirm the action. A “Good Bye” message will be briefly displayed on the screen. The phone will then switch off.
2. In idle mode pressing the 3. If the same number is called several times, it will appear only once and the date, time, and duration information is associated key will display the previously called numbers. with the last call to that number. 4. To redial a previously dialed number: • Select a desired number using the Up/Down • Press the key. key to initiate a call to that number. Put a Caller on Hold To place a call on hold: 1.
Input Method To change the input language selection: When key in text, long press the key. To Changing case: Press to change capital or lower-case letters. To Change input method: Press to change the input method (T9ab, T9Ab, T9AB, Abc, ABC, 0..9) Traditional English input • Press to and select the desired character. Note: Your phone provides Multi-tap function. For example, press to display the letter C. Characters Table Key Characters 1 .
Symbol Mode This mode is for typing symbols that are not available in the multi-tap mode. To enter Symbol Mode, long press the • Use the 4-Way key until symbol characters are displayed in the display. keys to find the symbol you want and then press the number key to select the symbol, then press INSERT to transfer the character to the main display.
Menu Structure 1. Message Settings for Messages Before you send or receive a message, you can set up the following: The message center number The message format or type The maximum amount of time a message will remain valid at the destination address without being read Enable delivery reporting to confirm your message arrived at its destination Enable a reply path so that the recipient can send you a reply Set SMS (Short Message Service) options Edit the list of preset messages that you can send.
2. Press number 4 on the keypad to select the Type entry or use Up/Down key to highlight Type and press the SELECT key to select it. The phone will display the four possible message types. 3. Use Up/Down key to highlight the type you want, and press the OK key to select it. Set Message-Valid Time This sets the maximum time an undeliverable message you send can remain valid. To set the maximum message-valid time: 1.
SELECT key to select it. 3. Use Up/Down key to select whether the reply path will be set to On or Off, and press OK to confirm it. Message Service Preferences To set your SMS (Short Message Service) preference: 1. Open the message Setting sub-menu as described in the “Settings for Messages”. 2. Press number 7 on the keypad to select the SMS Preferences or use Up/Down key to highlight SMS Preferences and press the SELECT key to select it. The phone will display the following sub-menu: 3.
display the number of characters still available to you as you type. Read Your Incoming Messages When you receive a message, the phone will automatically display a MESSAGE notification window. To read the message: 1. Press the VIEW button the phone will display the message Inbox. 2. Press the READ key to read the latest message delivered to your Inbox. The phone will display the message contents. 3.
3. Use Up/Down key to highlight one of the preset messages or simply leave the highlight on the (Empty) entry. Press the SELECT key to display the message (SMS) text box. If a preset message was selected, it will be transferred to the text box. Otherwise, the box will be empty. 4. If desired, add to the message. The size of the message can be up to 280 characters. In the title bar of the window, the phone will display the number of characters still available to you as you type. 5.
12. If you select to send the message, the phone will display a Working… message followed by a completion NOTE screen. Attach Objects to a Message When you send a message, you have the option of sending one of the following objects as an attachment: Symbols Picture Sound Melody Animation To attach one of the above objects: 1. From the menu selected in step 5 in the subsection “Create and Send a Message”, use the Up/Down key to highlight the object you want to insert. 2.
2. Press number 1 on the keypad to select the Reply or use Up/Down key to highlight Reply and press the SELECT key to select it. The phone will display the list of preset messages and from this point forward works in the same way as the message-create function used for sending messages. Note: You can also access the incoming message Options menu from the Inbox list; you do not have to actually have the message open to use these menu options.
SELECT key to select it. The phone will display a CONFIRM window to make sure this is really what you want to do. 4. Press the YES button to complete the operation.
2. Sound Setting Set the Voice Volume To change the volume of the speaker and earpiece when there is an active call: 1. From the idle screen, press the MENU key and then use 4-Way key to highlight the Sound Settings of main menu and press SELECT to select the Sound Settings menu. 2. Press number 1 on the keypad to select the Volume or use Up/Down key to highlight Volume and press the SELECT key to select it. The phone will display the following submenu: 3.
To make the selection: 1. key to highlight the Sound Settings of main menu From the idle screen, press the MENU key and then use 4-Way and press SELECT to select the Sound Settings menu. 2. Press number 2 on the keypad to select the Alert Type or use Up/Down key to highlight Alert Type and press the SELECT key to select it Use the Up/Down key to highlight your preferred option, and press the OK key to complete the operation. Profile To make the selection: 1.
confirm the selection. 5. You can edit the following items of the profile by pressing the number key or use Up/Down key to highlight the item. Change the Ring-Tone Melody To change the ring-tone melody: 1. From the idle screen, press the MENU key and then use 4-Way key to highlight the Sound Settings of main menu and press SELECT to select the Sound Settings menu. 2.
Select the Sound Played when Keys are Pressed You can choose between a simple tone, a human voice calling out the keypad number, or waterdrop. To select the key-tone type: 1. From the idle screen, press the MENU key and then use 4-Way key to highlight the Sound Settings of main menu and press SELECT to select the Sound Settings menu. 2. Press number 6 on the keypad to select the Key Tone submenu or use Up/Down key to highlight Key Tone and press the SELECT key to select it. 3.
3. LCD Settings Select Wallpaper Displayed in Idle State To select the image: 1. From the idle screen, press the MENU key and then use 4-Way key to highlight the LCD Settings of main menu and press SELECT to select the LCD Settings menu. 2. Press number 1 on the keypad to select the Wallpaper or use Up/Down key to highlight Dual Clock and press the SELECT key to select it. The phone will display a screen similar to the following: 3.
Note: The digital display includes indicator icons such as the signal-strength indicator and the battery-level indicator. The analog display does not. These icons are always available on the main display. Change the External Display To change the display type: 1. From the idle screen, press the MENU key and then use 4-Way key to highlight the LCD Settings of main menu and press SELECT to select the LCD Settings menu. 2.
3. Use the Up/Down key to highlight the screen saver you want, and press the OK key to complete the operation. The phone will display the animation of the currently selected screen saver. Configure the Backlight for the LCD and Keypad You can set the duration of the backlight is on for the display and keypad after the lid is opened or a key is pressed. To configure the backlight: 1.
4. Fun And Tools Calendar The phone includes a calendar, which you can use to schedule events and appointments. You can set the calendar up so that you receive a reminder before the event or appointment, and you can set up regularly recurring appointments. Set an Appointment To set an appointment or event: 1. From the idle screen, press the MENU key and then use 4-Way key to highlight the Fun And Tools of main menu and press SELECT to select the Fun And Tools menu. 2.
SELECT key to select it. Press the number on the keypad corresponding to the type of entry you want to make. For the Alarm Clock and Birthday entries you will be able to set a note and a time to receive your notification. The difference between an Alarm Clock setting and a Birthday setting is that a Birthday is always a yearly recurring event and is not deleted when you delete past events.
2. Press number 2 on the keypad to select the Edit or use Up/Down key to highlight Edit and press the SELECT key to select it. The phone will display a screen that will allow you to select what you want to edit: 3. Press the number corresponding to the facet of the event that you want to change. 4. For the Description, Date, and Time, enter the revised data and press OK to complete the operation.
5. Press the number to select or use Up/Down key to highlight the selection and press the SELECT key to select it. Calculator You can use your phone as a simple calculator: 1. From the idle screen, press the MENU key and then use 4-Way key to highlight the Fun And Tools of main menu and press SELECT to select the Fun And Tools menu. 2. key to highlight Calculator and press the Press number 3 on the keypad to select the Calculator or use Up/Down SELECT key to select it.
the SELECT key to select it. key to highlight Home and press the OPTIONS key to display the submenu. 3. Use Up/Down 4. Press number 1 on the keypad to select the Home City or use Up/Down key to highlight Home City and press the SELECT key to select it. The phone will display a world map, home city, date, and time. 5. Use the 4-Way key to select the home city. Press the SELECT key to complete the operation. The phone will return to the Home submenu. To select your local city: 1.
Adjust the Date and Time You only need to set the time for your home city; the settings for the local city will be adjusted automatically. To set the Time: 1. From the idle screen, press the MENU key and then use 4-Way key to highlight the Fun And Tools of main menu and press SELECT to select the Fun And Tools menu. 2. Press number 4 on the keypad to select the World Clock or use Up/Down key to highlight World Clock and press the SELECT key to select it.
the SELECT key to select it. 5. For time format, you can select between 12 and 24-hour mode. key s to select your preferred format. Press the OK key to complete the operation. Use the Up/Down To select the Date format: 1. Perform steps 1-3 in the above procedure to access the World Clock submenu. 2. Press number 6 on the keypad to select the Date Format or use Up/Down key to highlight Date Format and press the SELECT key to select it. For time format, you have following choices: 3.
and press SELECT to select the Fun And Tools menu. 2. Press number 6 on the keypad to select the Games or use Up/Down key to highlight Games and press the SELECT key to select it. 3. Use the Up/Down key to highlight your preferred option, and press the SELECT key to complete the selection.
5. Call Log View Missed, Received, and Dialed Call History Each of the Missed, Received, and Dialed Call lists can store information for up to 30 calls. When a list is full, a new log entry will cause the oldest item on the list to be dropped. 1. To access the call log from the idle screen, press the key or the MENU key and then use 4-Way key to highlight the Call Log of main menu and press SELECT to select the Call Log menu. 2.
Save a Number in Call Log to Phonebook This is similar to the above procedure. But, instead of selecting option 2 in step 3, select option 3 to save the call. Remove an Entry from a Call Log This is similar to the procedure for sending a message. But, instead of selecting option 2 in step 3, select option 5 to delete the call. View Airtime for Previous Calls You can view the accumulated airtime for received and dialed calls and the airtime of the last call. 3.
View Cost of Last Call or All Calls The Call Costs submenu contains information about the cost of the Last Call and All Calls made or received on your mobile phone. This information is displayed in either units or currency, and users set the displays to units or currency in the Call Cost Display menu. 1. From the idle screen, press the MENU key and then use 4-Way key to highlight the Call Log of main menu and press SELECT to select the Call Log menu. 2.
5. Select the data that you want to check by pressing the number or use Up/Down key to highlight the item and press the SELECT key to view it. Reset the GRPS Data Logs The GPRS data logs can all be cleared together in one operation. 1. Perform steps 1-2 in the above procedure to access the GPRS Data submenu. 2. Press number 3 to select the Clear Counter or use Up/Down key to highlight Clear Counter and press the SELECT key to select it. This will lead you to a confirmation window. 3.
6. Phonebook SIM Phonebook The maximum number of entries that can be stored within the SIM Phonebook depends on the SIM card memory. Phone Phonebook The Phone Phonebook can store up to 1000 numbers and 400 records, called Name cards.
Number and press the SELECT key to select it. Edit the number in the text box then press OK to make change. Add a Name or Number To add a name or number to a card in the Phonebook: 1. From the idle screen, view the Phonebook by pressing the PHONEBOOK key and pressing the number 2 to select the Add key to highlight Add and press the SELECT key to select it. or use Up/Down 2. Enter a name into the text box then press OK. Enter a number into the text box then press OK to finish the entering. 3.
5. If you want to add members now, press the ADD key again. You will be presented with an Options menu that will allow you to add or create a member of the group. 6. If you do not wish to add members at this stage, press the BACK key to finish the operation. View Group Members 1. From the idle screen, view the Phonebook by pressing the PHONEBOOK key and pressing the number 3 to select the Caller Group or use Up/Down key to highlight Caller Group and press the SELECT key to select it. 2.
1. Perform steps 1-3 in the above procedure to access the Options submenu. 2. Press number 2 on the keypad to select the Add Member or use Up/Down key to highlight Add Member and press the SELECT key to select it. The phone will display the list of phone cards that are not currently members of any group. 3. Use the Up/Down key to scroll to and highlight the card you want to add to the group. Press the Select key to complete the operation. Remove a Group Member To remove a card from a group: 1.
2. Press number 4 to select the Edit Group Name or use Up/Down key to highlight Edit Group Name and press the SELECT key to select it. The phone will display a text box where you can key in the new name. 3. Press the OK key when you have finished. The phone will display the Smart Phonebook list with the revised group name.
Caller Group or use Up/Down key to highlight Caller Group and press the SELECT key to select it. 2. Use the Up/Down 3. Press OPTIONS key to access the Options submenu. 4. Press number 6 on the keypad to select the Delete Group or use Up/Down key to scroll down and highlight the group on which you want to operate. key to highlight Delete Group and press the SELECT key to select it.. The phone will display a CONFIRM window to confirm this really what you want to do. 5.
1. From the idle screen, view the Phonebook by pressing the PHONEBOOK key and pressing the number 5 to select the Copy key to highlight Copy all from SIM and press the SELECT key to select it. all from SIM or use Up/Down The phone will display a confirmation window to tell you the operation could take several minutes. 2. Press the YES button to start the operation. Upon completion, the phone will display the status of the operation.
Delete Entire Phone Phonebook Use the procedure described in the preceding sub-section but in step 1, press the number 8 on the keypad to select the Delete All from Phone entry.
7. WAP Launch the Browser 1. From the idle screen, press the MENU key then use 4-Way key to highlight the WAP of main menu and press SELECT to select the WAP menu. 2. key to highlight Launch and press the Then press number 1 on the keypad to select the Launch or use Up/Down SELECT key to select it. Bookmark You can bookmark a favorite page so that you can quickly launch it. You can also edit and delete your bookmark. Set a Bookmark To set a bookmark from the page you want to bookmark: 1.
Type a name for the bookmark, using up to 20 English characters or 10 Chinese characters. In the title bar of the window, the phone will display the number of characters still available to you as you type. Press the OK key to display the URL screen. 6. Enter the address of the page you want to bookmark, and press the OK key to complete the operation. Go To a Bookmark To go to a bookmark from the idle screen: 1.
SELECT key to select it. This will return to the last page you visited. Cache a Page for Viewing Offline WAP pages are stored (cached) in the phone. If you cache a page, you have the following options for controlling when it is displayed: Display from cache if available or Display from cache only those pages that do not expire. To control caching behavior: 1. From the idle screen, press the MENU key then use 4-Way key to highlight the WAP of main menu and press SELECT to select the WAP menu. 2.
instructions to setup a profile. To edit a profile: 1. From the idle screen, press the MENU key then use 4-Way key to highlight the WAP of main menu and press SELECT to select the WAP menu. 2. Press number 6 on the keypad to select the Setting or use Up/Down key to highlight Setting and press the SELECT key to select it. 3. Use the Up/Down key to select the profile you want to edit, and press the OPTIONS key to display the profile Options menu. 4.
8. Phone Settings Set Call Answering Options By default, you answer a call by pressing the key. You can change this to one of the following: Answer by pressing any key Answer by opening the phone flip Auto Answer Press Any Key to Answer To select this mode: 1. From the idle screen, press the MENU key then use 4-Way key to highlight the Phone Settings of main menu and press SELECT to select the Phone Settings menu. 2. Press number1 on the keypad to select the Call or use Up/Down select it. 3.
select the Auto Redial or use Up/Down key to highlight Auto Redial and press the SELECT key to select it. Auto-Answer With the Auto Answer feature enabled, the phone will automatically answer a call after a specified time-out. This function is available only on the first incoming call when the phone is in the idle state. To configure auto-answer settings: 1.
Remove the Keypad Lock Repeat the same procedure as for setting the lock, but in step 3, highlight the Off entry in the Keypad Lock submenu instead of the Custom entry. Quick Keypad Lock To prevent accidental calls, keypad can be locked any time with a long-press of the To unlock the keypad, long-press . until the keypad unlocks and the Idle screen is displayed. Reset the Phone to its Default Settings You can reset the phone to its factory settings as follows: 1.
9. Call Services Call Forwarding Options To enable call forwarding: 1. From the idle screen, press the MENU key then use 4-Way key to highlight the Call Services of main menu and press SELECT to select the Call Services menu. 2. Press number 1 on the keypad to select the Call Forwarding or use Up/Down key to highlight Call Forwarding and press the SELECT key to select it. The phone will display the options that will active call forwarding. 3. Press the number or use Up/Down 4.
7. If you select the Voicemail entry, your calls will be diverted there if voice mailbox is defined. 8. Select the To Phonebook entry if you want to divert calls to a number defined in one of your phonebooks. 9. If you select the To Other Number entry, the phone will display a screen where you can enter the number: Cancel Call Forwarding Perform steps 1-4 in the preceding sub-section and then select number 2 on the keypad to select the Cancel entry.
4. Press number 1 on the keypad to select the Activate or use Up/Down key to highlight Active and press the SELECT key to select it. The phone will display a screen for you to enter the call-barring password. 5. Enter the password. The phone will display a dot for each character you enter. Press the OK key to complete the operation.
1. From the idle screen, press the MENU key then use 4-Way key to highlight the Call Services of main menu and press SELECT to select the Call Services menu. 2. Press number 4 on the keypad to select the Caller ID or use Up/Down key to highlight Caller ID and press the SELECT key to select it. The phone will display the submenu. 3. Select number 1 for show-caller (CLIP) information or number 3 for show-connected (COLP) information. The phone will show a window as the following: 4.
Configure the network-searching mode: Auto or manual. View and edit your network list. Select between GSM900/DCS1800 and PCS1900 network bands. To access the network menu from the idle screen: 1. From the idle screen, press the MENU key then use 4-Way key to highlight the Call Services of main menu and press SELECT to select the Call Services menu. 2. Press number 5 on the keypad to select the Network or use Up/Down key to highlight Network and press the SELECT key to select it.
2. Press number 2 on the keypad to select the Preferred or use Up/Down key to highlight Preferred and press the SELECT key to select it. The phone will display the preferred network list. 3. Use Up/Down key to highlight the selected network and press OPTIONS key to display the network Options menu. 4. Select number 1 to Insert a new entry prior to the selected network, number 2 to Move the sequence of the entry, or number 3 to Delete the entry. Band Selection 1.
10. Security Force a PIN to Use the Phone The PIN Lock feature lets you force a PIN (Pin Identification Number) entry when the phone is powered on – if you know the PIN1 password. The default value is stored in the SIM card. To toggle the state of the PIN Lock: 1. From the idle screen, press the MENU key then use 4-Way key to highlight the Security of main menu and press SELECT to select the Security menu. 2.
PIN. 3. Enter the current PIN and press the OK key. The phone will prompt you for the new PIN. 4. Enter the new PIN and enter the OK key. The phone will prompt you to verify the new PIN by entering it for a second time. 5. Enter the new PIN again and press the OK key to complete the operation. Change the Call Log and Restricted Dialing PIN PIN2 is the gateway to any changes to the call-cost log, and interactions with the Restricted Dialing list. Changing PIN2 requires you to know its current value.
3. Press number 1 on the keypad to select the FDN Only or use Up/Down key to highlight FDN Only and press the SELECT key to select it. The phone will prompt you for the PIN2 password. 4. Enter the PIN2 password and press the OK key. The phone will display the following information screen to confirm that FDN-only operation has been enabled. 5. To revert to unrestricted dialing, follow the same procedure as above. Enter a FDN Number Directly To enter a number directly: 1.
when you are entering a number into the Phone or SIM phonebook. Delete a Number This operation is similar to deleting an entry from a phonebook, except that it is protected by the PIN2 password. Follow the same procedure as in the preceding subsection, but, in step 4, press number 6 on the keypad to select the Delete or use Up/Down key to highlight Delete and press the SELECT key to select it.
General information Battery care Your phone is powered by a rechargeable battery. • The battery can be charged and discharged hundreds of times but it will eventually wear out. When the operating time (talk-time and standby time) is noticeably shorter than normal, you should buy a new battery at the time. • Unplug the charger when not in use, and don’t leave the battery connected to a charger for longer than a week, since overcharging may shorten its lifetime.
• Avoid exposing your mobile phone to extreme hot or cold temperatures. • Avoid placing your mobile phone close to lit cigarettes, naked flames or any heat source. • Do not attempt to disassemble it. Non-expert handling of the device may damage it. • Do not drop, knock or shake it. Rough handling can break internal circuit boards. • Do not paint your mobile phone as the paint could obstruct the earphone, microphone or any moveable parts and prevent normal use.
Potentially explosive atmospheres Switch off your phone when in any area with a potentially explosive atmosphere and obey all signs and instructions. It is rare, but your phone or its accessories could generate sparks. Sparks in such areas could cause an explosion or fire resulting in bodily injury or even death. Areas with a potentially explosive atmosphere are often, but not always, clearly marked.
Warning Statement: FEDERAL COMMUNICATIONS COMMISSION This device complies with Part 15 of the FCC Rules. Operation is subject to the following two conditions:(1) this device may not cause harmful interference, and (2) this device must accept any interference received, including interference that may cause undesired operation. NOTE This equipment has been tested and found to comply with the limits for a Class B digital device, pursuant to Part 15 of the FCC Rules.
FCC RF Exposure Information Body-worn Operation This device was tested for typical body-worn operations. To comply with FCC RF exposure requirements, a minimum separation distance of 1.5 cm must be maintained between the user’s body and the handset, including the antenna. Third-party belt-clips, holsters, and similar accessories used by this device should not contain any metallic components.